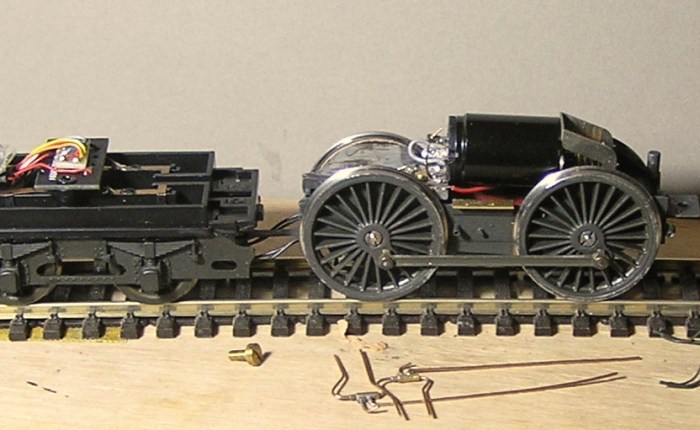
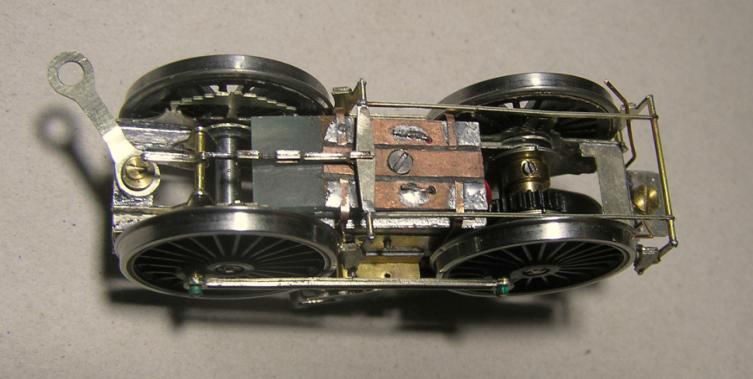
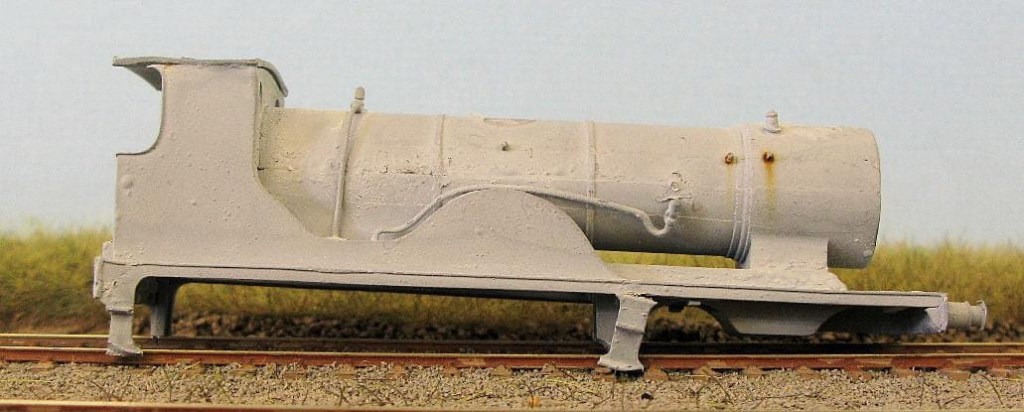
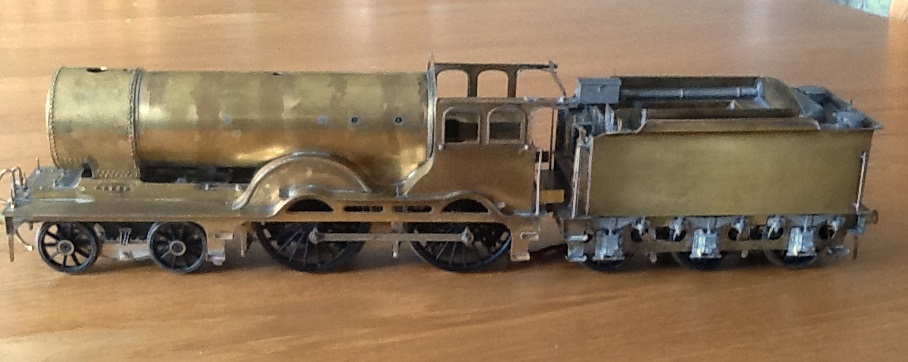
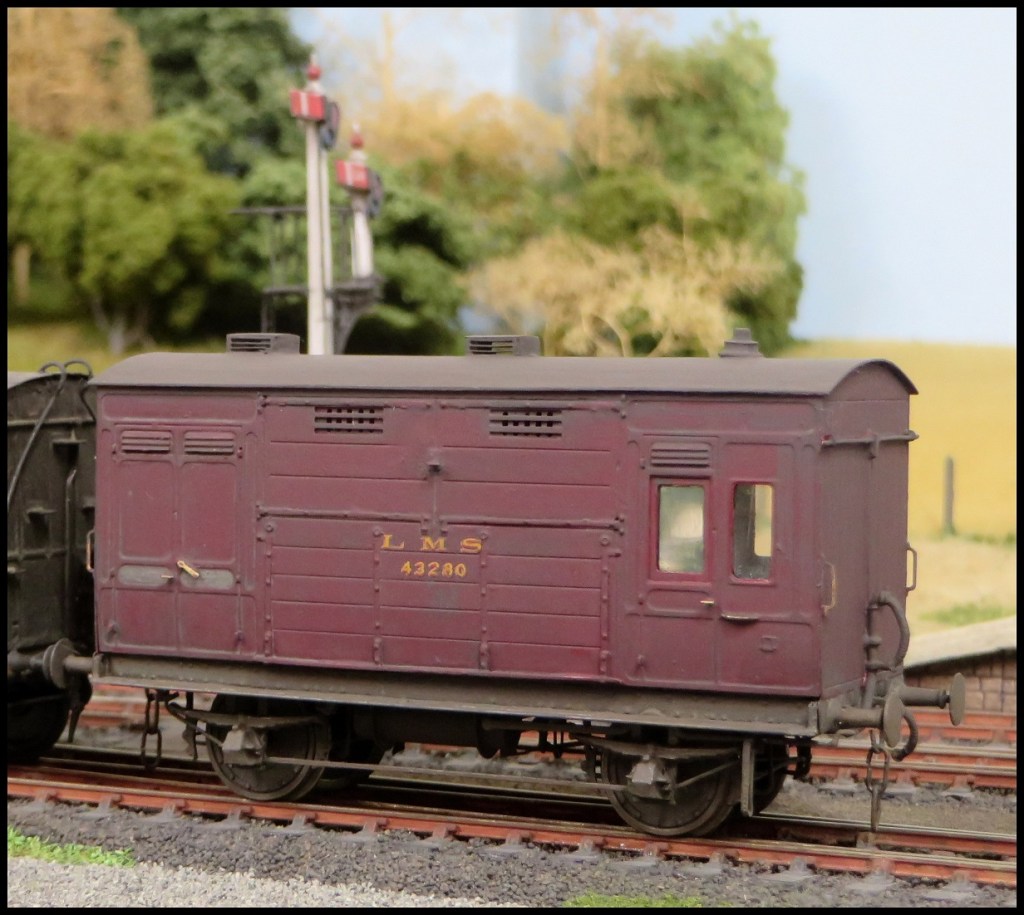
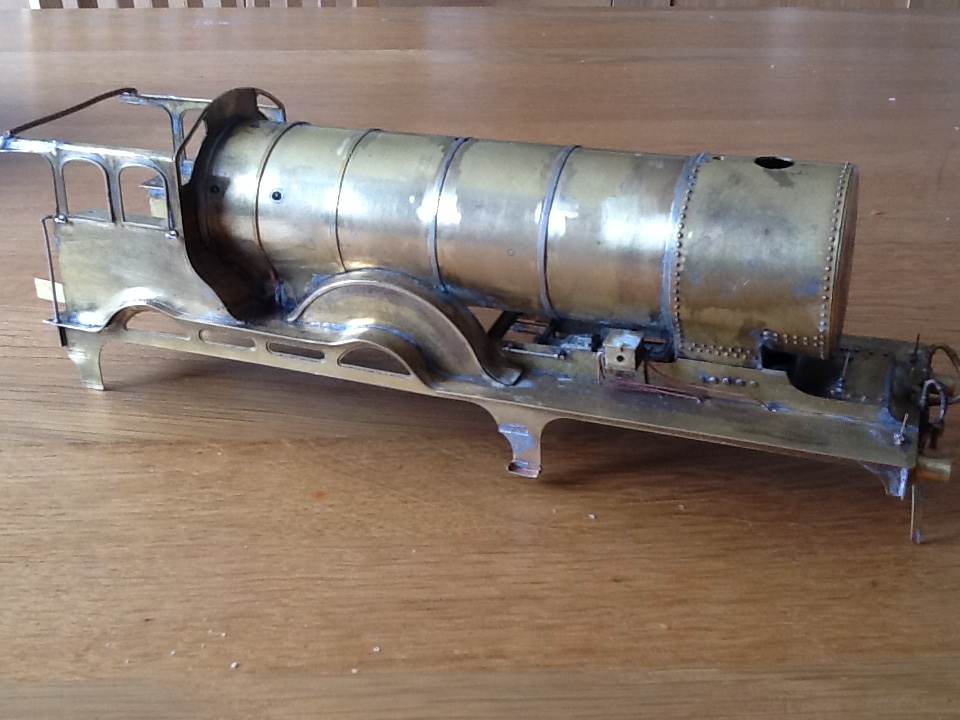
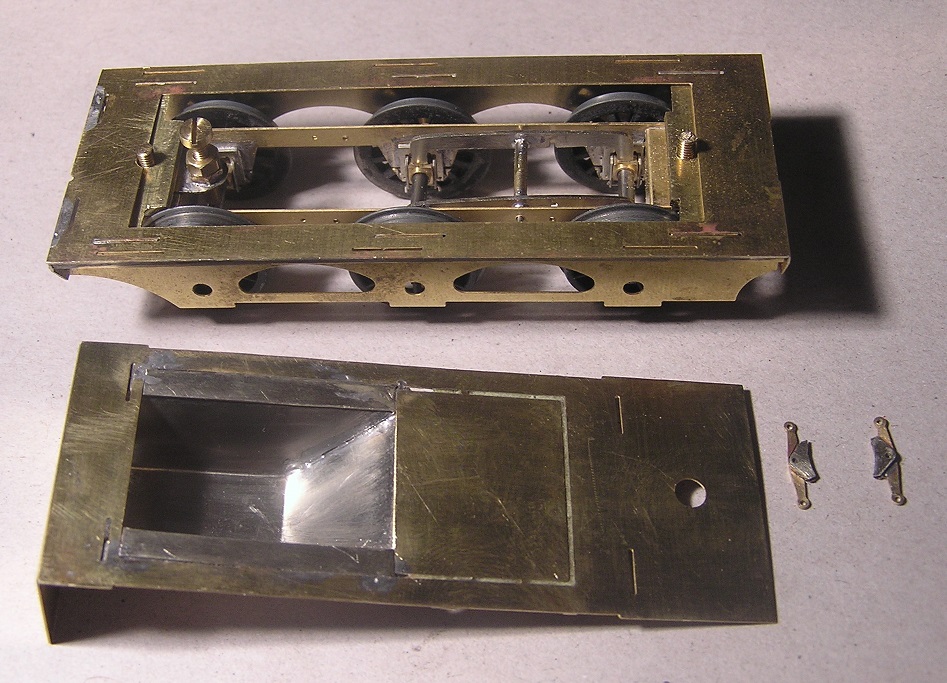
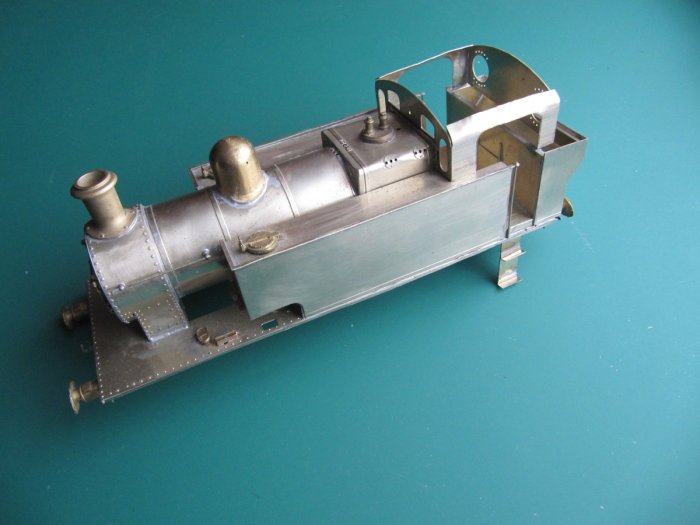
Despite seasonal distractions, members made progress on several fronts. Our featured image is the painted and assembled chassis for the battered Wills T9 that Steve S is building to 00 Gauge for a friend. The Zimo chip is in the Hornby tender and the Hornby loco harness has been wired into the loco PCB. This means that current is collected from the driving and tender wheels.
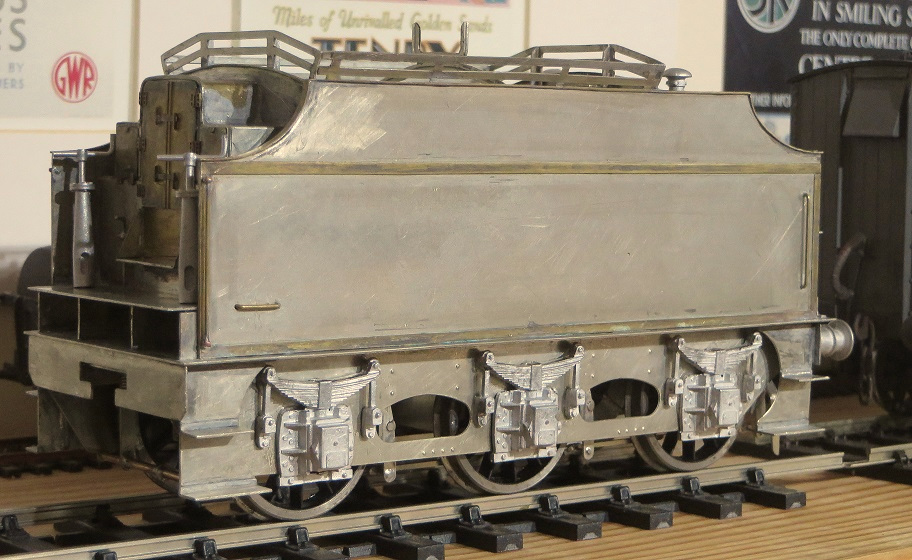
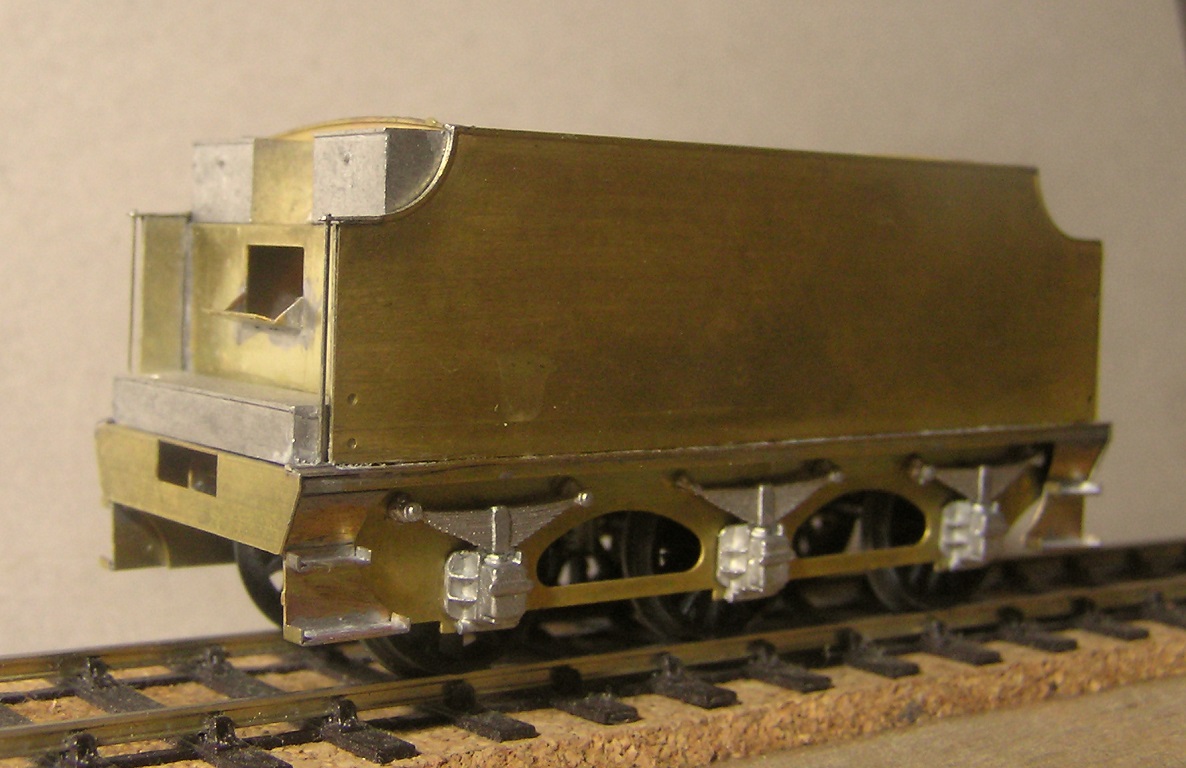
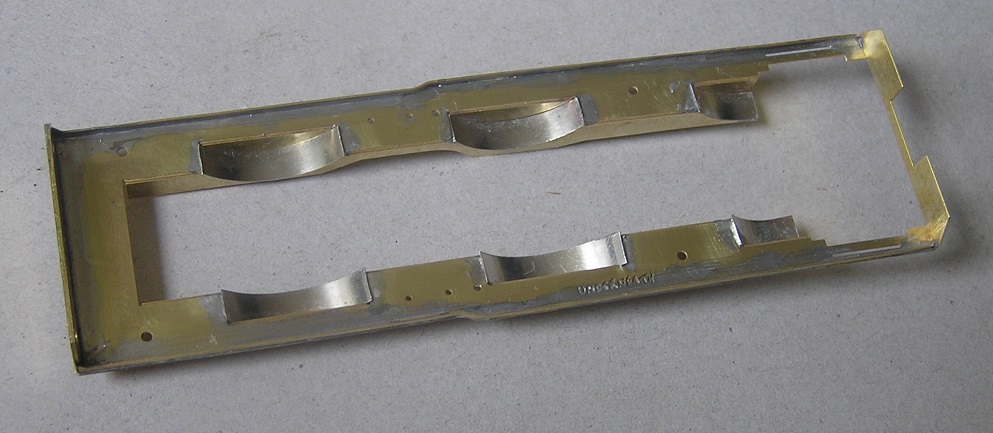
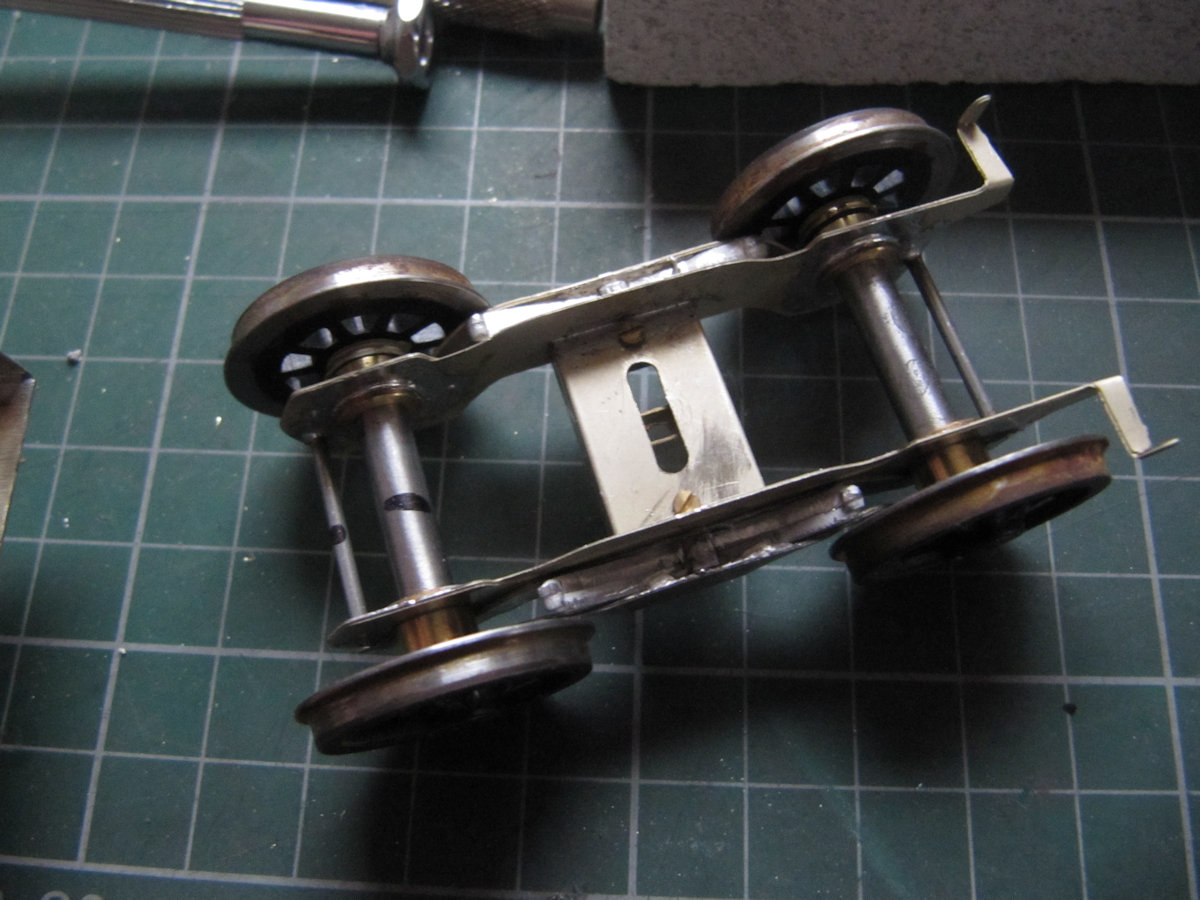
Shown above are the various painted assemblies built as per the SE Finecast instructions with the addition of a Perseverance bogie to replace the SEF bogie that had been used elsewhere. The SEF etched chassis is implemented as a ‘power pod’ that despite being twin beam compensated runs perfectly well standalone, plus a vestigial section of frame above the bogie. The brake arrangements in the kit are closer to those of the saturated T9, but not actually correct for either version. The steam pipe was not needed by this engine as only two of the wide cab T9s seems to have had them running down the outside of the running plate. Happily, it will come in very handy for a Hornby narrow cab T9, which came with the smaller diameter brake pipe with the tighter bends down both sides – perhaps they all do! News of that EM conversion should feature next month.
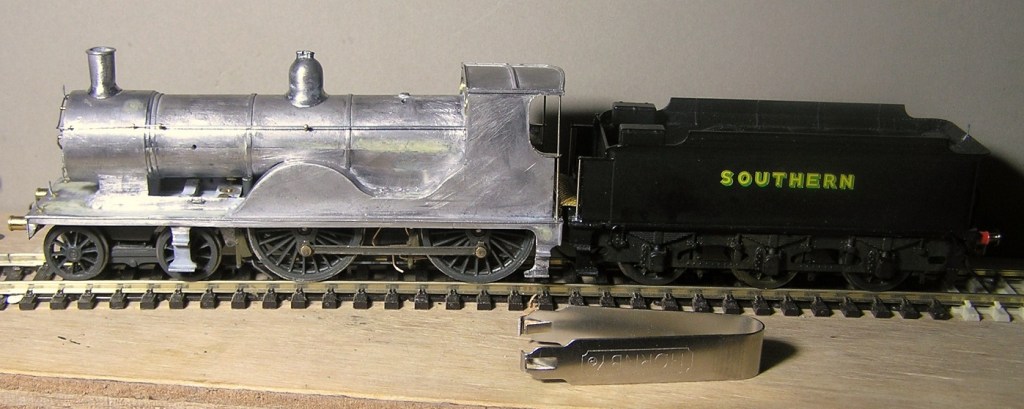
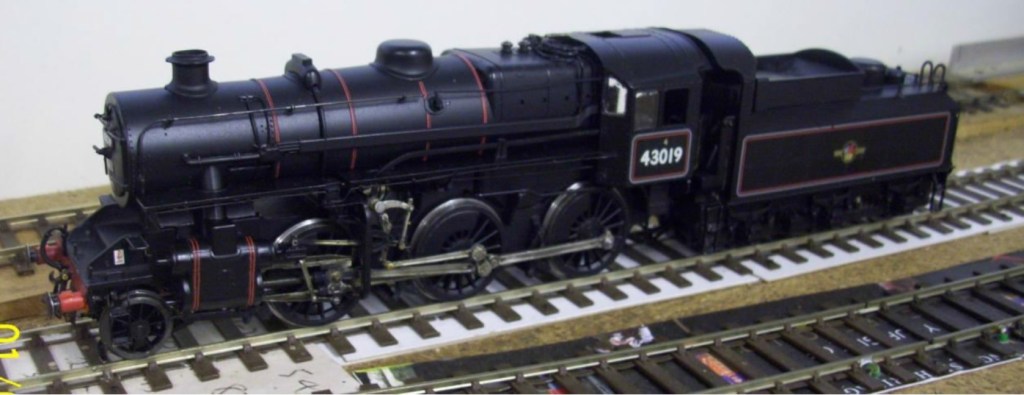
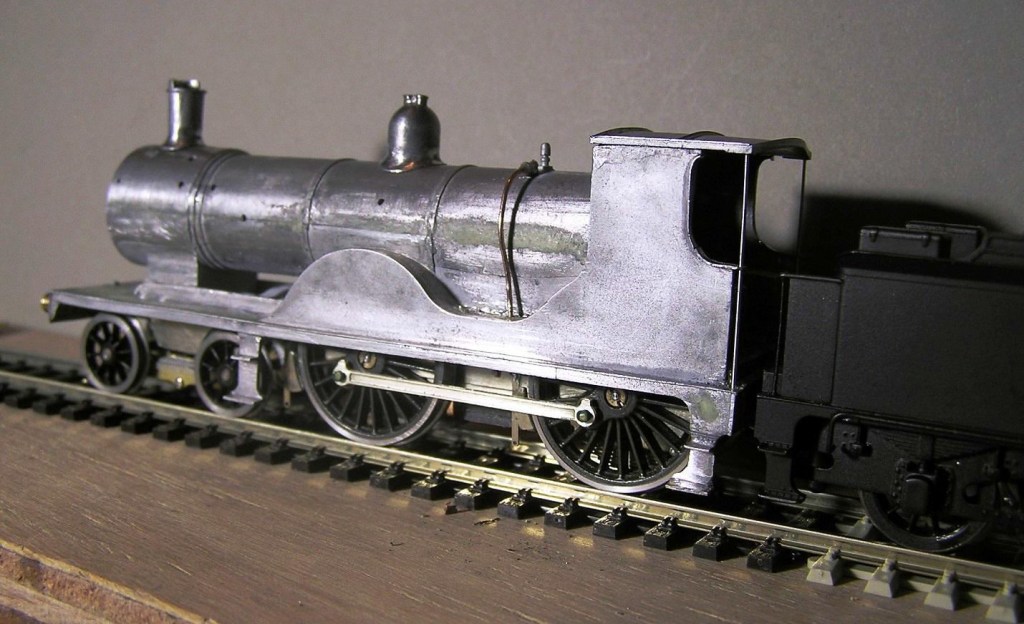
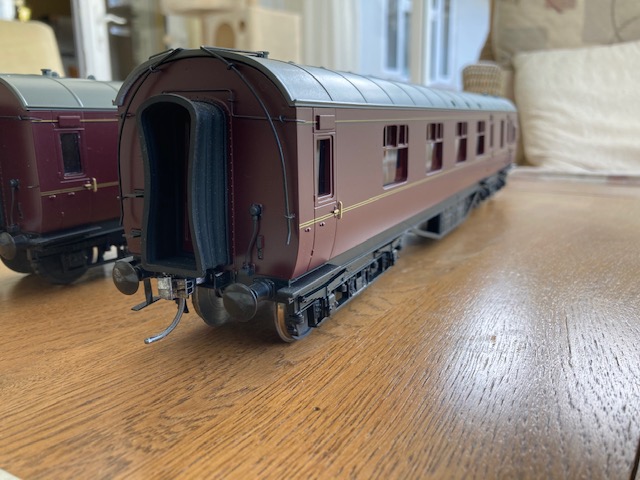
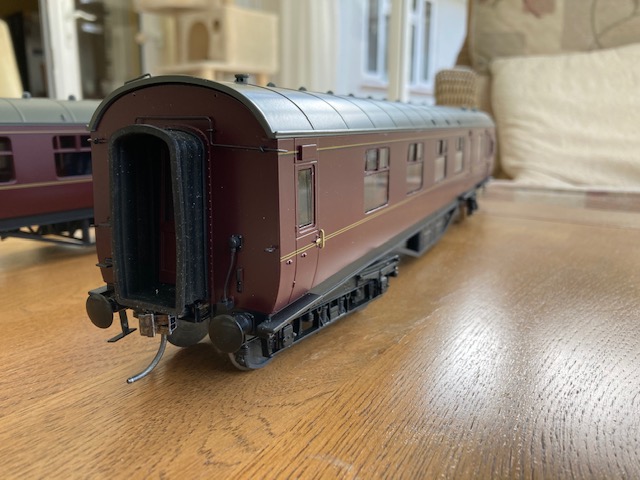
This is the very smooth running T9 (on DC) waiting for a test run on its new home layout – and there lies a tale in a future blog! The cab cutouts had to be modified to get the handrails/stanchions to line up with the Hornby tender. The front footsteps had originally been fitted too far back, and initially I just put them back where I found them, having noted the very poor location there. Once correctly centred on the rear bogie wheel the fit was much improved!
Dominic has very sensibly (and successfully) been trialling static grass on the other side of his “photo plank” in preparation for some scenic work on Coombe Town.
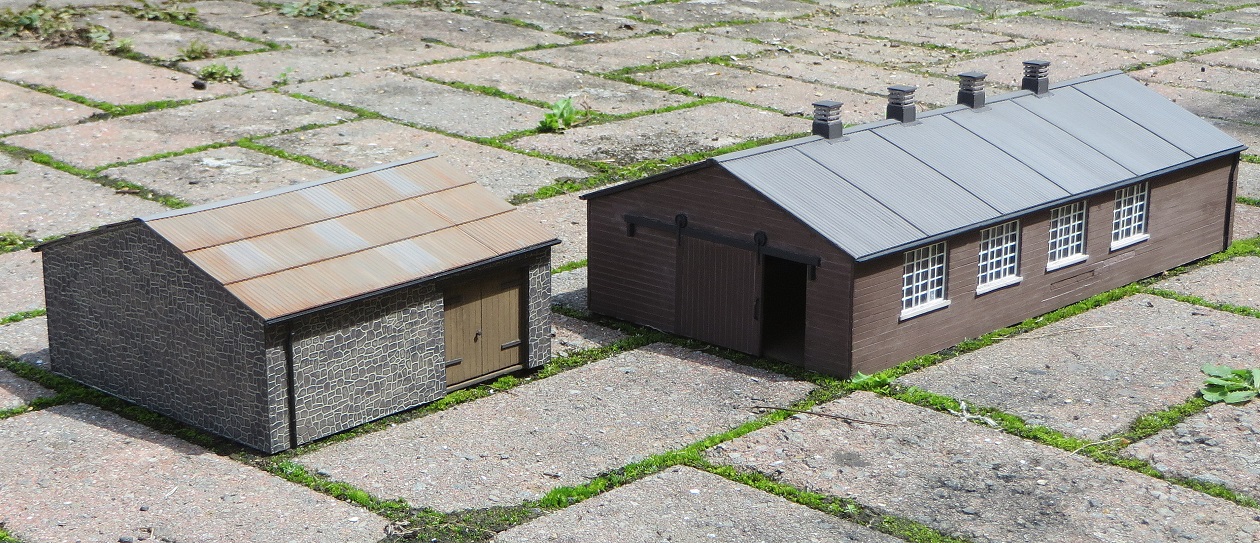
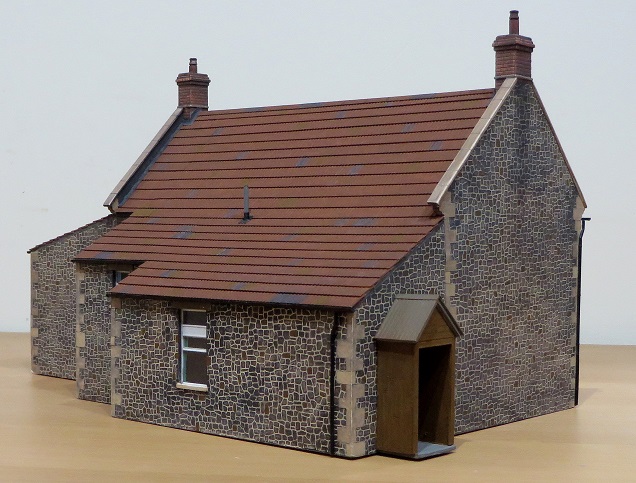
Dom’s other picture shows progress on the Goods Shed with the guttering and roof on the office. It is a mirror image of the goods shed at Washford and is getting more convincing with each appearance.
Allan H’s 7mm scale Fowler 4F (complete with tablet catcher) is now ready for the paint shop.
Allan is justly famed for Kingsferry, but it is still quite extraordinary that such a superb model should result from his very first loco build in any scale, and he only started it in the Autumn!
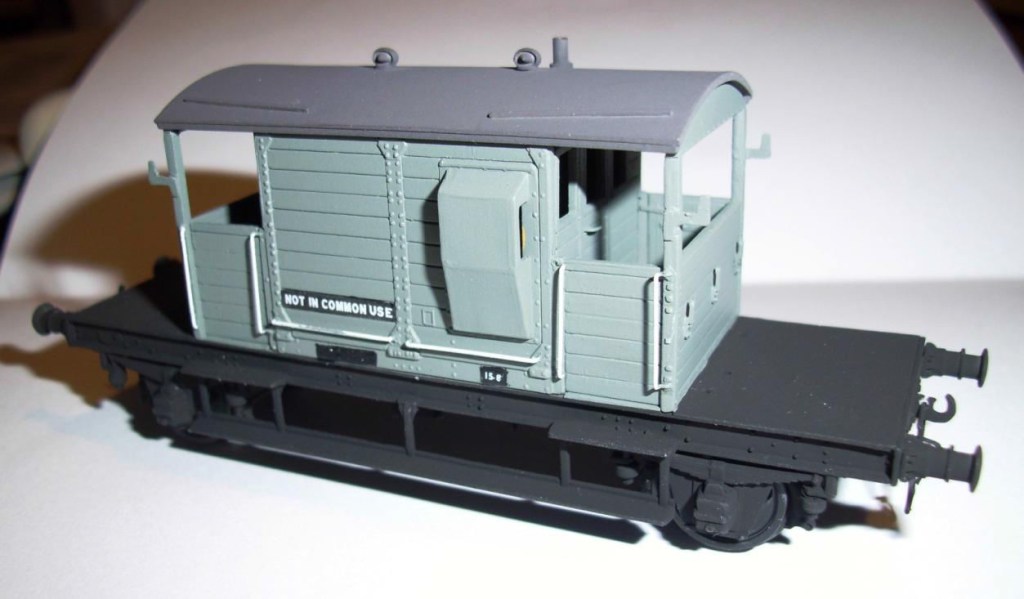
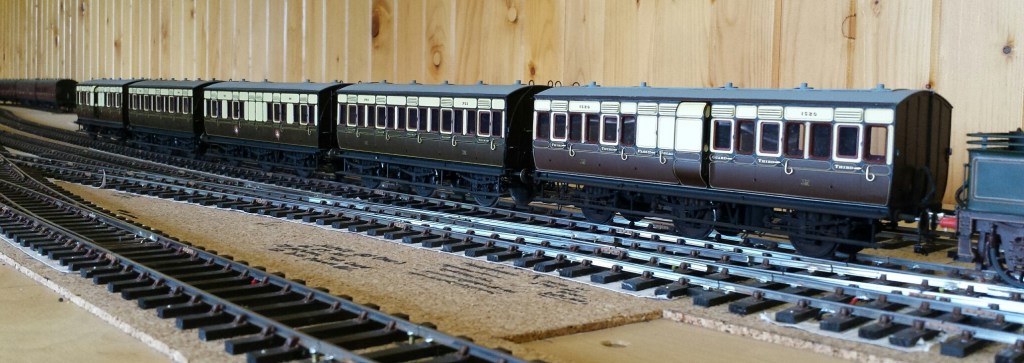
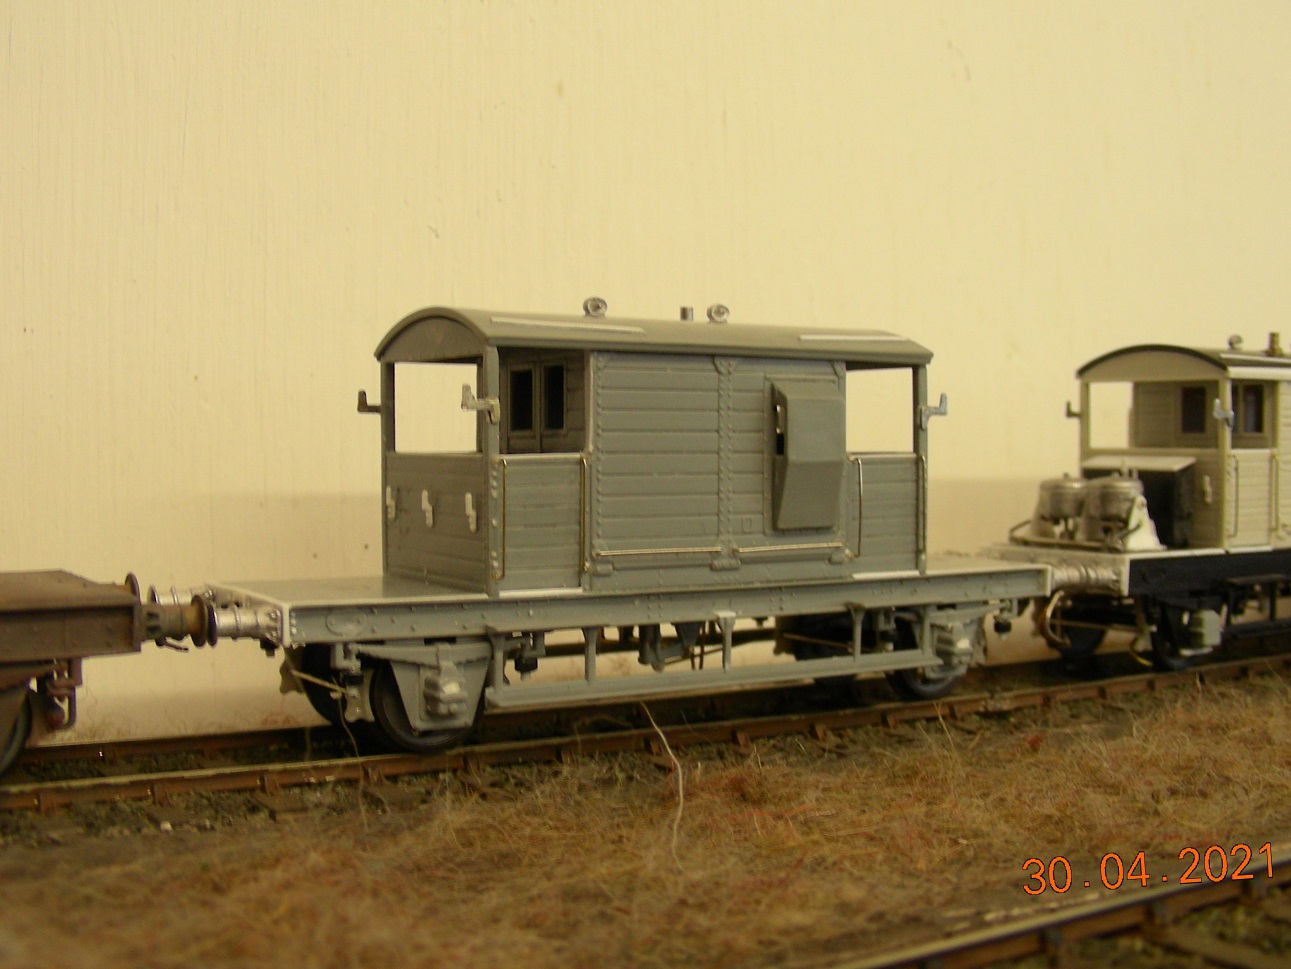
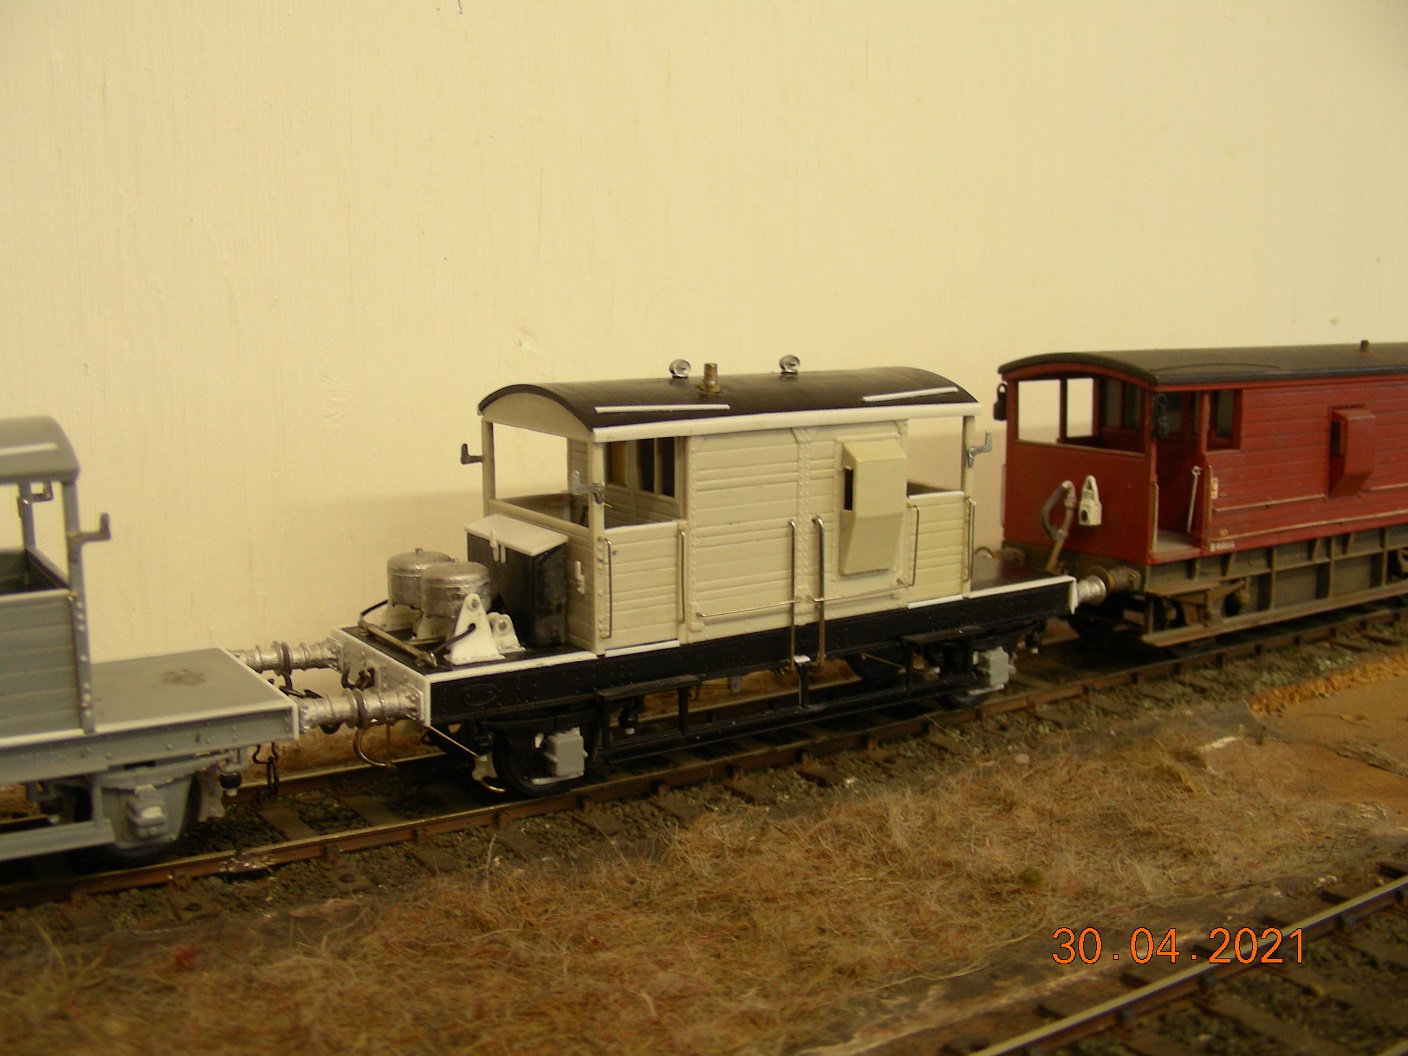
In EM Gauge Pete C has been busy; the two SR Brakes are almost finished, having been sprayed with Halford’s Matt lacquer to blend the transfers, “much nicer to use than Dullcoat – even the Americans have apparently banned its manufacture!” If Pete made a left hand ducket SR Brake van – then he reckons he’d have a complete set of SR brake vans. A Parkside Medfit and David Geen GW Conflat A have now been finished and are shown in a brake van sandwich.
The Trestol is now painted,
Pete’s Ivatt 2-6-0 has had some final adjustments, including polishing the treads of the tender wheels to improve pickup performance as the Gibson finish wasn’t that great. It now runs very smoothly at a nice slow speed.”
Next up a couple of completed 7mm Slaters cattle wagons from Dave H which his kids bought him for Christmas in 2020 (he thinks) – just to prove he does weather things sometimes! They are modelled c. 1900, with the lime wash they used to use in those days to disinfect the insides. Wagons were no cleaner in 1900 than they were in 1950 as far as he can tell.
While he was in the mood, Dave H weathered the two Stephenson Clarke coal wagons he built some time back from HMRS resin body mouldings. You can see how good the detail on the mouldings is – he’s not altered them in any way, just added running gear and brakes mostly from spares.
CS2 layouts have their very own ‘Cripple Sidings’ where wagons and locos go when in disgrace. John M has been attending to some 7mm scale examples. Generally they need replacement axle boxes, couplings or brake gear that have come adrift. This month we end with two such wagons, repaired and ready to go back into service.
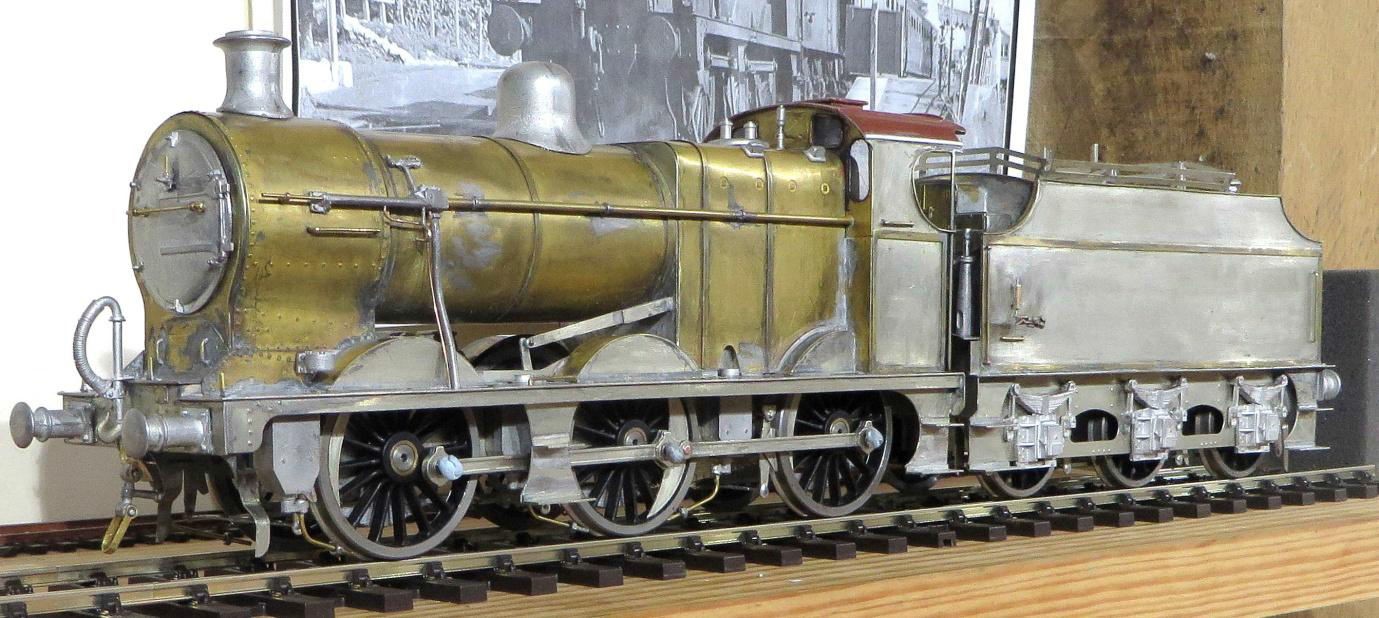
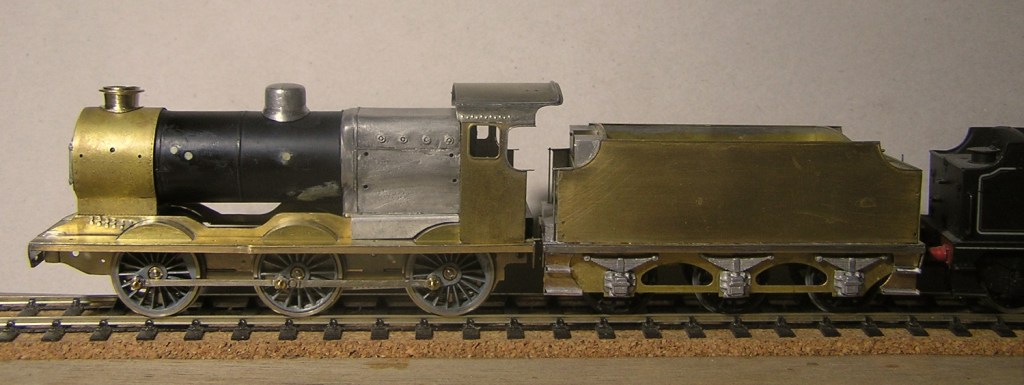
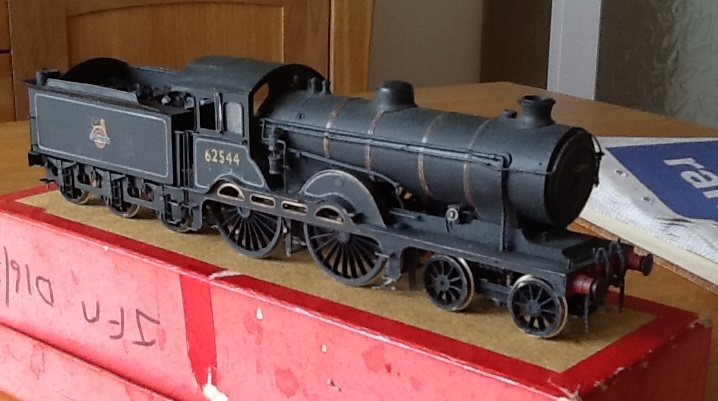
This month our featured image is the late Bob O’s Wills T9 on a Perseverance chassis (so correct 10′ wheelbase) with Escap motor and gearbox driving the rear axle. Weathered, with Sharman wheels and compensated on the Sharman principle some 30 years ago – somewhat ahead of its time. Destined to go to a new home within the club for a lot of TLC. It’s very likely to feature on the ‘Western Thunder’ forum at some point!
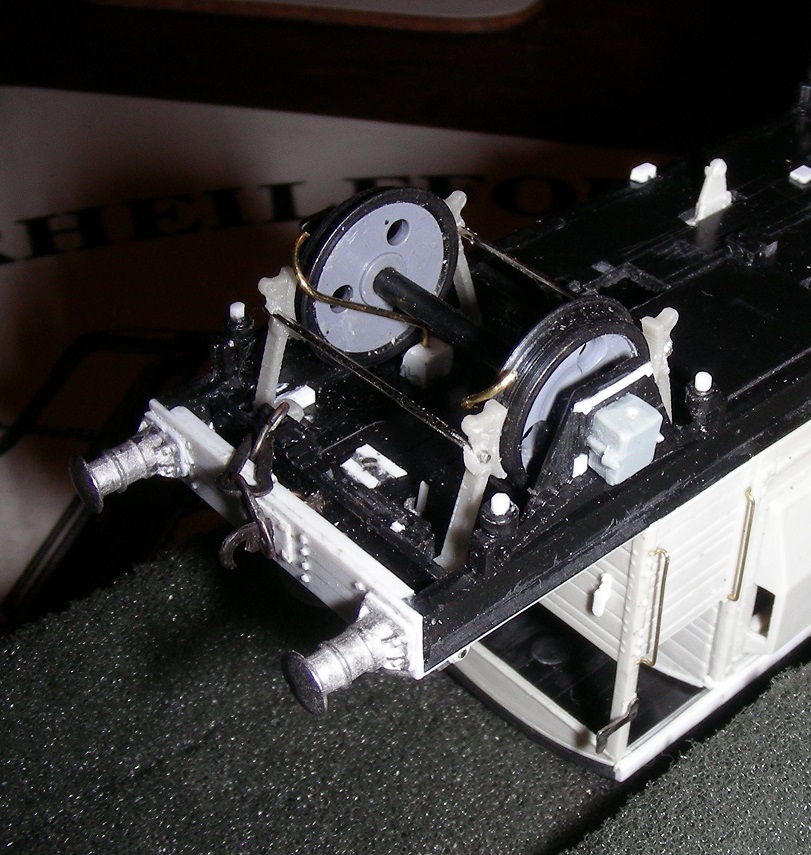
Jim’s 2mm Freightliner wagons are making steady progress. The 40 bogies are now finished and painted but the lattice work of the wagon etches need completing and a means of fixing said bogies to said wagons needs firming up – 12BA nuts into bolts or 12BA bolts into nuts!
Top left are the 10 Worsley Works “simple” etches. They need bogie mounting points adding, plus some form of brake cylinders etc. Top right are the more complex Stephen Harris etches which have still to be finished. For example, bottom left are two folded etches that create kerb rails that need soldering onto the sides. When they are done, there are a further 18 like them! On the track are two Worsley Works etches that Jim acquired from a fellow modeller some years ago. For some reason, he chose to ignore the marks and put the bogie pivots much nearer the buffer beams – and used the wrong bogies! The former can be changed – the latter can’t as Jim has no spare correct bogies.
Gate-crashing the photo is the brilliant new Hunslet shunter from the N Gauge Society. It comes provided with a DCC chip, and just (!) needs the wheels turning down or changing for 2mm finescale ones.
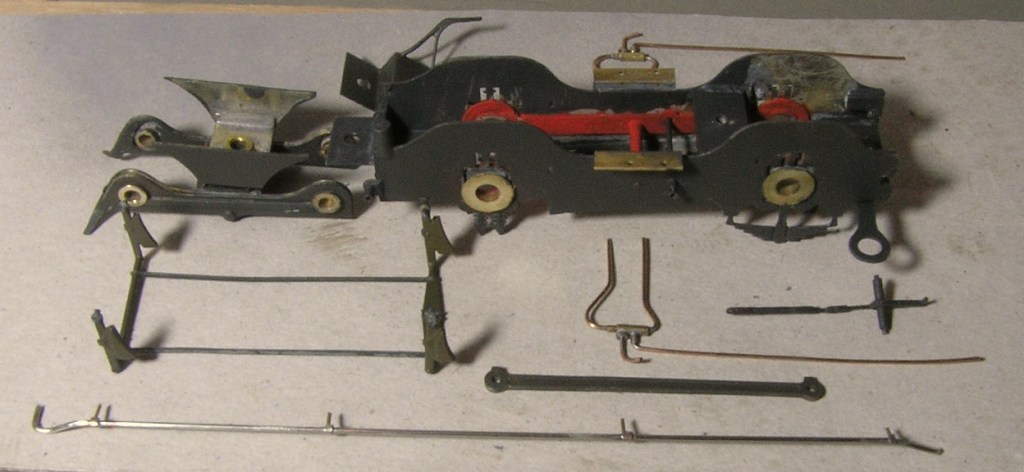
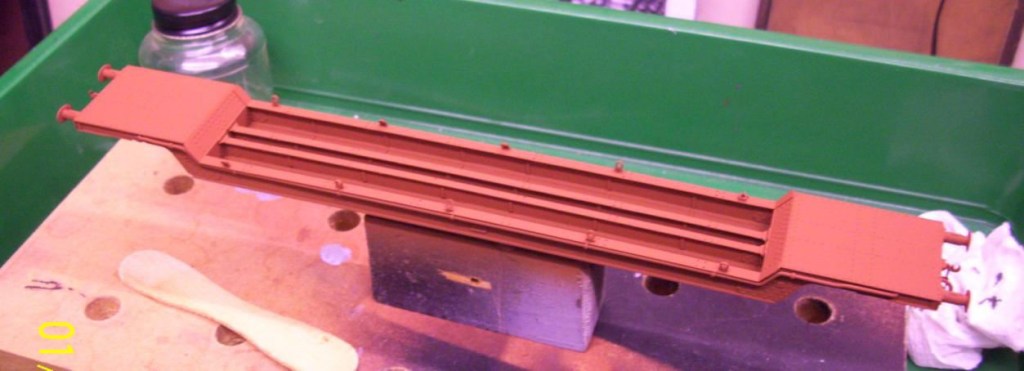
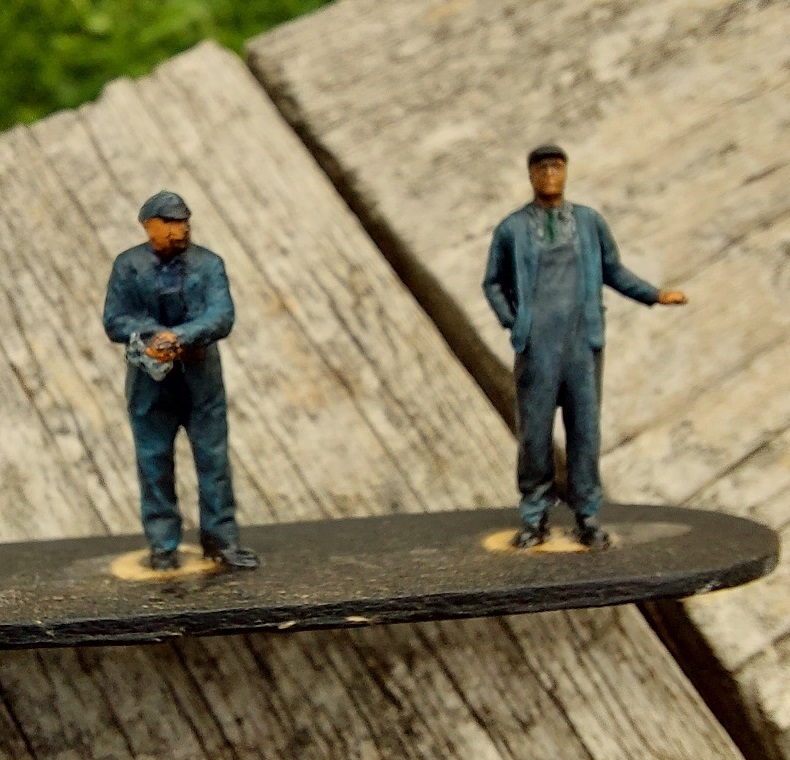
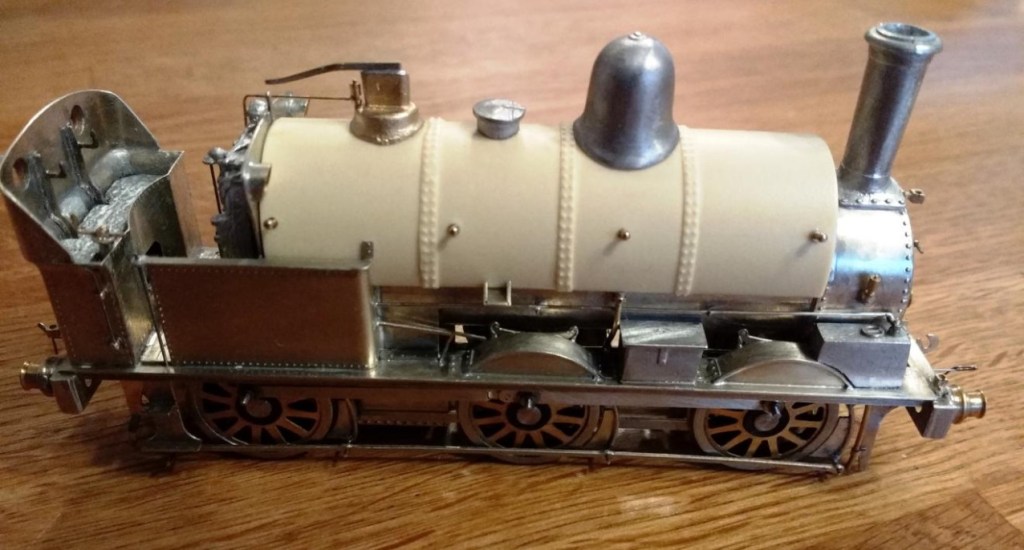
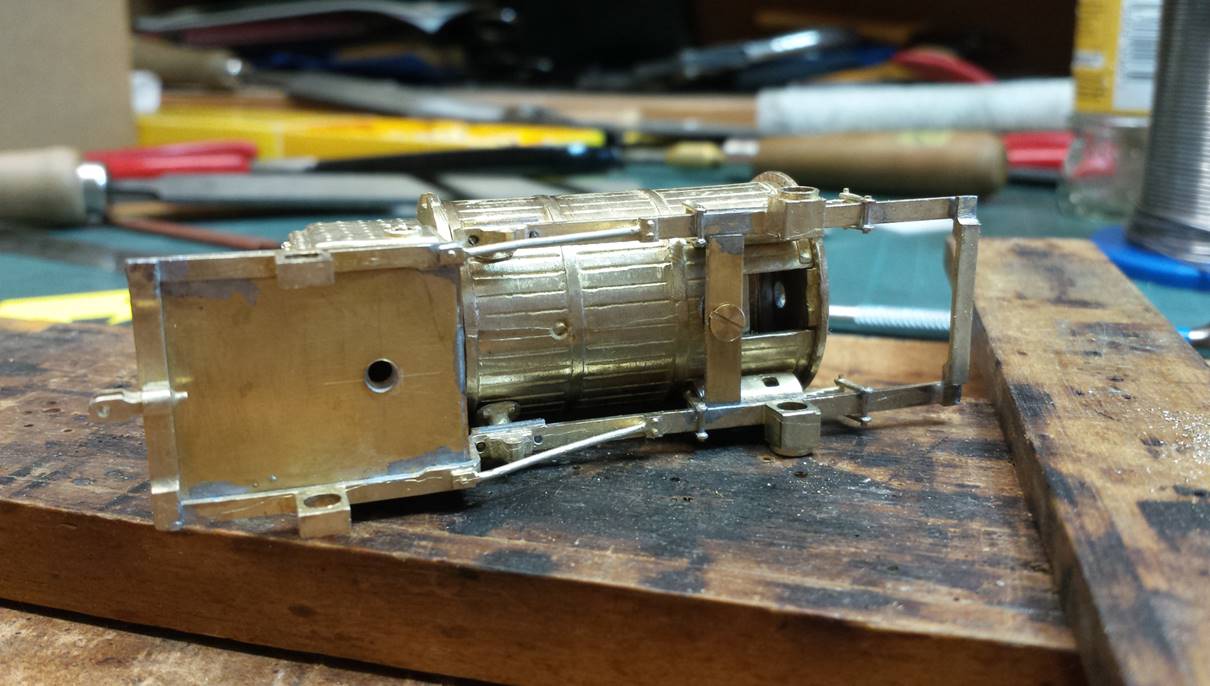
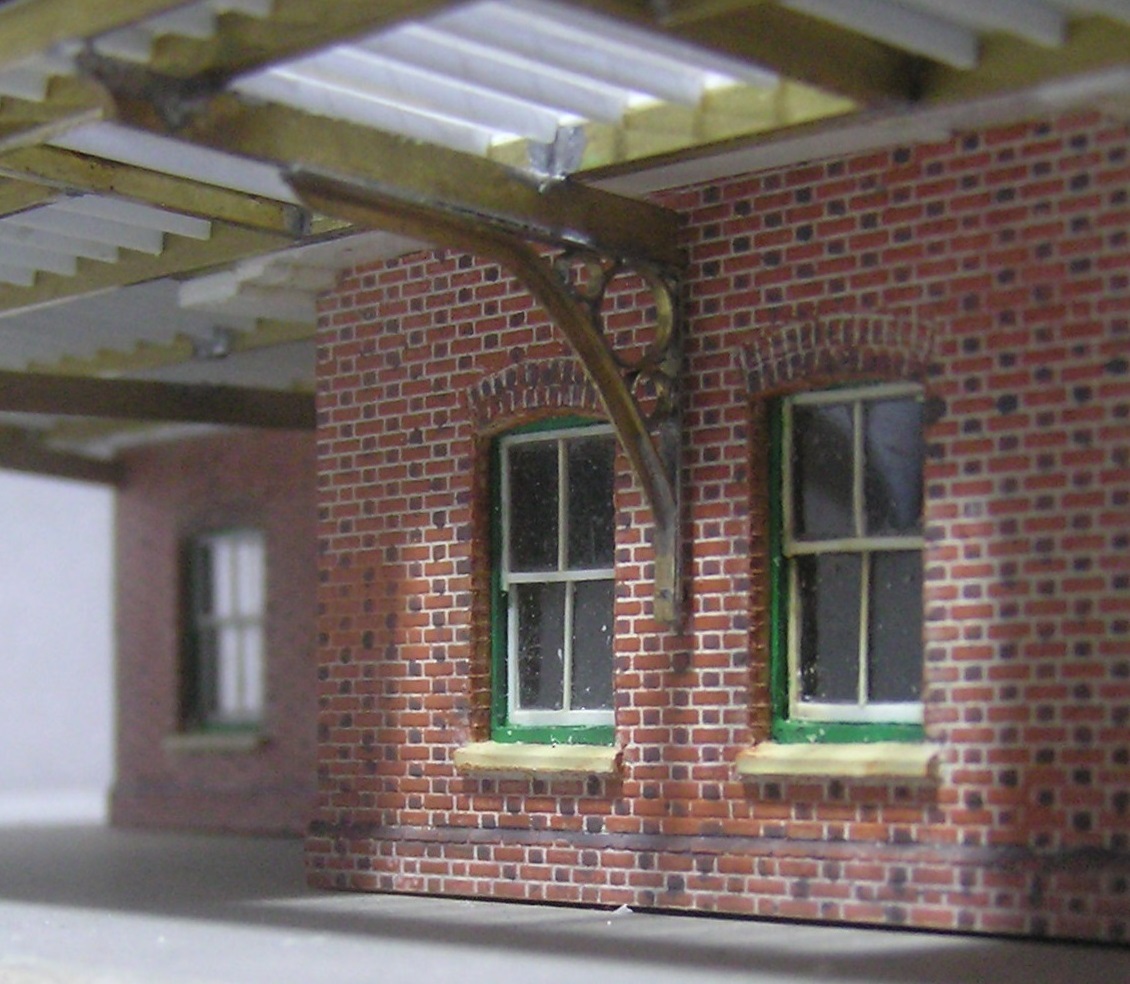
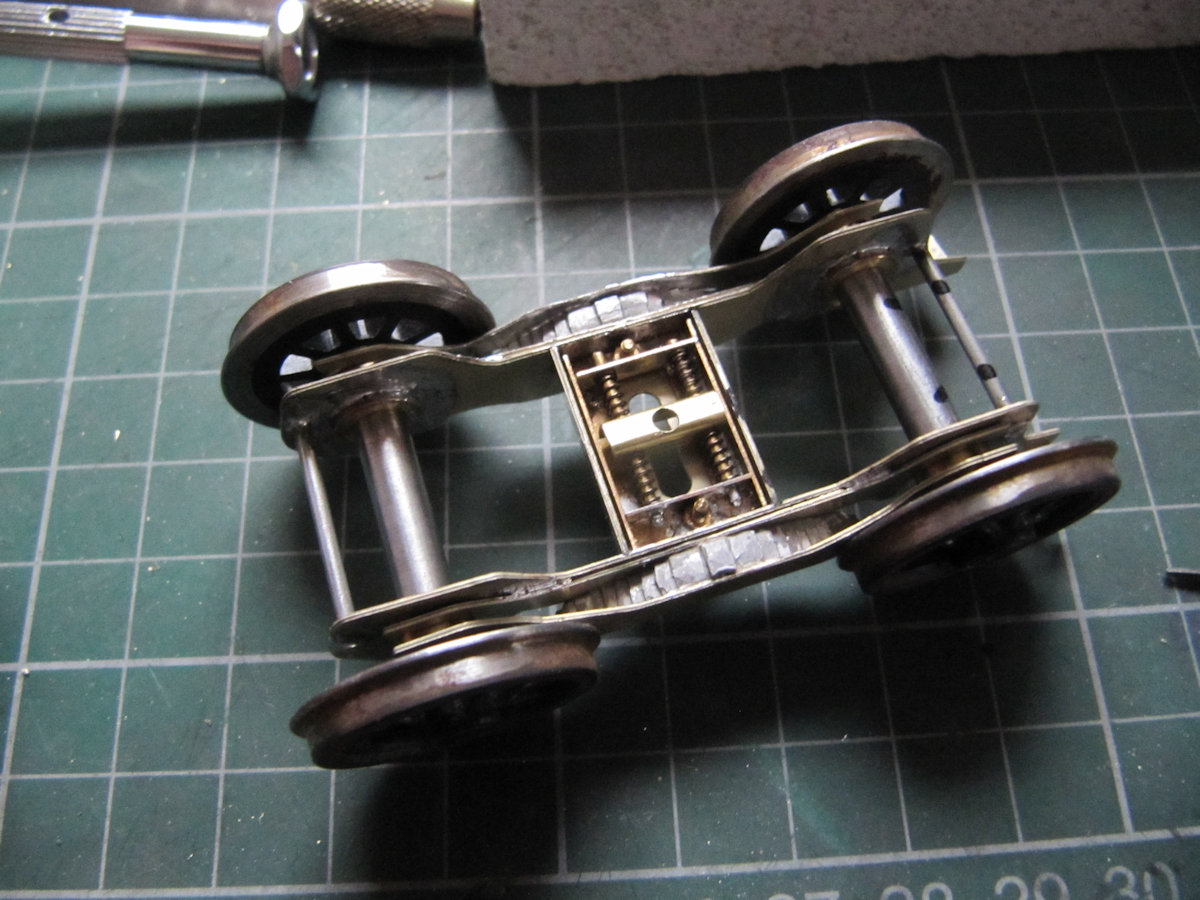
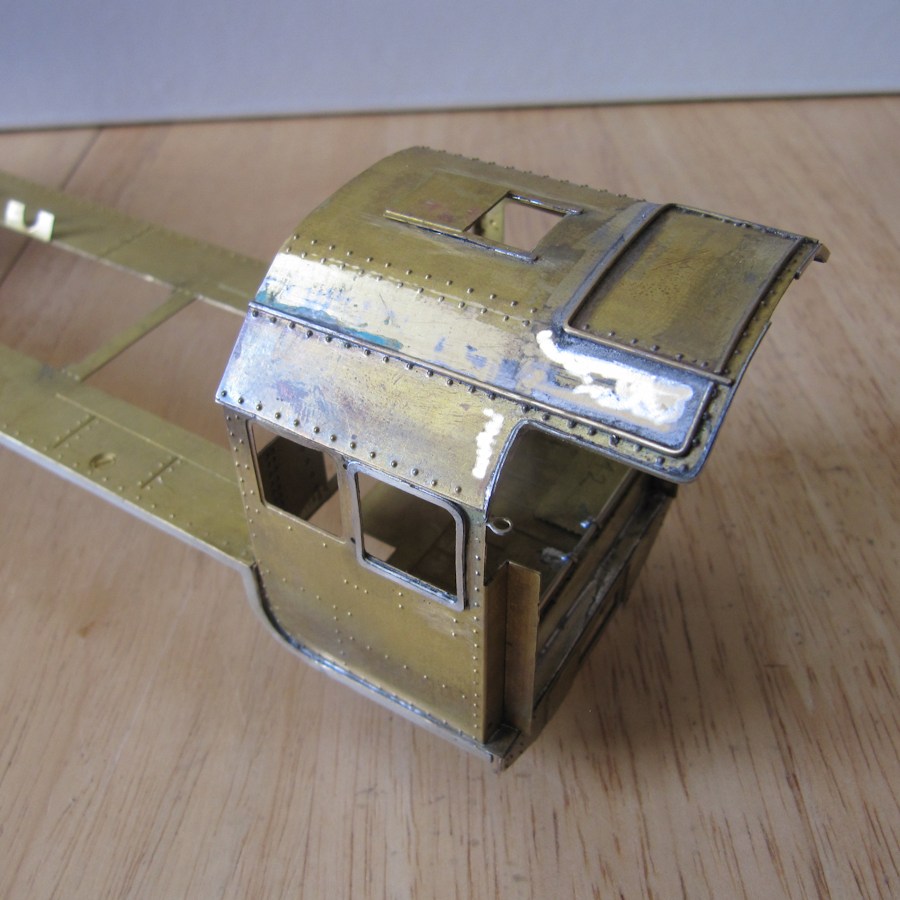
Steve’s 00 Gauge Wills T9 ‘for a friend’ continues to progress. The upended ‘power pod’ is shown above with brake gear and sand pipes fitted. The SEF 00 chassis spacing is exceptionally wide for 00 Gauge and there is very little room round the wheels. Good for footplates, but bad for running clearances! The drive is an HLK RoadRunner paired with a HLK (High Level Kits) 1219 coreless motor. Whilst this is a superb combination on straight DC, it did very odd things when tested with a donated black Gaugemaster controller – it seems that black Gaugemaster’s come with feedback control!
The super-detailed face of the loco is above, with scratchbuilt bufferbeam courtesy of the superb GW Models riveting tool, and a delicate home made ‘Daddyman Dart’. The smokebox door clamps and dart are correctly positioned for 30314. Good proportions really help the Wills T9 which responds well to such treatment. More details can be found on the Western Thunder build thread linked in the last post.
John M continues with his Great Eastern D16/3. He says: “The vacuum brake exhaust pipe has been fitted. The vertical copper pipe is to drain any condensation in the pipe. When releasing the brakes after a station stop, without a drain, the condensate would go up the sooty chimney and shower black water in the surrounding area. The handrail knobs on the left side of the loco have also been fitted. These complete that side of the loco except items that also concern the cab such as windows.”
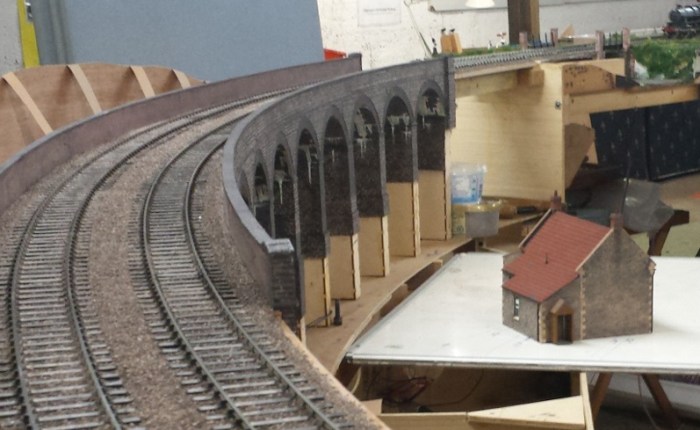
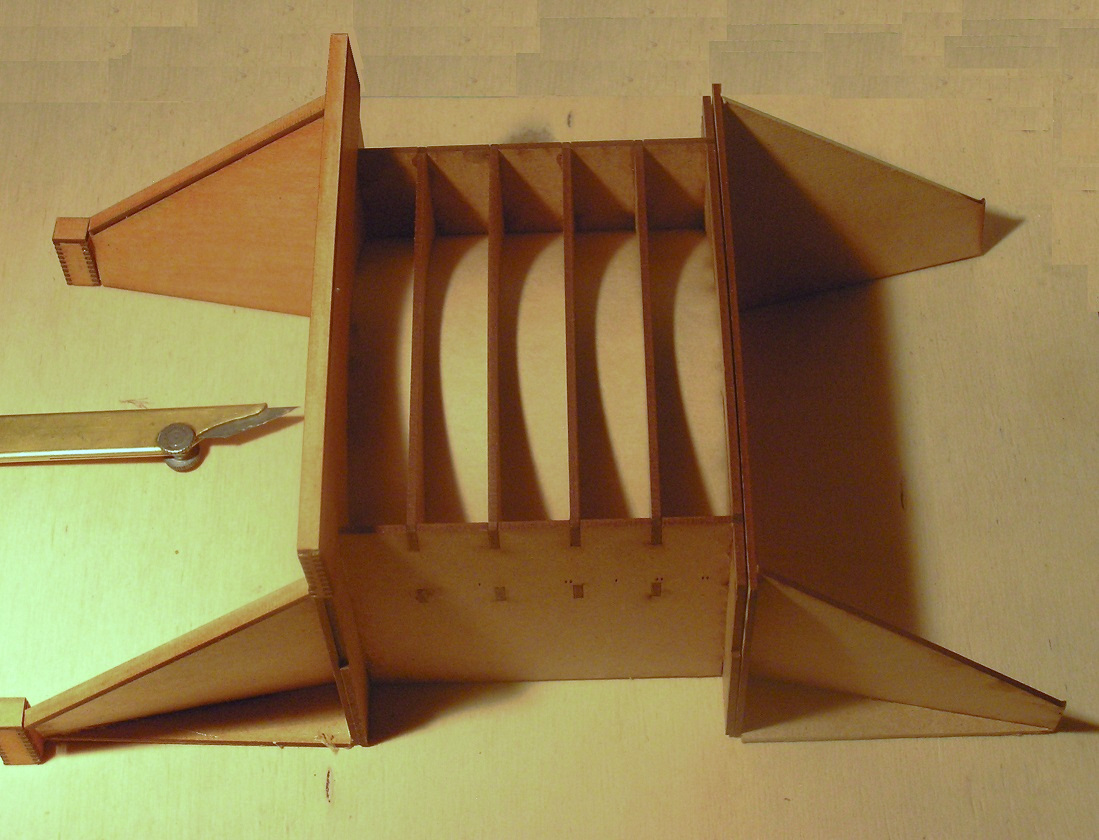
Dom has started construction of the signal box locking room for Coombe Town. It is based on the original at Crowcombe on the West Somerset Railway, the one that featured in “A Hard Day’s Night”.
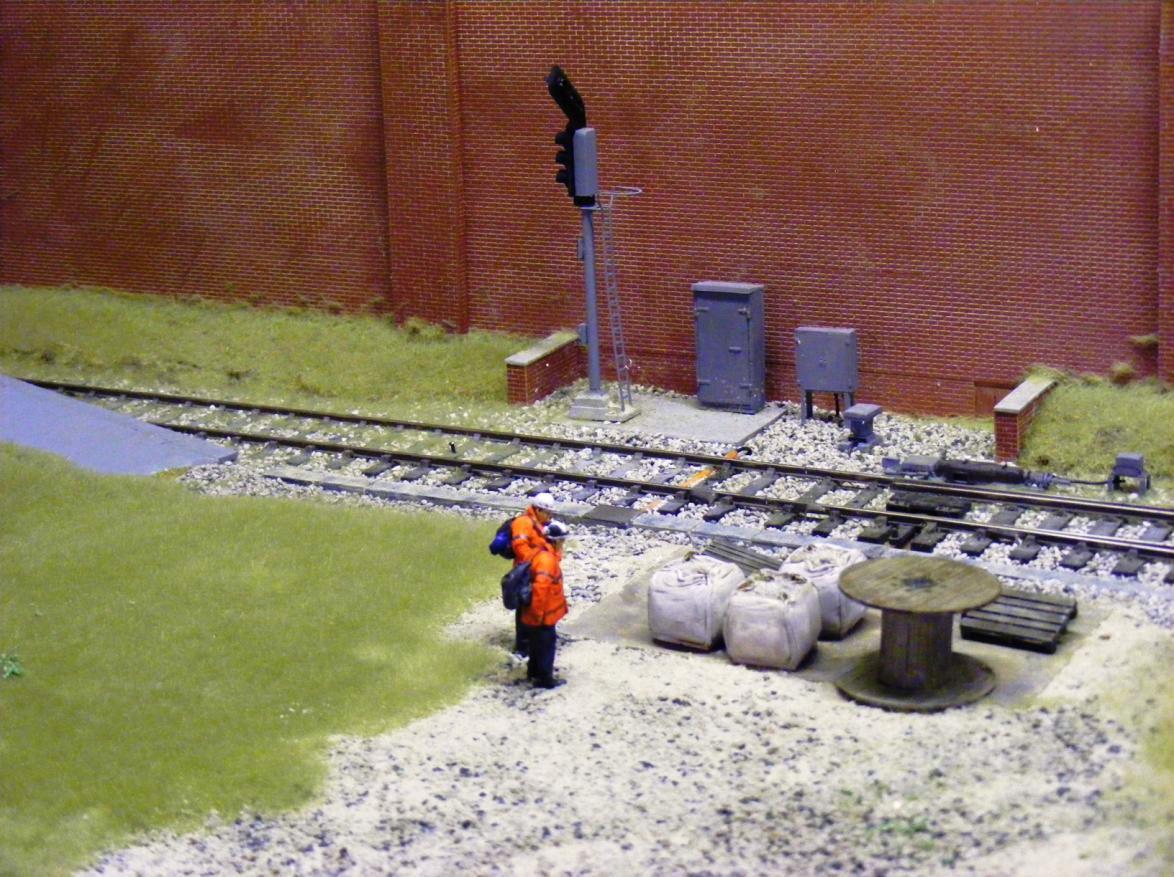
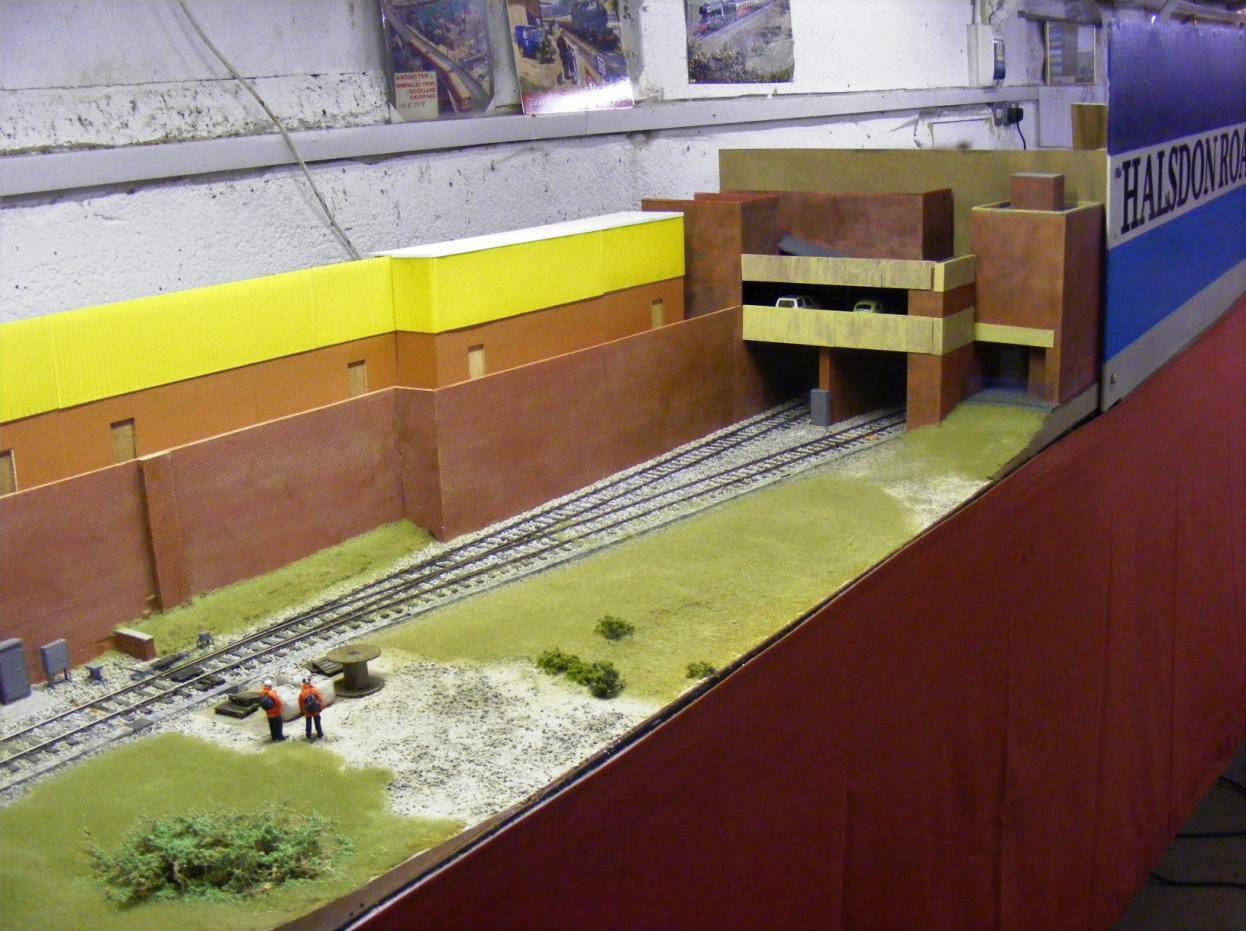
In 0 Gauge, Halsdon Road (now booked for Taunton Rail-Ex 2022), has had a small extension featuring a multi-storey car park and a couple of S&T men admiring their new cabling.
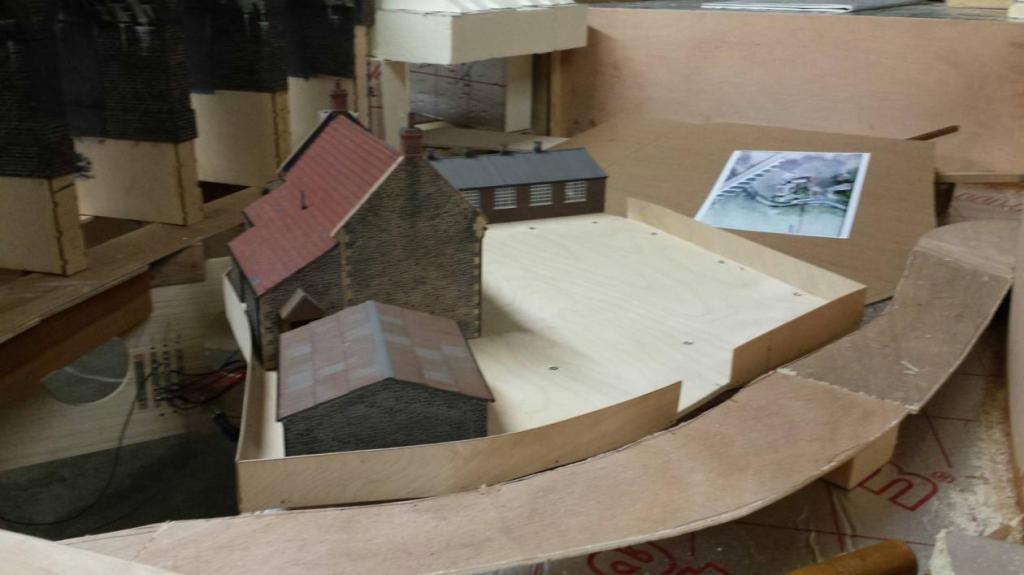
Also in 7mm scale the beginnings of the farmyard module for Evercreech New with the foundation for Prestleigh Lane in front of it. The problems of compression in large scale model railway layouts may well come home to roost on this one!
Dave S is helping the N Gauge Group with new baseboards for the fiddle yard of “The Bank”. Built in genuine Poplar ply the result is shown below – they look strong enough for Gauge 1, let alone N, and are surprisingly light! The Overton sign is Jim’s. It was purchased on impulse from the late lamented Collectors Corner, and travelled home first class on the Manchester Pullman!
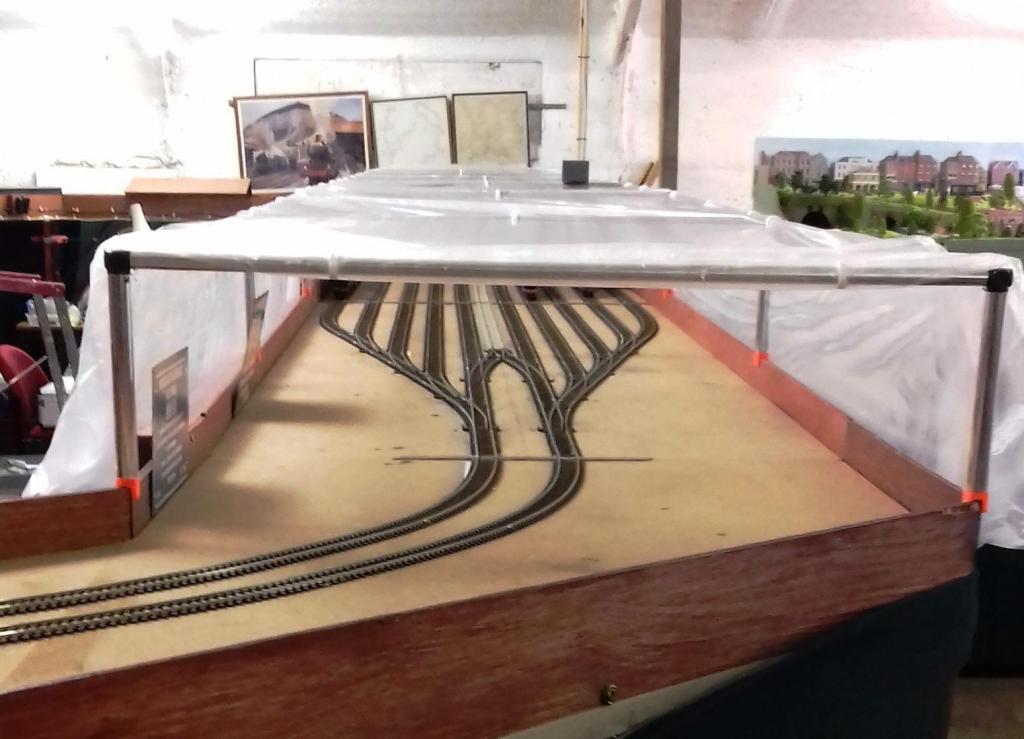
Bringing up the rear, the extensive fiddle yard of Yeovil Town under its super new covers, but apparently bereft of trains. In 00 Gauge and DCC controlled, layout operation will be fully automated.
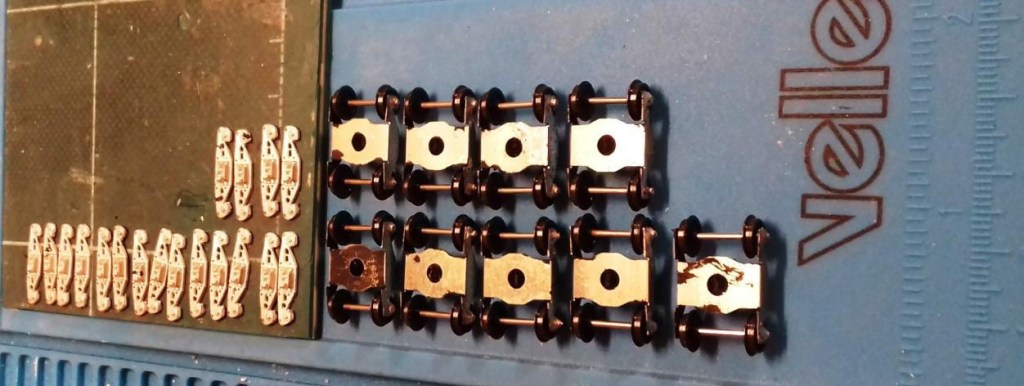
Our featured image for October is Jim’s latest mega micro-project. He has sold off his N gauge Graham Farish RTR models of the traditional FFA/FGA Freightliner wagons, and is replacing them using etched kits. He claims the GF models are ‘crude’, but your author doesn’t know how he can possibly say that with such tiny models! 🙂
Anyway, two rakes (ten wagons) are from a fairly intricate design by 2mm Scale Association member Stephen Harris and a further two rakes are a much more basic (and simpler) etch by Worsley Works. They all need bogies – 40 of the little blighters – and these are constructed from a fold up etch (also by Stephen Harris), to which are soldered top hat bearings and then clothed with white metal cast sides. Needless to say, they take 2mm finescale wheels with 12.25mm long axles, not N gauge wheels with 14.8mm long axles.
The first picture shows the components, the second one shows most of them constructed and awaiting the paint shop. (Below are the “Clam” ballast wagons mentioned many months ago – no nearer being finished!)
In EM Gauge, Peter C has been finishing off the Cambrian Brake Vans that needed those 3D printed brake blocks that YMRG designed and printed for him. First up the WD/SR 25T Brake van undergoing final painting, using transfers from assorted sources. Sandboxes still to be fitted.
Next the SR 15T Brake van undergoing final painting, using transfers from assorted sources:
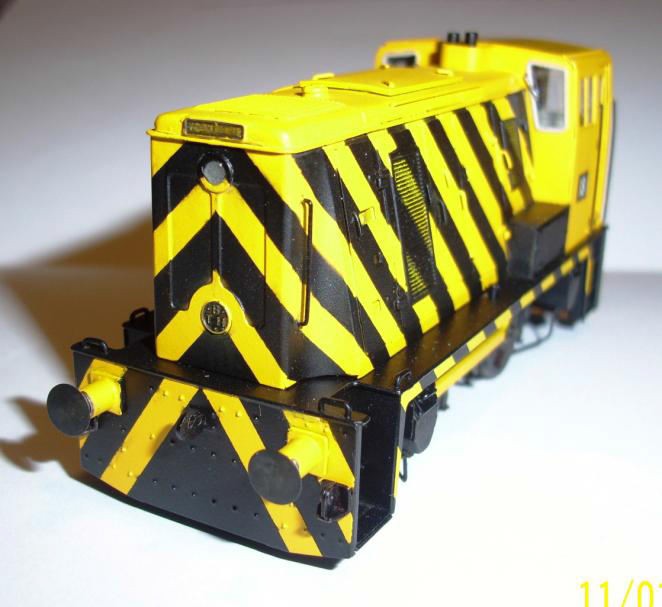
Finally bringing up the rear, although perhaps it should probably be on the front, is a Yorkshire Shunter in a nice understated ‘wasp’ livery. Built from a Judith Edge kit some years ago, and finally fitted with a cab side number and windscreen wipers, Pete only had to make six in all, he still hasn’t found the ones that flew away!
Next up is Allan H with rapid progress on his 7mm scale 4F, being built from a Connoisseur Models etched kit. The loco chassis looking very smart – and even better, it moves!
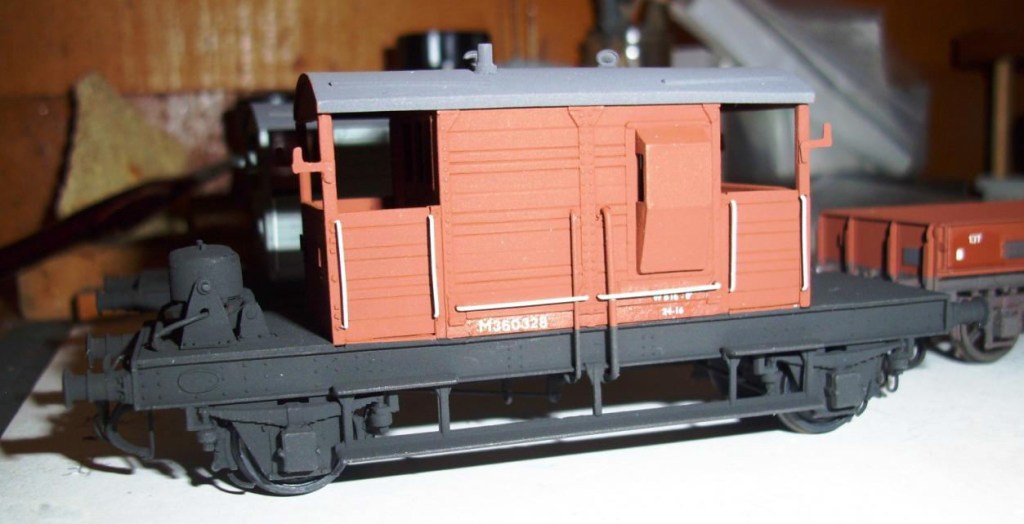
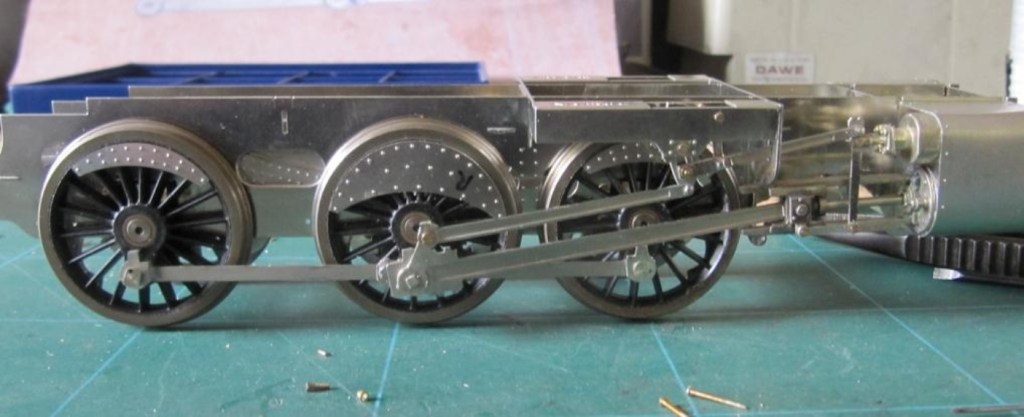
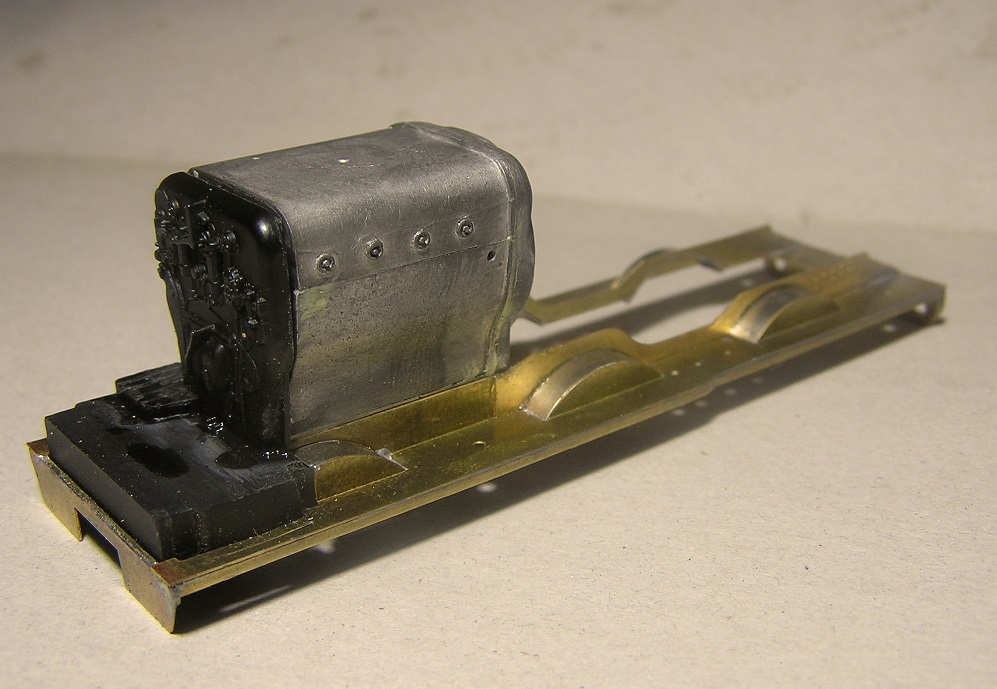
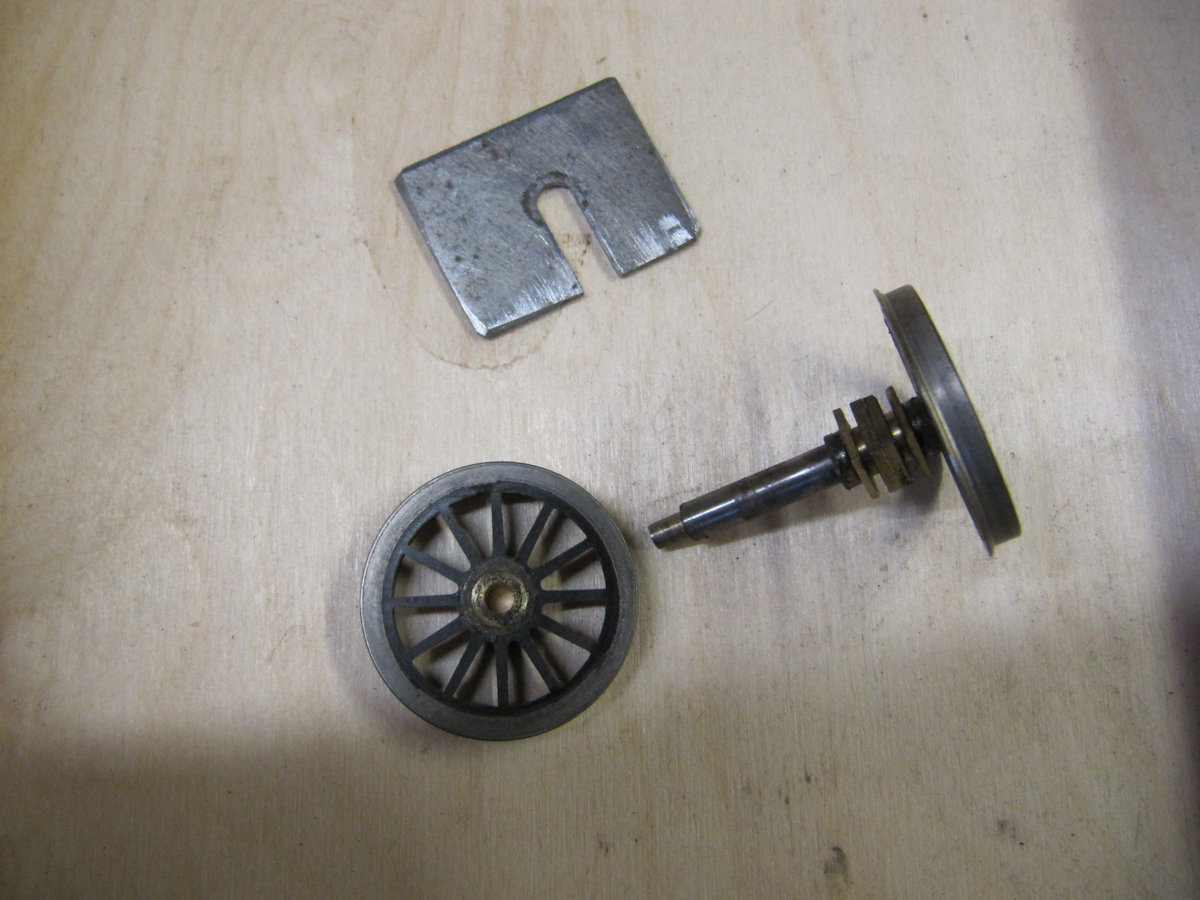
Moving onto 00 Gauge, Steve S has been repairing and upgrading a battered Wills T9 for a friend whose father must have started it over fifty years ago. As far as it had got, it had been assembled with a tinman’s soldering iron on a gas ring, using some sort of medium melt solder.
Collected at the end of September the body was repaired and sat on a new SEF etched chassis by the end of October – spectacular progress by Steve’s normal standards! Paired with the first of several iterations of Hornby six wheel tender – this was the view by the end of the month. A fairly comprehensive build thread for this rescue mission can be found here: https://www.westernthunder.co.uk/threads/wills-t9-repair-and-upgrade-in-4mm-00-gauge.9966/
Also in 00 Gauge Dominic has been doing bits and bobs on at Coombe Town. He has got the first parts of the Modelu guttering installed on the Goods Shed and has completed the first sliding door. The door is made from various bits of styrene strip with 3D printed wheels, which are designed to sit on the rails to allow the doors to be posed – and just how cool is that!
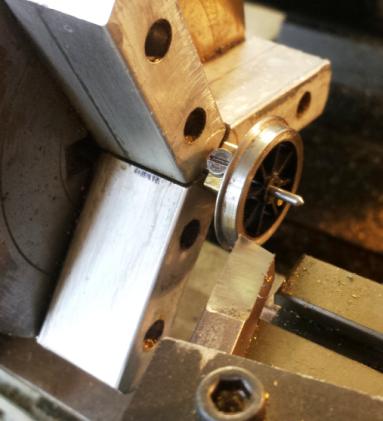
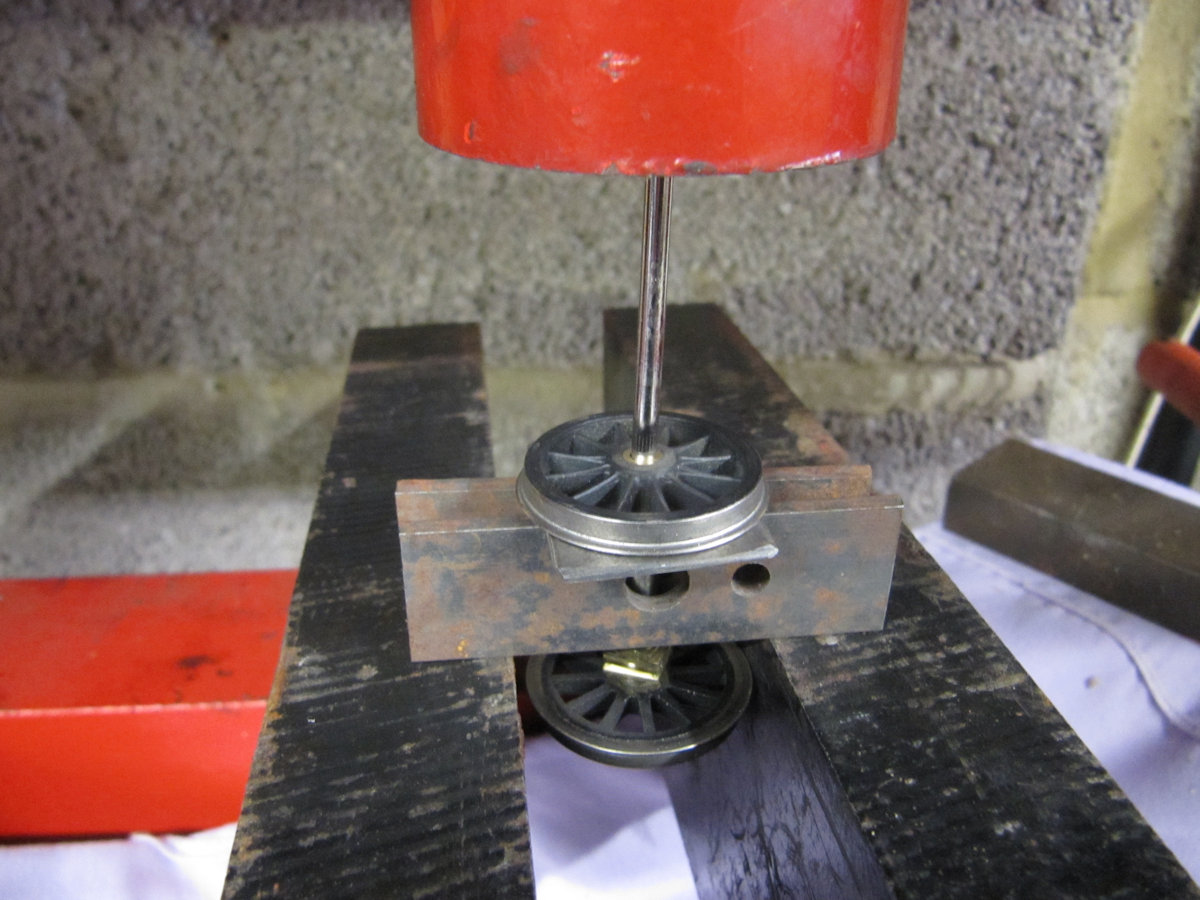
Finally, in 0 Gauge Dave H has been wrestling with wobbly wheels. As he says: “The only modelling I’ve done recently is to build a couple of Slaters GW cattle wagons. However I got so fed up with wobbly wheels that I decided to turn the rims of all new wheels using this little gizmo (picture below left). It’s just a bit of brass with a clearance hole for the axle, a brass peg that fits between the spokes as a driving peg, and a 6BA screw to clamp it to the axle.”
“The picture above (right) shows it in use to skim the treads on my aged cheapo lathe – it only needs a few thou off generally to get them concentric, then the transition between the tread and the flange is finished off with a half round file. Without the gizmo, they just turn on their axles with the lathe tool stuck in them. The flanges may still be a bit wobbly, but that doesn’t affect the running. If the treads are concentric with the axles, then you don’t get that awful limping effect as they run past. I’m afraid all the plastic centred wheel manufacturers I’ve tried suffer this problem occasionally – some worse than others.”
“The picture above shows the two cattle wagons nearly complete – just brake gear and roofs to add, then painting. I’ve modelled one with old style grease axle boxes, and the other with those new-fangled oil boxes.”
September saw us busy on both Evercreech New and Halsdon Road. Halsdon Road’s long overdue appearance at Taunton Raile-Ex was again postponed, and will now happen in 2022. The plan was to do a single update for the whole Autumn, but there was too much going on over that period for one post!
The 7mm scale D16/3 Claude Hamilton continues to progress with John reported that the cab roof had been rolled and riveted using a rivet punch that he had converted from a leather punch.
The finished cab roof. Milled brass angle is used for the rain strips and milled ‘U’ section for the ventilator slides. This has been modelled open. John claims: “62578 was a Melton Constable engine, and it is always dry and sunny in North Norfolk. No, it does not open and close!” The inside of the roof had a T section stiffener inside. This is again from T section brass which was soldered to some scrap brass before being shaped then unsoldered before fitting.
Not to be outdone, having completed the tender Allan H has started on the loco body for his Fowler 4F to run on “Evercreech New”.
Changing tack entirely, Jim has dug out some of his recent N Gauge purchases to see what scope there was to replace the wheelsets with finescale ones readily available to members of the 2mm Scale Association – rather than have the N scale ones turned down in a lathe. The majority of the recent purchases have been various types of bogie container wagons, which have 5.25mm diameter wheels. However, something slightly different was a pair of KUA nuclear flask wagons, designed to carry fuel to and from Sellafield and Rosyth and Devonport for our nuclear submarine fleet.
They are impressive beasts and will look good on “Bungham Lane”, assuming it is ever built! Although the model makers, Revolution Trains, tend to use axle lengths that do not correspond with the Association’s standards, I found 16 axles that were suitable, and the result is above.
Pete C has been beavering away with various EM Gauge projects, including replacing the pony wheels on his Ivatt Mogul. Pete says: “They came from John Meakin and are Sharman wheels, Mike Sharman being an RAF aircraft engineer used 3/32” axles. The bogie bearings were for 2mm axles, so I had to make a couple of bushes on the Unimat, my Unimat came via Peter Bedding who was his commanding officer on Vulcans. Luckily I successfully made 2 bushes first time and fitted them with a smear of Loctite retainer:”
A Weltrol wagon now has trestles.
Also our featured image a 40 year old Mainline Warship now has new windscreens, the old glazing having yellowed: What a splendid model this was for its time – as long as it either has two motor bogies or a replacement mechanism…
Finally, for Peter B’s P4 magnum opus depicting Market Bosworth, an exquisite Johnson Class 1400 2-4-0.
Things are slowly getting back to normal in CS2 with attendance steadily increasing on Wednesdays. Although Covid restrictions remain, some will be pleased to hear that from September, for a trial period, masks may be removed once one is safely ensconced in the centre of a layout whilst alone or in the presence of agreeable individuals.
In a faraway place Dominic has spent several nights painting 3 sets of 4mm scale crew to go in locomotives for Coombe Town. The first image is a Modelu set. The second is a set for the Model Rail 16xx printed by Hardys Hobbies. The 3rd and 4th also from Hardys are for the B2 Peckett.
In 7mm the Claude Hamilton is making huge progress.
The steps have been attached, as have the sandboxes. Those steps on the coupling rod ‘splashers’ were the very devil to attach. It would have been easy if John had three hands! The photos show some flux corrosion even though he rinsed it after each modelling session. A horrible glass fibre pen will need to be used which John has learned to use under water to minimise bits of fibreglass getting in his fingers.
The components for the loco brake gear fettled and ready for fitting and fitted. The blocks have been riveted to the hangers to stop them becoming unsoldered while the hangers are being soldered to the frames, a dab of Cyano will secure them when everything is lined up. The blocks on the pickup side will have a coating of Cyano in case they touch a wheel rim.
The Claude Hamilton Cabriolet ready for its test run
The brake gear was fixed before its successful test run at CS2. Keith raced it down the long straight in the fiddle yard and lost! This concerned John a little because fast engines are often weak engines, but when it was coupled to a lengthy goods train it had no trouble pulling it, making two circuits before the final gear drive became loose on the driving axle – apparently greatly disappointing our member for Ferndown when the grub screw failed to fall out.
The front sand pipes were attached next and that should finish the chassis. The sanding arrangements on these Locos were strange. The front ones were operated with compressed air from the Westinghouse braking system, and the rear sanding was by gravity from the sand boxes in the cab. The Westinghouse Company disapproved of the front arrangement, but no doubt the G.E.R. /L.N.E.R / B.R. who were good customers took no notice of their objections. There must have been an air reservoir somewhere on the loco, but the drawings that John has, do not show this. On many other Westinghouse fitted engines it was on the back of the tender. The castings on the model are from the now defunct Hobby Horse range.
From Simon K some Dapol O gauge wagons in a slightly distressed state for his non-S&D project.
Spurred on by a series of articles in the current editions of “Railway Modeller”, Allan has decided to build what he claims to be his first loco – a Fowler 4F in 7mm scale. Sensibly, Allan has built the tender first, before attacking the locomotive. Pictured above is the superb result – awaiting a visit to the Paint Shop.
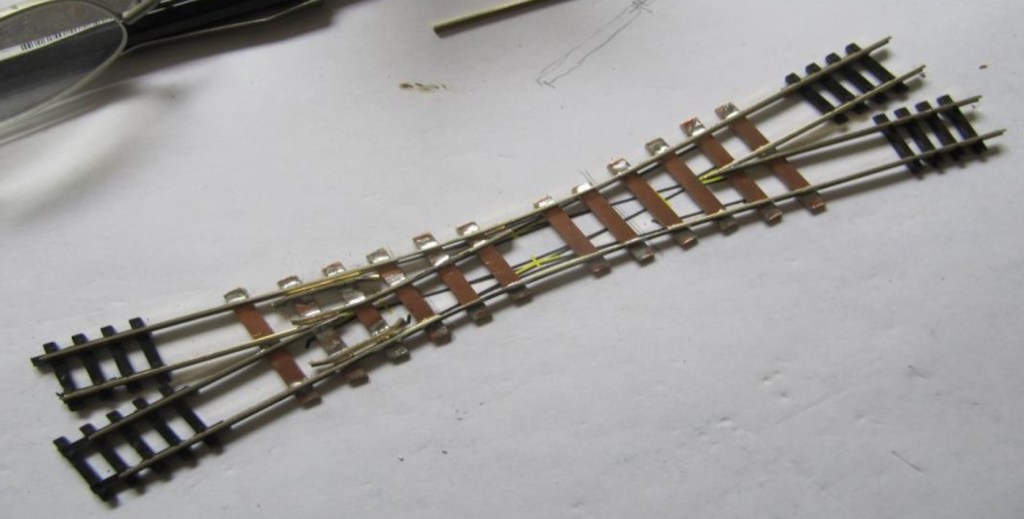
This is one of the new entrances to the N gauge fiddle yard for The Bank. Layout Coordinator Alan has sourced double cross-overs giving much greater flexibility in the use of the fiddle yard. The track had to be taken up anyway as it had buckled with the excess heat in CS2. As can be seen, it’s all wired ready for connection to the point motors – MP1s for the single points and MP5s for the cross-overs. This is the work of Dave S, but Alan will be doing the other end!
And back to 7mm where Dave S has been assisting David S with the valve gear on his S15. The picture shows one side assembled on the loco:
Finally one of our Associate Members Peter B has been helping a friend build a model of Market Bosworth station on the Ashby and Nuneaton joint railway. The model is built to P4 standards and set in 1908. There is still quite a bit to do, although this is not at all obvious when looking at the photos. The line was constructed by the LNWR and MR. Track and lineside fencing was Midland Railway pattern. Signals and signal box LNWR. Other buildings and bridges etc were designed specifically for the line. This location was chosen as in addition to being a through station it had a good sized goods facility, and allows both LNWR and MR stock to be run.
As disruptive as the pandemic has been it has allowed good progress to be made on the layout and stock. The layout was due to appear at Scaleforum and Railex last year, but unfortunately the shows were cancelled. Pete B and friend are hoping for a new invite.
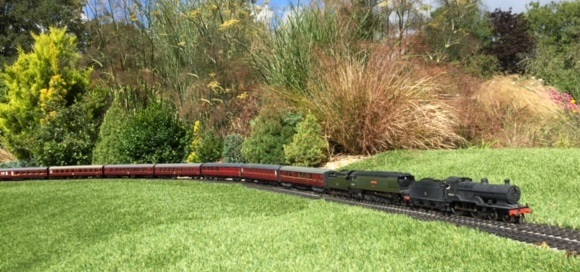
In lieu of our Open Day usually held in July our Group met up in a reasonably far away place to see big big trains (some of them fitted with sound) running in a lovely garden with excellent food and company. The weather gods smiled on us for the second possible date, and a great time was had by all. As a previous Chairman said “we are as much a social club with a railway interest as we are a model railway club”. £60 was raised for a local charity dear to the hearts of our wonderful hosts, but revealing which one would give the location away! In other news we are back to a single club night on a Wednesday, and the requirement for a recent negative PCR test has been dropped. Other Covid secure measures remain in force in line with current government guidelines.
Dave H has continued to assemble the model of the Rocket to act as a trophy for a new Gauge 0 Guild competition in memory of Bob Alderman. He figured out how to make the thing screw together so that he can paint the boiler barrel separately from the rest (which is mostly black). The rear boiler plate was soldered to the firebox, then the front plate (which will have the chimney soldered to it) was screwed on using a bit of channel soldered across the inside of the boiler near the front. After that the whole boiler was secured in place with a screw from underneath, locating onto the back plate. It’s a bit rough and ready ([Ed} this is most unlikely), but it all fits together quite solidly.
The tapped hole in the footplate is for a 6BA screw to attach it to its plinth – hopefully it shouldn’t be too visible. He’ll need to put one up into the tender too – it would be a shame if it fell off! The slot in the bottom of the boiler at the front is for the motorising kit if it’s being used – it’s offset to one side to clear the working inside valve gear which is supplied with the kit!
The really touching news is that because ModelU have 3D scans of Bob Alderman from a few years ago, they have kindly undertaken to print a figure of him wearing a top hat and waistcoat to drive the engine – just how cool (and appropriate) is that!
Allan finished another outbuilding for Mill Farm and has further weathered the roof of the chicken shed. He feels both of these buildings as well as the farmhouse of course will benefit from plant growth, moss, farm debris, old tools, machinery, hens etc when they’re placed in situ on the model. One kind and considerate soul felt they just had to point out that the paving slabs were perhaps just a little bit overscale!
Some of you may remember this striking image of the S&D at Pitcombe as a teaser for an art exhibition at Pitcombe that featured some of Allan’s railway images a while ago. No doubt due to the pandemic this was rescheduled for September this year. The updated Flyer is reproduced below:
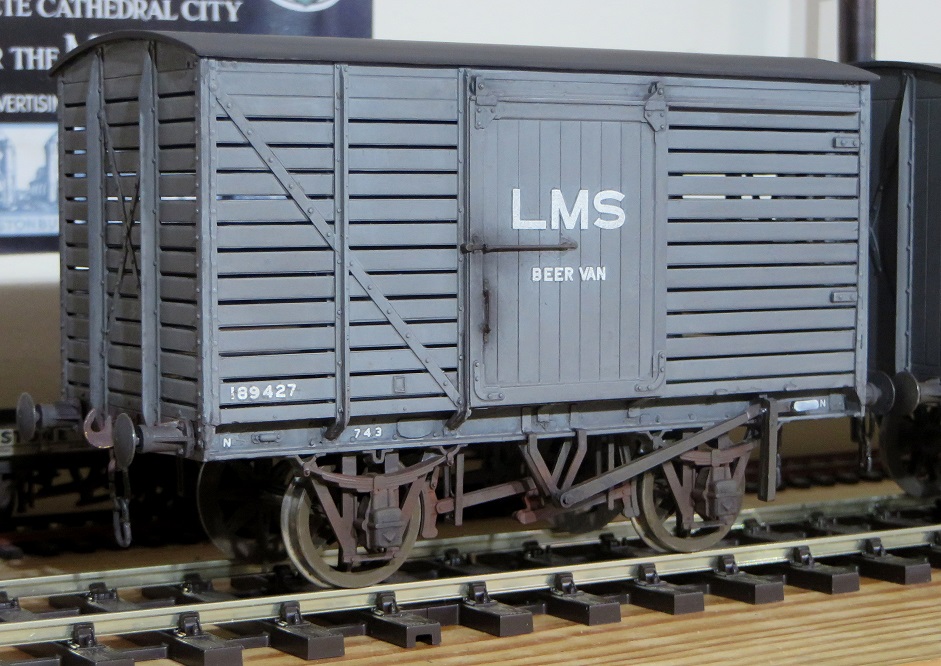
How could anyone resist Allan’s LMS Beer Van built from a 7mm Parkside Dundas kit – also perfect for The Alderman’s Hobson’s Brewery layout! Purists might notice the rather small ‘beer van’ lettering. Actually the wording is from a 4mm HMRS sheet as Allan is (in his own words) ‘too mean to pay out for a full LMS wagon sheet in 7mm’, He also didn’t like the waterslide transfers supplied in the kit. It seems Allan hasn’t yet fully entered into the spirit of 0 Gauge if he baulks at the price of a sheet of transfers! 🙂
Up in a big smoke, Dom continues to make progress on Coombe Town.
The stonework for the Goods Shed is now painted and ready to be varnished once the crane and its supports have been added to the interior, then this can all be weathered. The main roof structure was made up of 45 pieces of styrene and 3D print, before the tiling was added… the result is a solid, removable structure that will allow access and further detailing in the future.
The final picture shows the fiddle yard. The traverser was removed as Dom was finding it slightly irritating having to pick up locomotives and brake vans to switch ends, so have replaced it with Cassettes, two of which are shown.
Dave S has been shunning his 7mm Black Five and Fowler Dock Tank to build this N Gauge double slip in copper clad for our mini-modeller’s layout based on Hemmerdon Bank. It’s either for the fiddle yard or will need deep, deep ballasting! Perhaps due to the clubroom being closed for so long, there has been some movement in the long heavy fiddle yard boards and replacements in proper poplar ply are being mooted.
Finally we arrive at the engine that Verwood doesn’t really need apart from on High Summer Saturdays. Here pictured on some gash Romfords for fettling the suspension and drive unit.
July saw the chassis built, and the firebox rebuilt – square this time. The PDK supplied Lemaitre chimney appeared too tall, but after studying photos of the real thing it was realised that the rim was overscale with too much material above it, and also that the prototype chimney did not have the lovely heavy flare onto the smokebox that the supplied one had. Cue much removal of material from both ends, and a large chimney that does now look shorter than the dome – albeit posed slightly too far back.
The original shallow etched running plate valances were replaced with 1.5mm deep brass angle, and new fastenings for the loco body provided to suit the modified SEF 4F chassis. The body was then raised 0.5mm on the chassis to get the correct ride height. The wheels are nicely centred on the splashers with just enough clearance – two different manufacturers getting it right – or at least wrong in the same way! The tender needed to go up another 1mm to match the loco ride height, and a tender coupling installed. In the fraught process of removing the old valance from the tender one of the leaf spring ends was caught with the iron. 😦
A shiny very Q shaped butterfly emerging from that ratty old Airfix 4F chrysalis!
Summer is finally here and with CS2 re-opened in a Covid compliant manner, there is plenty to report.
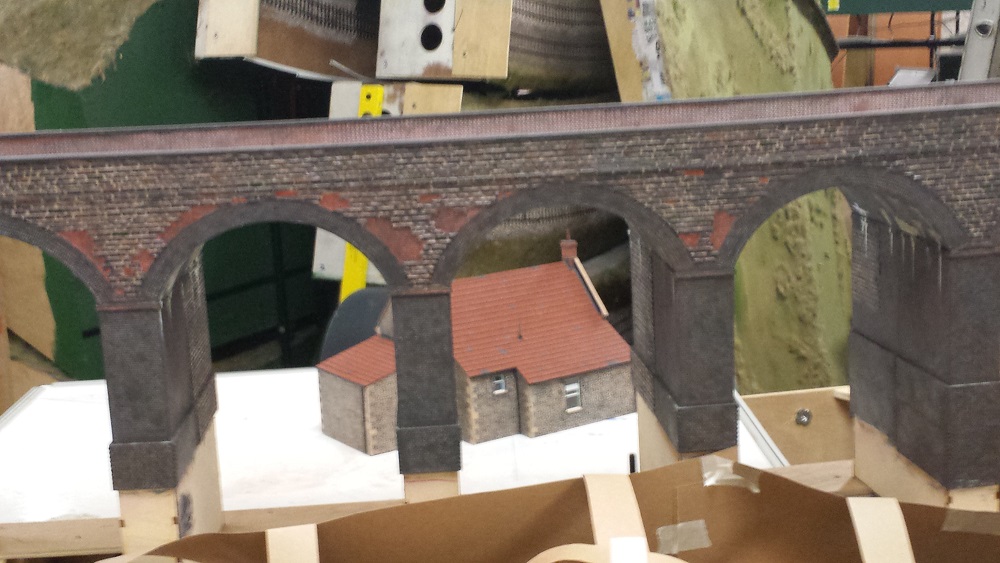
With work parties back in CS2, Dick attached the wee pattresses to one of the arches. The overall effect is rather fine we think – it looks like it might well have collapsed without them. Dave H put in the drain pipes on the farm side of the viaduct (for which we had a photo showing where they appeared), but we’ve managed to mislay the photo showing the pipes on the other side. Daves S and H spent some time leafing through all the S&D books they had to hand. It’s amazing how much time we modellers spend doing that. They still couldn’t find it!
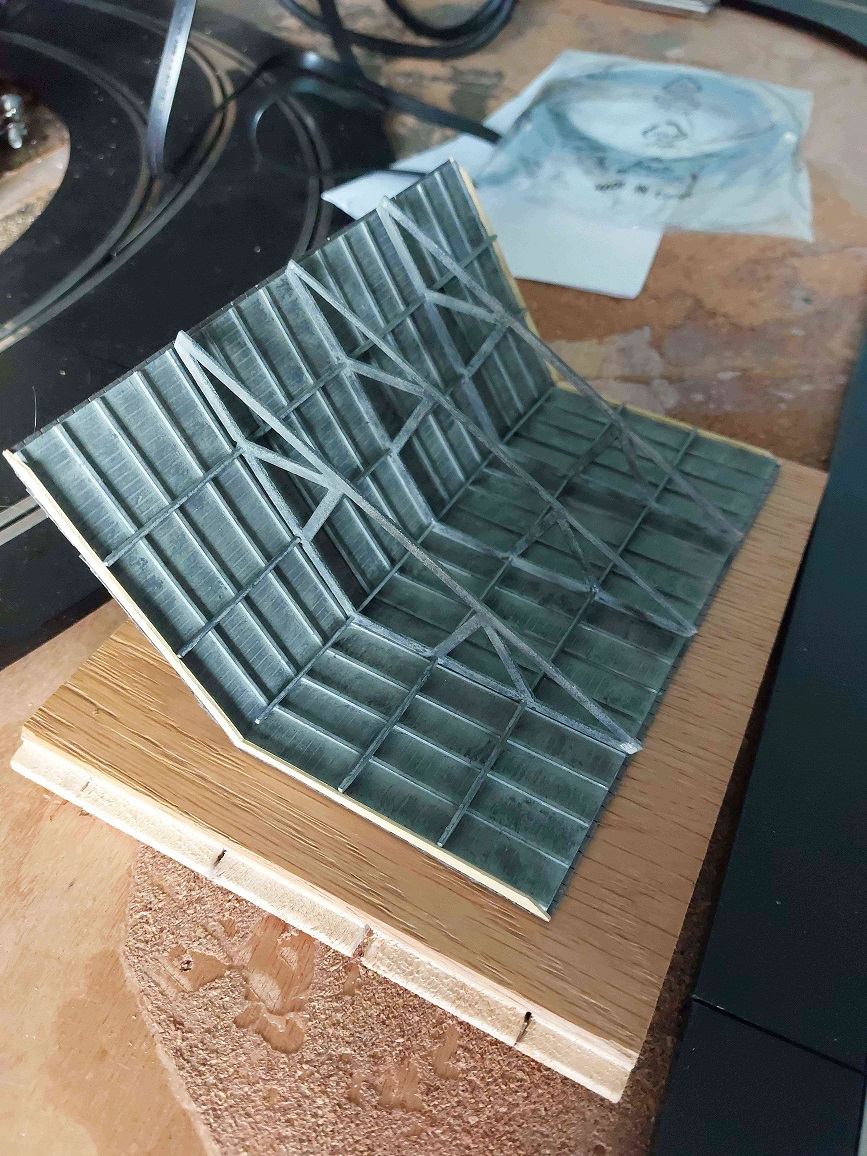
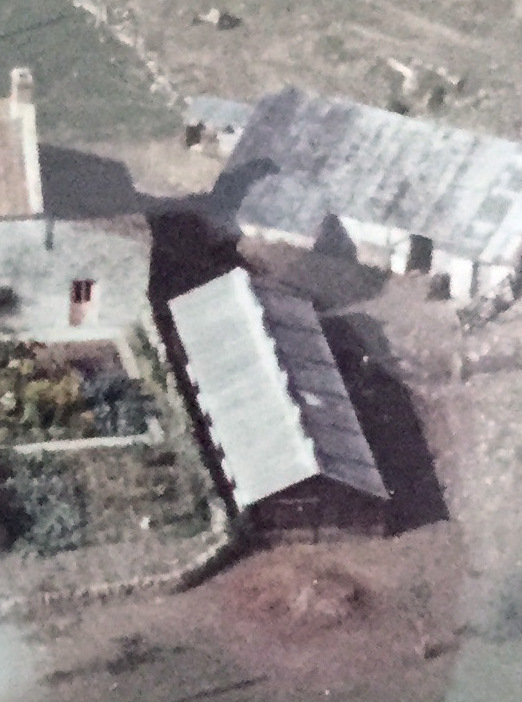
This is Allan’s finished poultry shed for the farm that is tucked behind Prestleigh Viaduct. The design is based on very limited information, and surviving local examples. Photos of the original show one more bay and window than modelled, but there is limited space at our disposal. The vents are Allan’s own design – vents of the period (1950s) are many and varied from what can be gleaned. The farm is known as Mill Farm and a search of the archives has indicated that the mill building was the one behind the poultry shed in the aerial view, the arrival of the railway blocking the course of the old mill stream and changing the use of the building.
Dave S slipped Dave H the second version of the 3D printed buffer housings for his Brake thirds. Here they are being Araldited in place. Dave H reports that they are excellent – much better than any casting could be, and very robust. Unlike 99% of buffer castings, the hole through the middle is in the right place, so nothing should be wonky! Dave found that the holes could be gently reamed out with a tapered broach. If you try to drill them then the plastic tends to fracture, which is odd because it’s quite tough otherwise. This is an excellent tip! [Ed].
A superb example of 21st century model making, the Shelf Queens have a mix of etched brass, white metal and lost wax brass castings, 3D printed parts, steel turnings, and styrene in them, but no wood in these two!
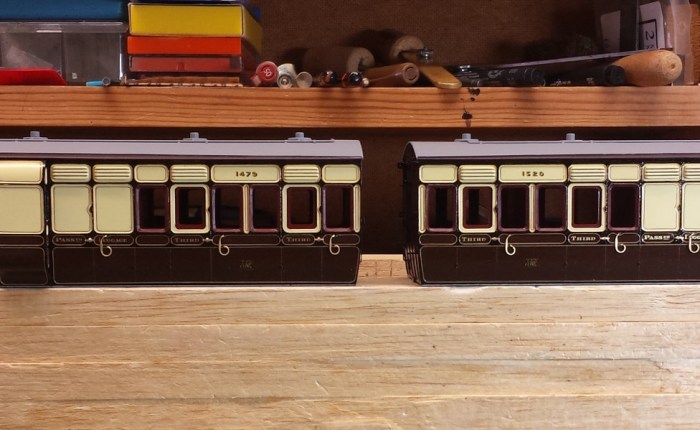
And with those buffers fitted and a coat of paint two Shelf Queens are now finished – both six wheel brake thirds. Our picture (and featured image) shows them top and tailing the first three which were finished in 2002! So his winter project has delivered about one third of its output with an overrun of 100% in time – though on a very low budget. The rest of the Shelf Queens will have to wait until another winter, but then as the days are already drawing in….
On the 7mm Claude Hamilton, one step back and two forwards. After many unrepeatable words and scorched fingers the boiler bands were attached – see last month. But they have had to come off because they appeared hopelessly out of scale on the photograph. Instead, John will use his usual method of putting the lining onto black paper and cutting them with a very sharp knife. It was then time to put on the vacuum ejector exhaust pipe, so the positions of the fastenings were marked out using a surface gauge. The handrail positions were also marked on both sides of the loco at the same time. The oak table was flat enough for this purpose. If John had wanted the use of the gauge to be even more accurate, he would have used a piece of plate glass.
A picture of the no longer dodgy Duchess that was promised last month and here she is! It has been claimed that onerous DIY duties (namely replacing a bathroom suite) have robbed Jim of the spare time needed to replace the former LMS insignia and numbers with BR ones, Ready for next month then?
This is an LMS horsebox photographed on Kingsferry, but built by Simon K in 4mm many moons ago from a PC Models kit. Simon, no longer a 4mm modeller, kindly gave it to Allan. Allan has added 3-link couplings (probably should be screw-link but he’s none left) and weathered it. We definitely like to see a nice, fairly rare, model of an interesting vehicle! Kingsferry incidentally has been easily our most visited web page since April.
For Verwood the 4mm Q Class makes steady progress. Utilising the old Crownline Conversion kit for the Airfix 4F, there is very little 4F involved and therefore surprisingly few compromises. Although a goods engine, their role on the Salisbury & Dorset seems to have been limited to hauling the summer Saturday holiday specials carrying Welsh miners and their families to the seaside at Bournemouth.
The kit includes almost everything needed to build the Maunsell 3,500 gallon tender, It was supposed to take the Airfix 4F tender drive, but instead rolls very smoothly on a twin beam compensated Comet tender chassis, and I did have to fabricate and fit a coal hopper. The fit of the Crownline etched brass parts was excellent, and of the castings only the water filler was out of register requiring a fair bit of rework and detailing.
Not a lot of the old 4F left! Only the backhead, boiler and smokebox (wrapped) will make it into my finished model. The flimsy half etched cab sides were reinforced and the shape of the cutout corrected. Then a complete replacement roof was fabricated so that the curve was continuous and appropriately peppered with rivets, complete with that characteristic front overhang. The 4F backhead and cab floor was heavily modified to look more Q like, with the backhead now lined up nicely with the cast whitemetal firebox that had to be raised 1mm to be where it needed to be. For overall layout and proportions, the Eastleigh Weight Diagram has proved invaluable. The build is being blogged on RMWeb, the original thread being hijacked halfway down the second page.
Following our AGM on Zoom, we have a new Chairman – Ed Pickup – and a new Treasurer – Dave Haines. All other posts remained unchanged. Even more importantly perhaps is the long awaited re-opening of our clubroom – albeit strictly controlled to comply with the Government’s continuing restrictions. A one way system has been applied to ensure social distancing, and a current negative Covid test will be required for a visit. To this end, Secretary Simon is maintaining a rota to ensure that the ‘Rule of 6’ is met with Wednesdays and Thursdays having two designated sessions.
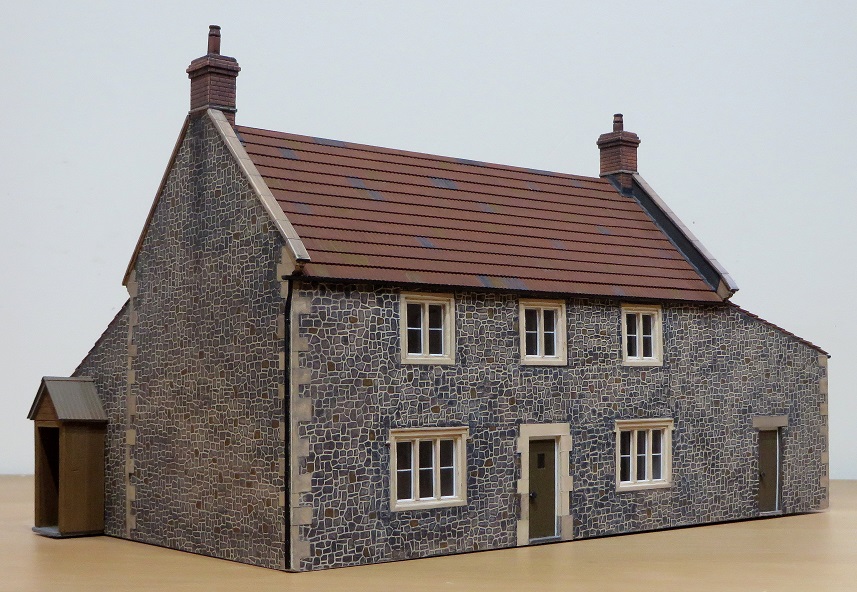
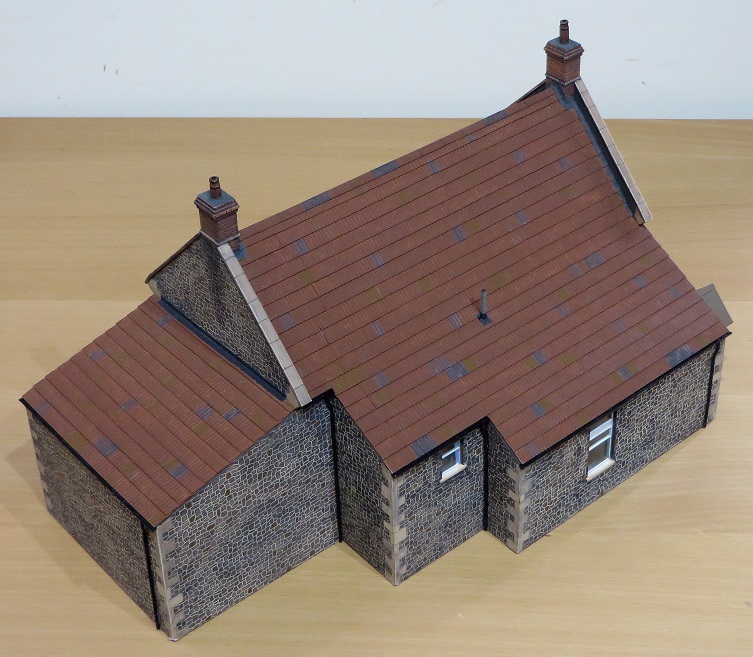
On the modelling front there is still plenty to report starting with the Allan’s superb model of Prestleigh Farmhouse.
The represents the farmhouse as it was in the run-up to the closure of the railway. It has since been much extended at the rear which would totally change the view that the public would see on the layout. More views of it in situ below.
The underframes for the six wheeler Shelf Queens are coming on. Brake gear is all done – very complicated on these old carriages. Dave H likes to have it all there – some people do this in 4mm scale which he modestly tries to claim would defeat him.
Yes there should be two more pairs of wheels! The mechanical bits are from an underframe kit marketed by Slaters, the details are castings and etches now marketed by the Broad Gauge Society, but suitable for these kind of coaches (what Jim calls prehistoric). The wheels are Alan Gibson and very good – much better than the Slaters ones in my opinion. The frames and buffer beams are scratch built in brass. Footboards, gas tanks, buffers and vac pipes still to do.
In a nice view of the loco body we can see that the 7mm scale Claude has gained its boiler bands.
Peter has finally finished the two SR brake vans from the Cambrian kits, a 25t one ex WD, i.e. fitted, that passed to British Railways from the Shropshire and Montgomery Railway and survived well into the sixties, and the 15t version for branch line use. They’ve used Dave and Steve’s 3D printed brake shoes as the ones in the kit aren’t correct, Peter might retrofit the completed one that was built some years ago. All are 4mm EM Gauge.
Continuing the EM Gauge theme, Peter’s son Adam thought we might like to see these – a rather involved conversion of a Hornby Trout into one of the SECR’s antecedents (built by the Leeds Forge Company) now completed and weathered, along with a BR Pipe and a GWR P7 which would be ideal to feature on Evercreech New (it’s based on a picture taken at Evercreech Junction) were it not a tad small…
Verwood has not been forgotten and a lot of time has been spent on the canopy roof this month, firstly after a false start a much more satisfactory way of glazing the roof light was devised. The correctly spaced framing was drawn up in CAD and printed out. The glazing material was taped to this drawing and the supporting framing glued to the glazing material with Liquid Poly. The glazing material was then turned over and the assumed (overlapping) panes of glass scribed on. The glazing beads were then applied to complete the job. The completed assembly fits neatly in the hole in the canopy prepared for it, Flushed with success a start was made on the corrugated sheeting which had very visible lines of fastenings. There were four rows per sheet on most of it, and two rows on the rest. A jig centred the hole on the top of each ridge, with every fourth ridge being drilled – representing five ridges on the prototype. Each hole then received a short length of fine plastic rod trimmed to length. The rolled leadwork at the top of the skylight was also modelled.
The next challenge is to find a satisfactory way of gluing the various layers together in a way that won’t distort.
We Have:
The brass framework
A thin plastic sheet with the rafter detail
A thin card layer with cutout for the glazing
Corrugated plastic roofing sheets that need to be shimmed to look like they overlap.
Hopefully that will all be sorted out by the next blog.
Although Verwood has more than its fair share of unfinished loco projects, Steve its impulsive Loco Superintendent is attempting a Maunsell Q Class using the old Crownline kit to convert the Airfix Fowler 4F. The kit is supposed to use the unpowered loco chassis and powered tender drive, but the SE Finecast loco chassis kit for the Q will be substituted – if one can be obtained. Quite a comprehensive kit this as it includes a complete brass tender, and for the loco only the 4F boiler and backhead will be visible once the 4F smokebox has been wrapped as instructed.
Work commenced with the running plate which in common with the Roche drawing doesn’t have the characteristic narrowing of the front half that the prototype had so that was the first challenge. The half etched splasher tops fell through the resulting holes once frame tops and splasher fronts had been folded up, so slightly wider ones cut from thin nickel silver were substituted. The half etched buffer beam was narrowed to match the reduced width of the running plate and laminated up for robustness before being soldered in. With half etched lines on only one side of the etch it was quite a relief to see the etched ‘underneath’ is indeed underneath! At that point the Airfix body was still in the post, so attention turned to the tender.
Loco and tender are to be fully compensated, and with High Level Kits (HLK) furloughed, Verwood’s supply of ten full size HLK hornblocks did not stretch to loco and tender, but with great foresight there were six HLK ‘MiniBlox’ in the sorting box. The Perseverance tender chassis that was on hand was etched for full size hornblocks, so it was decided to go with a Comet tender chassis etch that was excellent value and Wizard Models were also able to supply the least unsuitable AGW wheels to go with it (3’11” diameter 10 spokes non-bevelled). Opening out the 2mm slots in the Comet chassis accurately to clear the bearings was a fiddle and there wasn’t a lot of material left when finished. The hornblocks were then carefully soldered into the frames before they were assembled using the supplied slotted EM frame spacers. The equalising beams were drawn up in CAD, printed out, stuck to N/S sheet with UHU and fretted out as were the brake shoes intended to enhance the flat looking Comet hanger and shoe.
Some crusty old Romford wheels were fitted on pinpoint axles whilst fine tuning took place, and the trim screw was adjusted and locked to set the chassis level. Quite stout mounts were required to position the minimalist Comet chassis correctly into the Crownline body, and it was a relief to see the pinpoints of the axles centred on the holes in the frames. The completed chassis runs through the crossover on the Verwood test track much as a bogie coach would, so that was pleasing.
The Crownline tender kit is designed to take the Airfix tender drive and has a very large hole where the coal should go. A hopper was drawn up based on the Ian Beattie and Russell (Eastleigh) drawings (they differed slightly in shape), and that was soldered in. Verwood is not very far from the halfway point between Salisbury and Bournemouth, so I’m going for a dip in the coal load. Progress (or more likely the lack of) is being blogged on RMWeb – a first for the author.
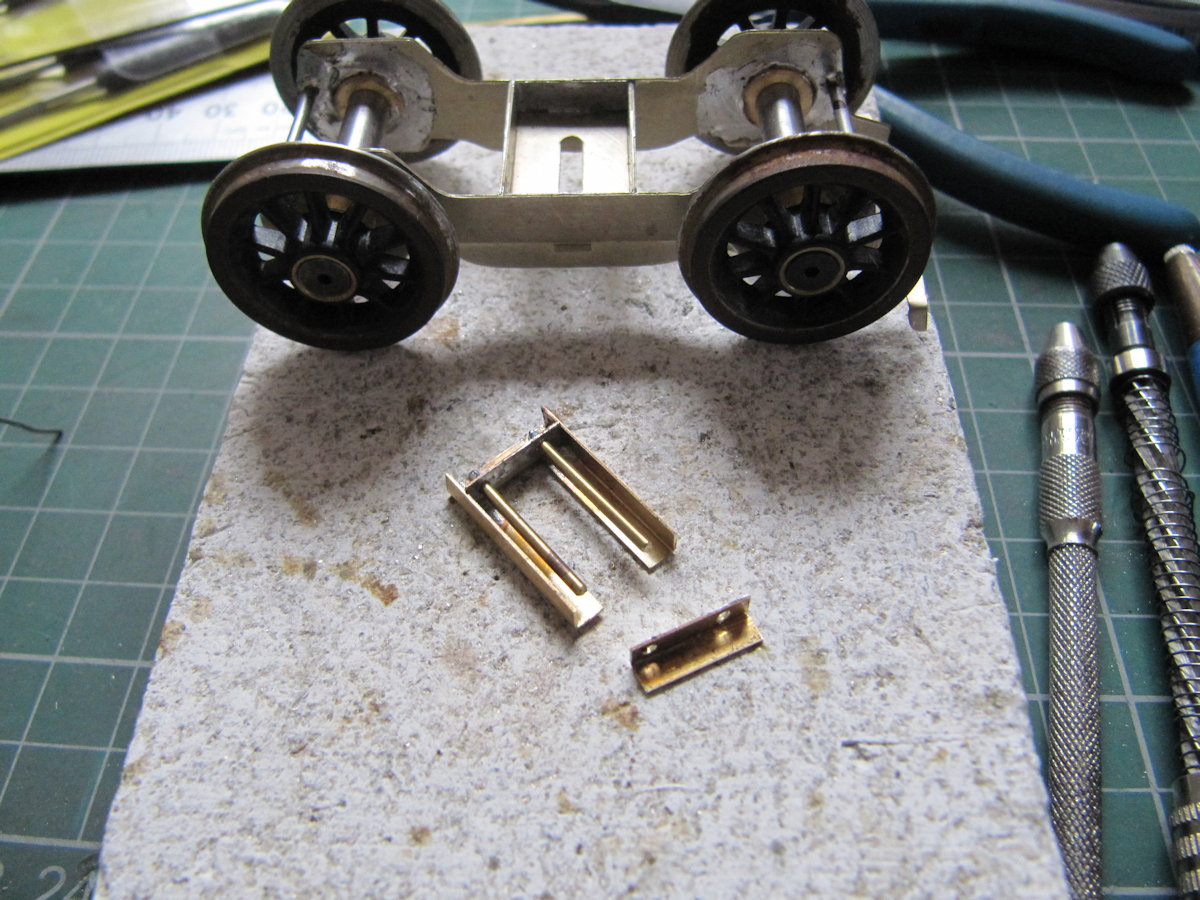
Back in 7mm Dave S asked the YMRG hive mind how they thought these wheels belonging to David S should be removed.
The consensus was that they were a press fit, and John hit the jackpot by identifying that they were in fact Slater’s wheels on a Morse taper. Dave S had already decided to try pressing the axle out from the wheel before John’s email arrived. So it was out with a collar that he had prepared earlier, and off to the garage where his 30 ton press lives. Not a lot resists Dave’s press and the Slater’s wheels and axles came apart easily. I’ll let the pictures do the talking now.
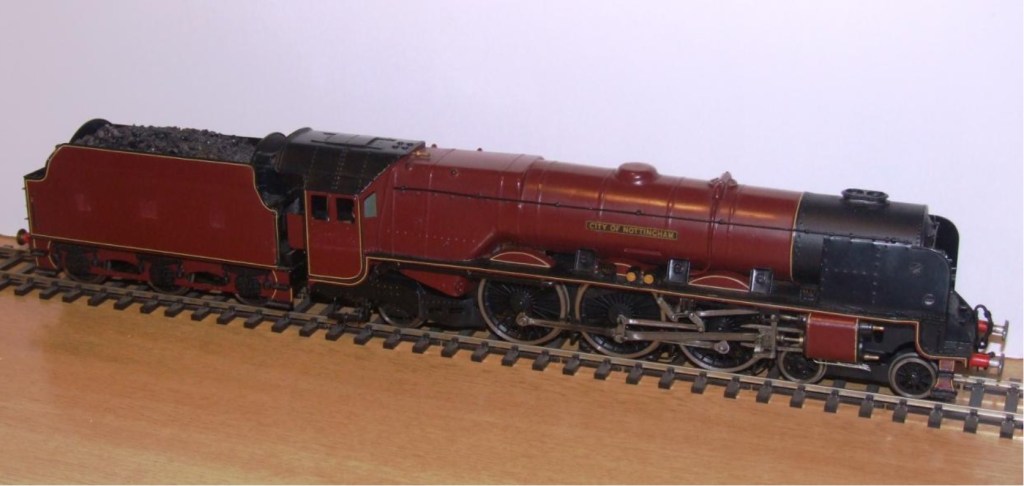
‘Engineer Dave’ has also been commissioned by Jim to sort out the chassis of a dodgy Duchess. For reasons your editor can’t quite fathom, this example of City of Nottingham is known as ‘Meghan’. She was built by a G0G member in North Wales, and purchased second hand via a dealer from Shrewsbury.
Just before first lockdown last year, Jim tried her round “Evercreech New” and she didn’t like the pointwork in the fiddle yard. Roll on a year and Jim realised that the B2B of the driving wheels are at least 1mm too narrow. The wheels were not Slaters, so he eventually bit the bullet and a few months ago purchased three new pairs of driving wheels. Of course, this was only the start of the problems as the whole loco is scratchbuilt, including the motion and valve gear, and this didn’t fit the Slater’s crank pins etc. Dave S takes up the story:
“I thought I’d take some pictures of today’s effort at fixing Meghan’s wobbly chassis. I started by removing (unsoldering) the centre axle bearings. As you can see, they were soldered over larger holes for adjustment.
The gearbox was removed so that new axle bearings could be inserted after expanding the existing holes.
The edge of the chassis was modified (both sides) to accept the new bearings in the gearbox.
The old front axle bearings were line bored (17/64″ diameter) to accept new axle bearings which were soldered in place. With the front and rear axles located and checked for “levelness” by fitting the wheels (it was level), the centre axle could be located.
I used my chassis building jig to locate the centre axle bearings. Springs were added at each side of the chassis to keep it central and press the bearing against the chassis side ready for soldering.”
Soldering of the centre bearings was duly completed, and the new Slaters’ wheels were fitted. No particular problems were experienced with refitting the coupling rods and valve gear since the original crankpins and return crank could be adapted to fit the new wheels. The not so dodgy Duchess is now ready for high speed testing on Evercreech New!
BR cab sides numbers and tender insignia will be added to replace the LMS ones she came with. Jim picked “City of Nottingham” as she was around to the end of the class so a good stable companion to his Black 5 and 8F. Photos of the whole loco to follow next month.
Zoom AGM today (Wednesday 12th May) with a new Chairman and Treasurer to be elected, and re-opening the clubhouse the following week to look forward to. Some of us have been very busy in the garden taking advantage of the dry weather, but still plenty to report on the model railway front this month.
There are quite a number of MTH Stanier coaches that run on The Summit/Evercreech New. Simon K discovered through the 0 Gauge Forum that someone was laser cutting windows to flush glaze them. He obtained a couple of sets and put them in one brake coach, with pics below showing the before and after. The flush glazing completely transforms these coaches though fitting them is a slight challenge as some windows seem to be a bit big and others slightly small.
Our Secretary Simon was keen that more 4mm stuff was included so below is a photograph of some wagon kits he has built recently, along with a very interesting Lego creation, apparently driven by an App on Simon’s phone. Lego clearly not what it used to be! 🙂
In the now really rather seasonally pleasant north, Dom has made a start on the Goods Shed cladding for Coombe Town, two walls of the main shed are now complete. He is detouring from the other two to build the exterior platform and cattle Dock before returning to the final two walls.
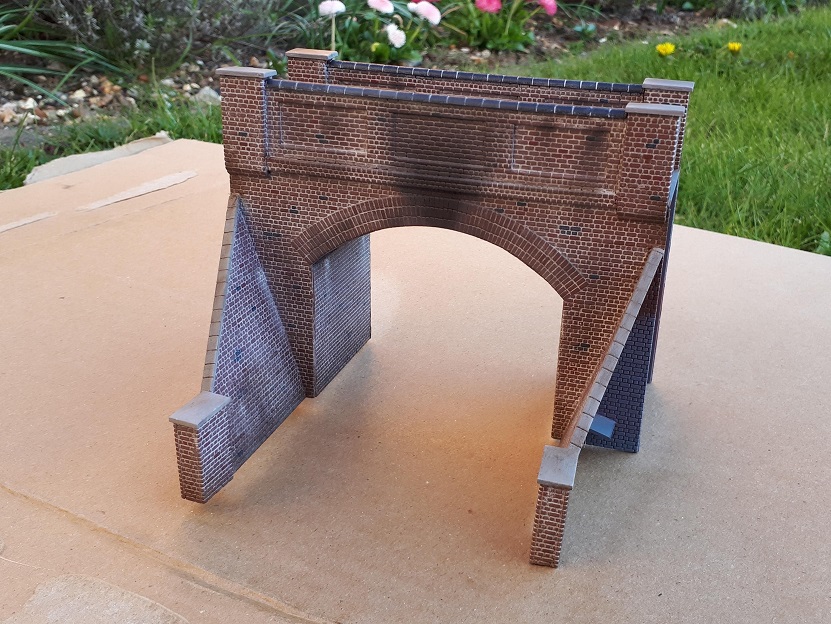
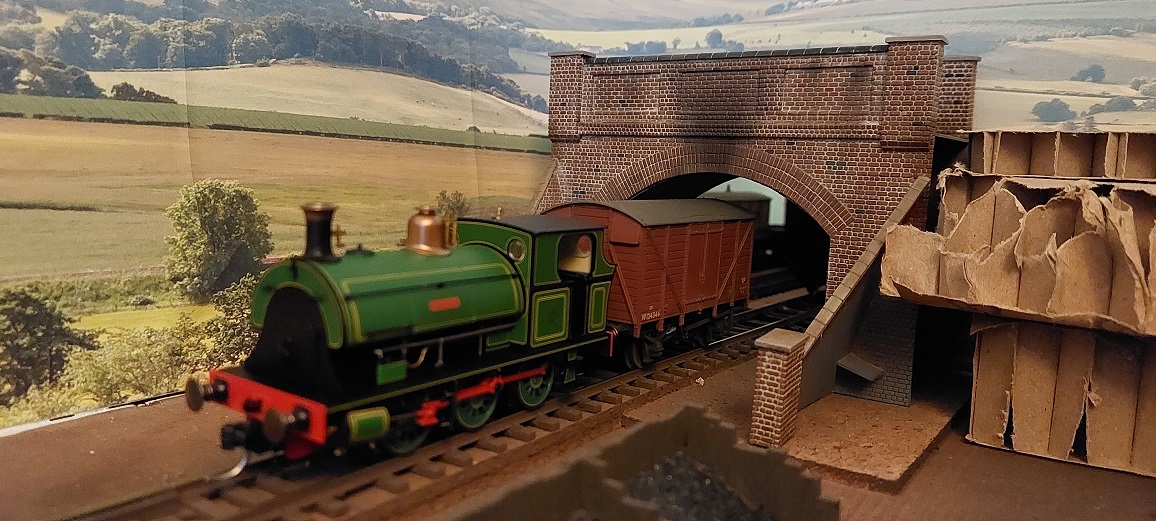
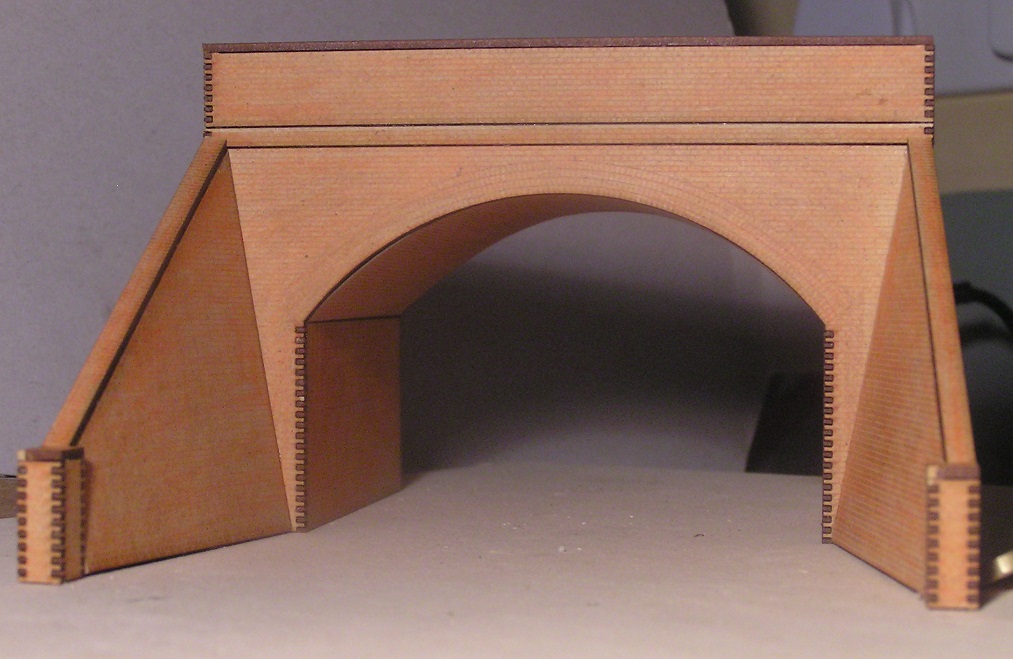
He has also got around to painting and weathering the Wills Brick bridge kit that forms the scenic break. Seen in the attached photo with my latest locomotive acquisition, the Bristol Port Authority Peckett. Although not GWR, the livery is exquisite and is a nice nod to his degree days spent in Bristol.
To continue the 4mm scale theme this is the lovely EM Gauge Claude Hamilton that John built around the time that he joined YMRG in 1984.
Back to 0 Gauge and John’s Claude Hamilton in 7mm will clearly have a live chassis, since two wheels have had some five amp fuse wire soldered across the backs of the treads, after being wrapped round the axil to short through the chassis thus saving a full set of pickups. This has to be done very quickly with a very clean large iron. NB. Slaters guarantee is now void! The etched balance weighs are stuck on with Araldite and they and the rims are chemically blackened
Also on the Claude the lubricator has now been piped up and fastened to a bracket fixed to the frames by a twelve BA screw and nut. I did it this way because so much else is soldered to the lubricator with different grades of solder and it is a solid brass casting which would be a perfect heat sink! This is a Ragstone product. The exquisite cast priming wheel will be removed until the loco is painted. Lacking a pipe and rod drawing I haven’t a clue where the pipes went and all the pictures I have show them in different places. As the lubricator is on the right-hand side of the loco and there isn’t one on the left-hand side it is obvious that some pipes go across the loco. Imagine having to repair one of those pipes between the smokebox and the slide bars. Steam engines ain’t romantic!
Dave H has not had much modelling time for the last two months, but is determined to finish at least two of the Shelf Queens before the summer. A start has been made on the two underframes for the 6 wheel coaches. Dave has adapted the Slaters parts from their GWR Siphon kit but using a separate brass frame – so far so good.
They will be finished with Slaters footboard supports and some old IKB parts for brake gear and axleboxes, and of course the buffers which Dave S is kindly 3D printing for him. Yes Dave H has shambled into the 21st C. at last! With some help he created a 3D drawing of the buffer housings, and we’ll see how they come out.
The first photo shows the frames so far – they use inside bearings on the Gibson wheelsets but they are quite free running nonetheless. The long spring rods are 1/2mm piano wire, and the centre wheelset slides from side to side while the outer trucks swivel on the pivots. It’s all a bit floppy but it works. They will go through all sorts of pointwork at breakneck speed without any extra weight, which is a good start. The second photo shows the buffer housing drawn using Fusion360.
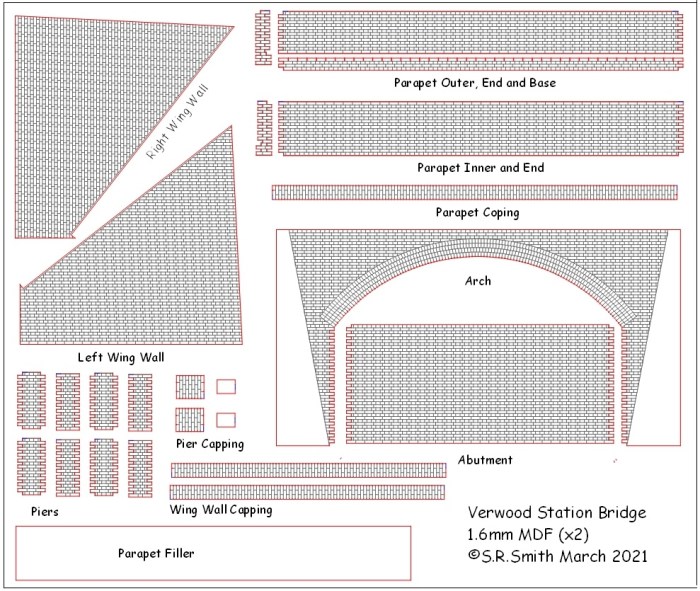
Back in 4mm scale the road bridge that carried the B3081 past Verwood Station was laser cut in Frome. It did not go well as the lasering software changed all the colours and line thicknesses. By the time the unfortunate operator had (unknown to me) ‘fixed’ the files – much intricate detail had been lost, and the brickwork only very lightly scribed! Anyway, the output from that exercise was test built to chase out as many bugs as possible. Just for effect it was (partially) coloured with pencil – and yes there were things to change and add! There remain some questions as to exactly what went on where the piers meet the wing walls which will only be resolved by examining the real thing which survives though now bypassed by the B3081 that surprisingly can be followed all the way from Ringwood to Prestleigh near Shepton Mallet.
A huge update on the Black Five just missed the cut for the March blog and saw the working chassis complete apart from the DCC Chip. The full story of the chassis is in Black Five Part 1, with the March update starting from the fitting of the ‘snot’ green brake hangers. One of the many highlights from this massive update is the bogie for the Black Five fitted with a design of deluxe side control picked up from Bob A.
And the finished job:
The chassis was then painted matt black and the inside red. What price those lovely 3D printed springs now!
Once painted it was just a matter of putting the valve gear back on and trying it out on his yard of O gauge track with little low speed control from my Hornby Dublo controller. [Ed] I would add a link to the video Dave made, but as is customary now the soundtrack is a little disturbing for Youtube. It does still run as well as it looks!
Dave S took a break after the chassis was primed and made a 2mm Fine Scale wagon chassis. He asked Jim if he could have a go at making one as he had a few to do. Satisfyingly fiddly.
Later in the month Dave S moved onto the body and this is covered in considerable detail in Black Five Part 2.
From this the very lovely cab:
April saw firebox, boiler and smokebox finished, and a trial fit could be made of the body on the chassis.
Before continuing further Dave S needs to sort out a DCC sound chip for the loco. The chip will need to be able to work the servo for the forward/reverse mechanism from a function key.
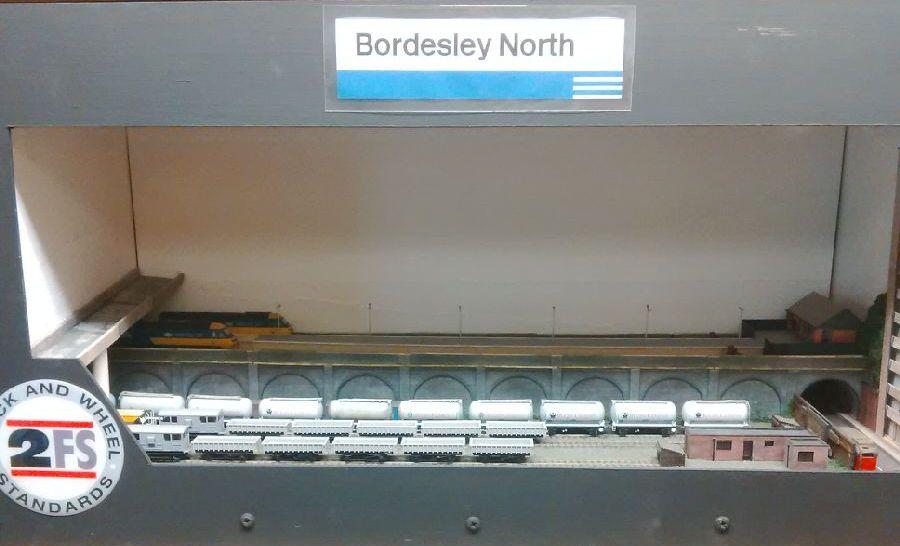
And finally, according to our only 2mm finescale modeller, the best scale left to last. The photograph below shows Jim’s “cameo layout” Bordesley North, which appeared in its first form at Railwells in 2019. On it are the 10 “Clam” ballast/spoil wagons, made from Parkside kits but on etched brass underframes (of which Dave S assembled one). Also lurking are two “Shark” ballast ploughs, which are N Gauge Society kits but again sitting on etched 2FS underframes. Only (!) painting and decals left to do, plus fine wire couplings.
The layout is due to appear at the 2mmFS Diamond Jubilee “Show within a Show” at Warley this November, delayed from 2020. However, before then, I need to install the backscene created from photographs I took of the Birmingham skyline and stitched together in Photoshop by Richard Doust (a member of the 2FS Kent & Essex Area Group). Also, a second board, depicting either the end of a Freightliner Terminal and/or a diesel depot, needs designing and building. This will be attached to the left end of the existing layout so there will be two separate cameos, fed by one central (cassette based) fiddle yard. Watch this space…
Much improved weather, and still considerable progress being made on members projects despite the increasing demands outside. Although still on target to re-open CS2 from May, our much delayed AGM will be held over Zoom in the next few weeks. A comprehensive agenda is being prepared that tradition now dictates will not include ‘Any Other Business’! On the model railway front Dave H has finished lining and lettering two of his shelf queens – our featured image above. Now they just need some undergear. Only five more to do – and the rest of those working ground signals for Evercreech New…
The resumption of garden train services this month must mean that much nicer weather is already here!
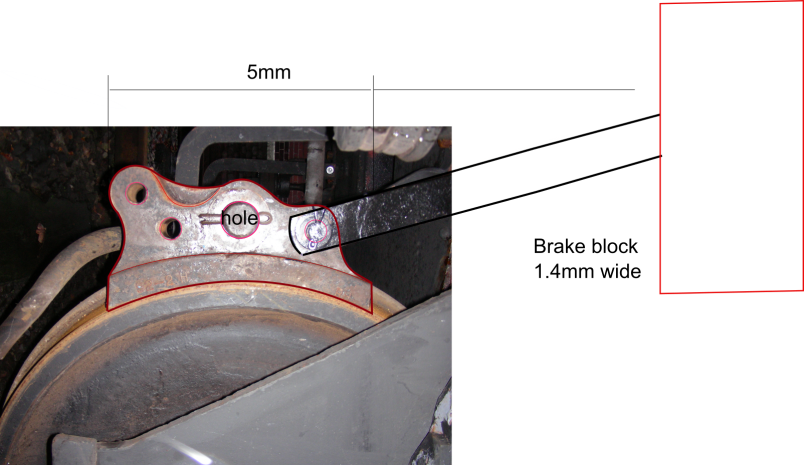
Last month mention was made of the Southern pillbox brake vans that Peter is building from Cambrian kits. As recorded then, with the ‘advantage’ of having access to the real thing, he was all too aware that the distinctive brake shoes needed were quite unlike any provided in the kit, so he took a photo of the real thing and traced it in a CAD package with the overall dimensions. This was turned into a 3D CAD model in OpenSCAD and an STL file produced, with Lychee being used to add the supports and produce the sliced file for the AnyCubic Photon 3D Printer. The final photo shows the very fragile brake shoes (insufficient material round the brake rod) fitted to the 15T version – a proper team effort and all in a month!
They say that a fool and his money are soon parted, so apparently that’s DaveS and Jim so far. Might there be others in YMRG? Anyway, at the York exhibition one year, 2018 we think, we were exhibiting St Martin’s Wharf for Bob. Jim spotted a small O gauge loco, a Fowler 2F dock tank, for less than £100 and bought it. DaveS bought a Pug at the same dealer, Agenoria. The dock tank was an incomplete model but had wheels and motor. Jim decided to move it on as he had done nothing with it in the intervening period. DaveS thought that it would make a useful addition for Gas Works and could get it working reasonably quickly, and so he bought it. Needless to say there has been substantial rework since then with Part 1 of this cautionary tale here.
The 7mm scale 16/3 Claude Hamilton appeared out of the blue last month and I at least hoped for more. The mechanical and electrical parts have been successfully completed and this will hopefully constitute a fuller Part 1 of the build in due course. It is, or rather was a Mallard kit, but it seems very few Mallard parts will find their way into the finished locomotive. Fine detailing has now commenced and more can be found in Part 2.
Covered in Part 2 this is the D16/3’s smokebox door finished and ready for eventual fixing. John had the whitemetal one that came with the Mallard kit. The master had obviously been lathe turned because the tool marks were still visible. Useless, so it will form part of the ballast in Simon’s ex WR toad. The other was picked up at some show and is a brass casting. Because he wanted the loco to have the attractive steel ring featured, and doesn’t like metallic paint he lightly tinned it. The number and shed plates are from Guilplates. If anyone has difficulty painting the white numbers, here is a useful dodge. Pick them out in white gloss paint being careful not to fill the voids of the noughts and sixes too deeply. Allow a couple of days for this paint to harden and then paint the whole plate black and while still wet drag the plate face down on a piece of paper which has to be on a hard surface. It works every time. [Ed] Easily tip of the month/year – possibly century!
In the seasonally less Grim North, Dom has managed to finish the work on the photo plank for the time being. Overall, he’s pretty happy with how it has turned out, getting the look of the road correct was definitely a challenge though. In time it will get ballast and he’ll produce the embankment on the other side
At Verwood the weighbridge hut has been taking shape. The window has proven particularly troublesome and this is the third attempt to get the right ‘look’, just 1mm taller/lower than the previous effort. There was a gap in the base underneath the window, presumably this was to do with the mechanism for the weighbridge platform which was directly in front of the hut. The colour is still a moot point. Two credible colour photographs (in that other objects seem to be the right sort of colour) show the Dorset Farmer’s Depot to be a light blue, one of those shows the weighbridge hut to be the same light blue. Not a colour associated with the Southern Region of BR, but that’s where we’re probably heading.
Progress has also been made on the Overbridge with the artwork ready for a test cut and build. The intention is that the brickwork of the prototype will be very accurately reproduced.
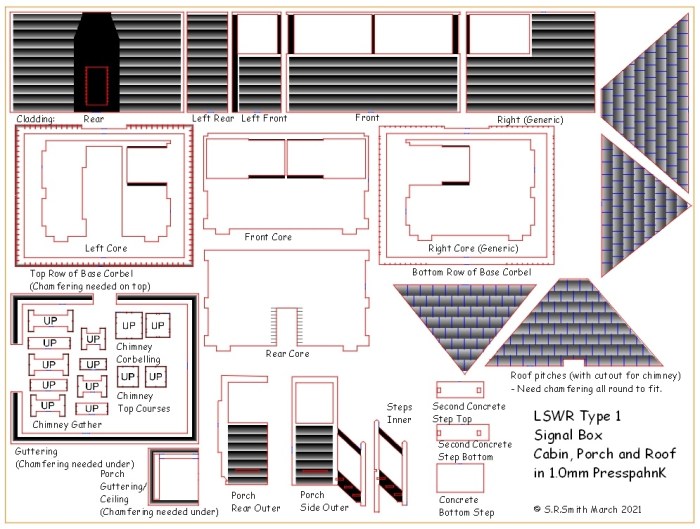
The signal box artwork has been laboriously converted from CorelDraw format to AutoCAD dxf format, and further changes made to upgrade it to bring it into line with the overbridge. Most of the changes involve improving the appearance of the toothed brick joints, and also removing any raster engraved thinning to try to cater for 1.0mm MDF that turned out to be 1.1mm. Dimensionally accurate 1.0mm PresspahnK board will be used instead.