Station Building
The station building has been constructed from Slaters plasticard and features a semi-modelled interior with an accurate room layout provided by Mark Warr’s Dad via Peter Russell. The building (though not the toilet extension) used bricks in a Flemish bond with dark grey headers, which is often seen on period buildings in the area. The sticky paper slate strips were laser cut for me, and as with the real thing it is vital that the rows of slates are set out carefully to keep things even and to arrive at the top in good shape for the ridge detail. Since the photos were taken, work on installing the structure to support the leadwork gutters that collected the water from the roof and canopy has started ready for the canopy to be fitted. Without accurate measurements for the building it was drawn up in CadRail with the 40′ plan and brick counting as a starting point and adjusted to fit the bonding on the Wills sheet until the proportions matched the photograph of the road frontage kindly provided by Howard Sprenger ahead of the publication of Nigel Bray’s book. This photo also showed the position of the ticket office window through the open front door as modelled here. The postbox was 3D printed the design being generated in OpenSCAD. It is such a satisfactory building that I am tempted to do it all over again as a laser cut kit without any compromise on the brickwork bonding!
Goods Shed
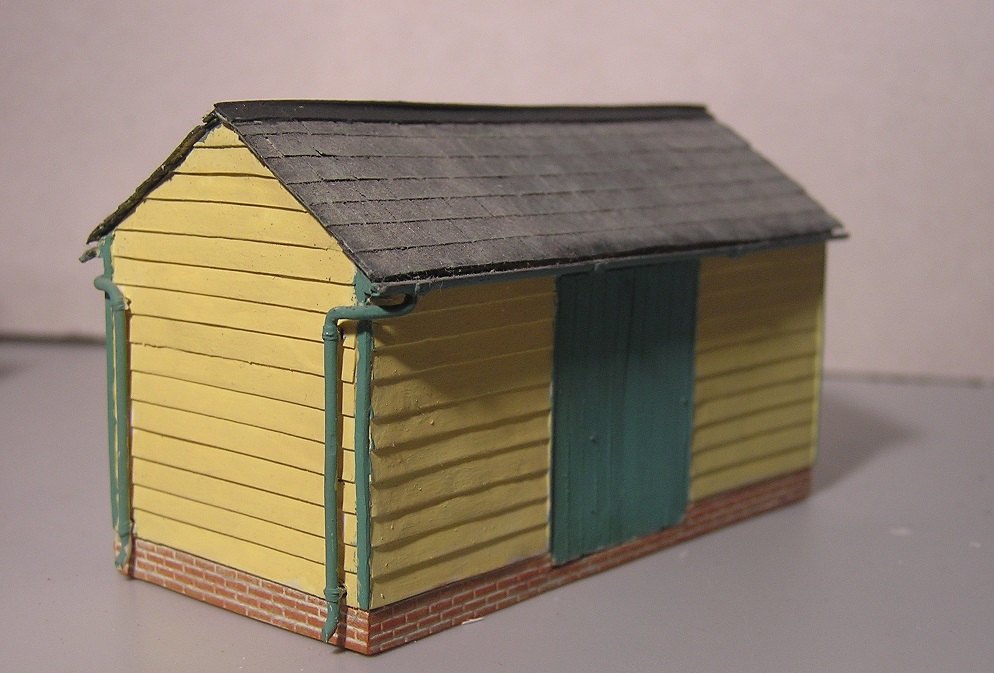
Constructed in Slaters Plastikard with copper downpipes and probably Wills guttering. With no dimensions or drawings available the 40′ plan, brick counting and guestimation ruled. This is the second attempt as the proportions of the first attempt looked wrong. As it pre-dates laser cutting I used hand cut strips of self adhesive label for the slates on the sagging roof as these were of a larger than normal size (Duchess 12″x24″) with a distinctive look as also used on the station building. Needs further weathering and a door knob on the other side where there was just a single door.
Signal Box
A LSWR Type 1 platform mounted signal box was provided at Verwood not very long after the line was opened. This was the very first building that I designed to be laser etched and cut. It has correctly bonded brickwork, with the chimney being based on the surviving box at Instow (thanks to Google Streetview). The initial version for this test build (it contains errors) uses multiple thicknesses of MDF and card, with ABS used to model the porch and steps. The painted version shown replaced all ABS with card and engraved MDF as it was found that the ABS did not laser very well. The slates on this version are 3D laser engraved to ease construction, and the wonky vent is 3D printed in resin. Verwood is likely to be unique in that the side of the box under the canopy was never weatherboarded and the characteristic cross framing of the signal box was just visible behind notice boards. This end has since been corrected so that the windows align with the framing which had four equal bays – obvious in hindsight! The 3D printed signal box sign is in an unstable resin so has warped, it’s too thick, and either slightly too long or the signal box slightly too small! In collaboration with James Hudson of DCC Train Automation who does the laser cutting it is intended to make this box available as a kit of parts with options to build a Verwood specific or a generic fully clad version.
Ground Frame Hut
Just off the West Moors end of the Down Platform was a Ground Frame (GF) with four levers. It was sheltered inside a corrugated iron hut that seems to have been unique to Verwood although Callington East GF had a completely open variation on the theme. The Ground Frame was released from the signal box; it operated the points at the West Moors end of the loop and controlled access to and from the goods yard. The Callington East GF shelter wasn’t painted inside so I will represent the Verwood interior the same way. The outside had faded to a sickly greenish hue (sort of a Brunswick Green) so was in the class of ironclad buildings in the vicinity of Southern stations that should be painted green unlike the lamp hut that had managed to acquire a coat of black bitumen first.
The model is a two layer sandwich of a thin corrugated plastic sheeting using epoxy resin as the filling to try to avoid warping through solvent abuse. It’s likely that this is (or was) a Slaters product. A representation of the internal framing was added since all photographs show the door ajar. For the rivet counters amongst you there are in fact four corrugations where there should be five, something I hadn’t twigged when I used it for the lamp hut. As this is an EM Gauge hut that can be lived with since suddenly it’s all about artistic effect. Plus there’s enough of the stuff left over for weighbridge hut and canopy roof.
The Knee Lever Frame inside was almost certainly a product of Stevens & Sons and will be 3D Modelled with a view to 3D printing it. There will be a very small copy of the GF diagram to go on the wall in front of it.
Down Platform Shelter
This was one of the first buildings attempted for Verwood. Also from plastikard it benefits from a fully modelled roof, with the timber cross beam calculated to be just about deep enough for the estimated load. The original weatherboard cladding used had distorted due to solvent action. This wobbly cladding was in .010″ plastic strip and it turns out wasn’t all that well attached so could be removed fairly easily. A design for internal and external cladding panels to exactly fit between the frames was quickly drawn up and was laser cut the next day by Dan at Frome Hardware. A type of phenolic card was used, and this was bonded to the thin plastic core using Roket Card Glue. The sides were tackled one at a time, being tightly clamped flat whilst the glue set up. Repairs to any damage from the cladding removal were completed and the guttering and downpipe added at the rear. A moment of inspiration came when sorting through my oddments box when it was realised that the foot of a bullhead rail was just the thing to reproduce the four curved brackets. Assuming that they were in fact all the same size, a little jig was made to set the holes accurately and the brackets bent by eye to clip into the holes. The pegs at each end being formed by filing down to a flat that could be bent at a right angle to go in the hole. With some trepidation a hair drier was used to set a slight sag on the roof. The shelter has been given a plain bench with waisted supports similar to some Victorian school benches.
Lamp Hut
Another Slaters plasticard building using their corrugated iron sheet which represents a 3″ pitch which is actually the norm. It’s waiting for the red and white notice on the door and the handle. I was quite relieved that the prototype had been bitumened at some point or the walls would also be green – that could be too much of a good thing. In reality the corrugated iron seems to be variously green, black and brown! The lamp room was clearly a later addition of a standard type found all along the Salisbury and Dorset and throughout the LSWR and was installed in the bank behind the down platform using a type of mass concrete retaining wall that was much favoured and quite possibly pioneered by LSWR. The door has since acquired the SR No Smoking sign and a convenient knob, but is still far too green.
Weighbridge Hut
Lurking at the back of the yard was a little corrugated weighbridge hut. Eventually sufficient images were tracked down to attempt a model. Modelled the old way in styrene and using the same slightly overscale corrugated iron as on the GF hut. There was a gap in the base under the window associated with the weighbridge mechanism, and to ease construction no evidence that guttering was provided. On this model the door is firmly shut and no attempt will be made to model the interior. An Instamatic photo provided by Tim Hale seemed to indicate that this hut and the Dorset Farmer’s Store behind it were painted light blue, and another apparently credible photo from Strathwood corroborated the colour of the DF Store as light blue. Both of these photos had been scanned and it now seems that this can impart a blue cast to the scanned image. Both images have been colour corrected by a friend who had experienced this with other scans and are much improved. It now seems that the hut was the same sort of grey as the yard crane or perhaps galvanised. The photo shows the third attempt at the window (1mm deeper) whose correct proportions proved elusive. The window was painted white, but only part of the door is shown in one B&W photo which shows it a darker shade so I’m plumping for a faded grey/green in line with the lamp hut.
Canopy
The columns for the canopy have been turned up in brass on my hand drill to get the fairly subtle taper. The interesting and if we’re honest hopelessly inadequately supported bracket for the canopy from the front wall of the building has been fabricated from brass using measurements from the one that survives at Breamore. The closeup of the canopy column at Verwood came via Pamlin Prints. The framing has been assembled from brass strip and work is progressing on the rafters and rooflight.
Yard Crane


It turns out that yard cranes on the LSWR are a very diverse bunch indeed with no typical LSWR type as such. Certainly the two cranes at Wimborne were of different designs that both differed from that at Verwood. A very grainy picture of the one at Tisbury shows it to be similar to the Verwood type and it is likely that the crane at Semley was also of the Tisbury and therefore Verwood type. As yard cranes go Verwood was quite well photographed although always incidentally. The photographs show a marked similarity to a very clear photograph of the yard crane at Crawley and it is from this crane that the basic proportions and layout have been taken although both safety guards and jib were of a completely different design. Another source for details has been the ex-LNWR crane at Conway.
The crane was at the back of the yard in front of the Dorset Farmers depot. It was mounted on a bank retained by a sleeper built wall which gave it additional lift. It is known that it was regularly used to load both logs and containers of finished furniture. All photographs show the crane neatly tethered. Since this loading bank was used as a vantage point for conventional railway photographs (containing trains) parts of it do appear in extreme closeup!
More information on my model of the crane here.
Loading Gauge
")

The-rail built loading gauge at Verwood is of a type similar to those found at Wimborne and West Moors. It seems to be an intermediate type produced between the more generally recognised standard timber and concrete types having some features of both. The model makes no use of modern techniques just basic fabrication. The model has the outside arms raised as per all photographs, and no attempt has been made to portray the operating mechanism with those super thin wires.
Signage
Specifically the two Running In boards and the Signal Box sign.
With no Font that matched the signs in both weight and style, the distinctive prototype lettering was traced in QCad (2D CAD) from a clear scaled bitmap image that had been imported. The 2D lettering trace was then extruded to form the lettering. I was also able to reproduce the style of framing used on the prototype and in the case of the running in boards print brackets on the back for the bullhead rail posts that supported it.
Fairly high up on the wall in the gloom under the canopy was what appears to an enamel station sign with light lettering on a dark background so presumably white on green, and that can just be printed out.
Post Box
The post box was originally on the platform and was moved to the station forecourt between the wars. There is one clear photo of it taken after heavy snow – so not that clear! The box can be seen to be long and thin (about 30″x10″) and the label placement is consistent with a box style that was used from Victoria through to George V. As it turns out a similar though slightly shorter box was found just down the road from where I live and this was used as my main reference for a 3D Model.
The post box was built into a brick column that fitted neatly between the windows to the Ladies Waiting Room. The detailing of the top follows the photo, and is probably necessary to tie the sides together.
WIP
List is decreasing, and notably the canopy remains in this category! A design for a laser cut set of parts for the overbridge is underway, with a successful test etch for the parapets complete.
To Do
The Albion, Station Master’s house (if included) and the timber hut for the coal merchant have yet to be started.
I intend to laser cut the platform faces and edging in MDF complete with toe holds and wonky brickwork.
Please feel free to comment.
