
My blue and grey 4TC arrived from Kernow this week and a splendid model it is too. Being delivered as 00 gauge it would have remained a rather strange ornament, so conversion to EM gauge ready for service on the YMRG South Junction layout was a priority so that the fun can start.
I have a special affection for 4TCs. As a teenager I travelled on these units in the 70’s and also observed them from the corner of the boating lake reserved for sailing model yachts in Poole Park. Heading towards Bournemouth the pushing Crompton would be taking a run at Parkstone Bank and very modern they seemed too. Something that I was less aware of is that they were a continuation of the Southern push-pull tradition and as a young child I remember seeing small black engines propelling their green coaches on the Old Road behind my grandfather’s nursery near Hayes Lane Crossing and thinking it a bit odd. The history of the 4TC units is well covered elsewhere and hopefully the following notes will help others to convert their sets to EM and possibly P4.
Collecting current via and running in metal bearings is a very sound approach that I would have liked to retain, therefore the first method tried was to move the wheels out on the stubs as suggested (I think) for the Bachmann 108. To do this I also had to thin the wheels and reduce the flanges. I do not have a lathe so this was accomplished in a hand drill with files. The wheels are plated brass so by now only the treads were plated. With the wheels gauged correctly (and at what I considered minimum width) the wheels fouled the collecting strip/bearing arms. I subsequently found that the Black Beetle EM wheelsets do the same so these collector strips will need to go for EM or P4 conversions.
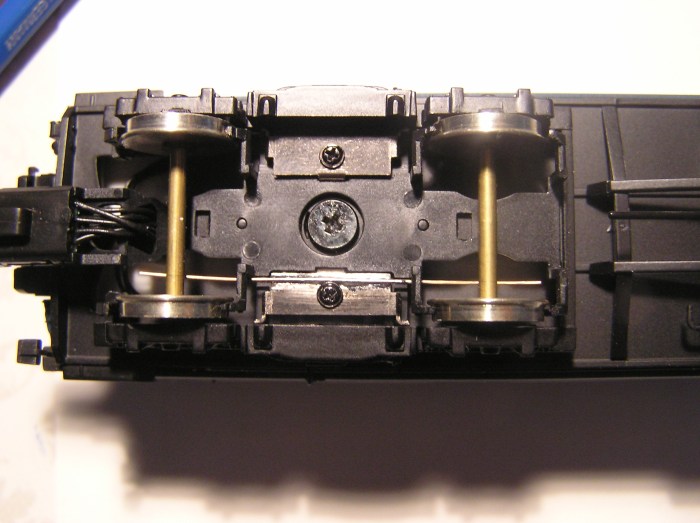
The final method adopted is the one that I also used for the Bachmann/Kernow Hampshire unit. Below is the converted bogies in the carriage. On top is the EM Black Beetle nickel silver wheelsets as sold by BranchLines (no connection except as a satisfied customer) and underneath a set of 4TC wheels spaced to EM gauge by inserting four Peco fibre washers one side of the muff and five the other. If anything the running qualities of the otherwise unmodified Bachmann wheels is slightly freer than the Black Beetles even though the resulting point to point length of the axles is slightly short of where it should be, and the back to back measurement is compromised by the thicker flanges. Note the extremely limited clearance on the Bachmann wheels!

First step is to remove the bogies from one of the coaches, then gently remove the wheelsets. Two of the brake shoes are fixed to the bogies, but although these should foul EM wheel sets I found that in practice they didn’t. The other six shoes are attached to a plastic unit that simply unclips. Finally the collector strips can be removed by undoing the tiny crosshead screws that hold them in place. A small magnetic crosshead screwdriver dramatically reduces the scope for disaster when handling these tiny steel screws. Put everything in a safe place for later. I converted one coach at a time to minimise the number of parts in circulation.
Wheelsets
For EM the Bachmann wheels can be spaced out with fibre washers four on one side of the plastic muff and five on the other side. With thick flanges the back-to-back will be under the EMGS standard, but the wheelsets will have the right amount of slack when set on the track. I suppose in this case it’s the root to root dimension that is critical. In my case I elected to go down the Black Beetle route, using 12mm wheels on standard length brass axles.
Bogies
Clearance is so tight that the pips that help to locate the collector strip on the bogie sides do need to be removed with a sharp knife, one for each wheel. The brake shoes that are permanently fixed to the bogie do not seem to foul EM wheelsets so required no attention, but see notes below.
Collector Strips
First job is to snip off the collector arms to give us the clearance that we need for near scale wheelsets.
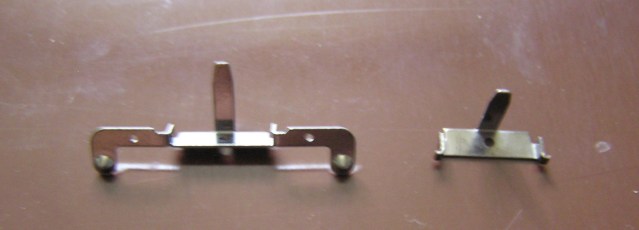
If current collection is required then one or both of the collector units needs the plating removed with a needle file on the inside edge ready to solder some straight lengths of wire to form current collection from the axles.

In my case I used 28 SWG phosphor bronze, but 0.45 mm brass would also work. With the Bachmann wheels pickup can be arranged from all wheels as before, with the Black Beetle wheels the axle is live to just one of the wheels so it is only possible to pick up from half of the wheels via the axle, so I elected to collect from both axles on just one side of each bogie. The wire needs to be bent up slightly so that it’s sprung against the axle once fitted.

Brake Shoe Assembly
This is the painful part. As supplied the brake shoes are aligned with the outside of the 00 gauge wheels which means that they foul wheels set to EM gauge, although not by as much as might be expected due to the 00 wheels being overscale thickness. The solution is to gain the clearance required in EM by thinning the brake shoe. The plastic used is extremely tough, and files will not touch it. However a really sharp scalpel blade is effective.

To get a consistent reduction of thickness I made myself a jig in .022″ nickel silver sheet that guided my cutting. The hole in the jig exactly fits and supports the brake shoe during the cutting operation, although once the initial cut is made I found that the cut can be worked on freehand out of the jig. The final vertical cut I also made in the jig so that I couldn’t inadvertently cut the front of the brake shoe off. It is critical that all of the brake shoe material above the jig is removed as the wheels will not rotate freely otherwise.

This method would not work for P4 as the clearance gained would be inadequate. I’d contemplate cutting sections of square brass tube and use these as a muff on the horizontal part of the brake arms to consistently align the brake shoes to the scale wheel location. It also seems to me that the middle shoes on the bogies are barely visible so perhaps could reasonably be discarded.
Assembly
First the current collectors need to be attached using those tiny screws making sure that each coach will be able to pick up on both sides (it’s neater OK). Did you remove those locator pips on the bogie sides? If not this is your last chance. Next task is to clip the brake shoe assembly in, and finally the wheels are fitted ensuring that the Black Beetle wheels have the bush on the opposite side of the bogie to the pickups (for consistency, to avoid errors and so it’s more obvious what’s going on). Replace bogies on coach making sure that the ends with guard irons are below the cabs.
Footnote
There’s probably scope for further thinning of the shoes and the three coaches on Black Beetle wheels don’t roll quite as well as the one coach now on Bachmann wheels, but the good performance of the Bachmann wheels is more of a positive really and makes me wonder if I should revert to Bachmann wheels and put the Black Beetle wheels into stock – if I can replace the four sets that I mutilated in my initial conversion attempt!
As far as testing is concerned South Junction had just been taken down as a practice for its visit to Taunton Railex 2017. Although immediately re-erected the track joints will have to be re-aligned before I can test my 4TC with it’s borrowed bagpipe fitted Crompton. This page will be updated if modifications are required following the test run.
I travelled on the penultimate train to Wimborne in 1977 and remember the last train leaving. It was an immaculate 4TC and I distinctly remember that the underframe and bogies were chocolate brown. So is it to be chocolate brown as per the last train to Wimborne or a weathered underframe so that no-one can tell?
Test Run
As promised the results of the test run on South Junction. Before the test run I was unable to fit a Kadee in the NEM coupling box as it is below normal height (the tail should be just above the rail head not grovelling in the ballast), so I dismantled one end to remove the Bachmann close coupling unit (a lot of tiny screws to get access under the PCB floor and to remove one of the retaining plates for the coupling unit) and then fitted a Kadee directly to the body.
Once on the layout, on attaching the last coach of the set, we got a dead short that went away, then intermittent shorts, and finally a dead short that was there to stay. Disconnecting the leading coach removed the short, so I checked the pins in the couplings and one of them was badly distorted (all scrunched up). I unclipped the cover from the coupling and did the best I could to straighten and then shape the faulty pin then replaced the cover checking that all looked well again. That fixed the short, but with eight pins in every coupling that won’t be the last time that happens…
Once the tail on the Kadee coupling was adjusted properly, running in push and pull mode was excellent with the close coupling units working extremely well as reported elsewhere. One of the coaches has a bit of a squeak, and there is still the suspicion that some of the converted coaches drag more than they should so I will be going through them again to see if I can improve matters further. It’s probably fair to say that the test run was a success once some very non-EM gauge related teething troubles had been resolved!
Nearly Six Months On…
Thanks to the ever helpful East Somerset Models my 4TC now has a Blue Heljan 33/1 to propel it. This loco has been converted to EM gauge using replacement wheelsets and the underframe has been super-detailed and sprung using the Penbits kit for the Class 33. It was whilst testing this loco that the issue of drag came up again and this caused the promised check through the unit to find what was still dragging and perhaps not surprisingly it was some of the unmodified glued in brake shoes at each end of each coaches that were the culprits. After much deliberation I decided that I needed some plastic brake shoes similar to the ones already fitted but in a new hole nearer the bogie frames. One of the original brake shoes was completely missing, and two of the wheel sets were clearly rubbing. The wheels are nearer 3′ diameter so wagon brake shoes seemed the way to go and I found that the Parkside PA35 LNER chassis kit (clasp brakes) would provide material for up to four axles, so this item was ordered from H&A Models and arrived a few days later. First job was to remove the old shoes completely ready to fit the new ones.

Above is the sprue with the brake shoes on, next to it is one of the affected bogies with the jig fabricated from two pieces of right angle brass used to make the necessary holes nearer to the bogie frame. The hole should probably have been 1.1mm but 1mm was too small and 1.2mm was the nearest bit size up that I had. The new brake shoes are cut from the plastic that joins them together and the square peg fastened in the round hole with the top of the peg just proud of the top of the bogie so that the base of the brake shoes all line up. Luckily superglue is pretty good at gap filling at these tolerances and a secure bond was made applying superglue top and bottom.


Above are a couple of shots from slightly different angles showing the replacement shoes in position. The pattern of brake shoe is not quite the same, but this is not visible even after I had picked out all of the brake shoes in brake dust colour. The main point is that all of the coaches now roll freely and I can concentrate on why the 33/1 is so sloooowww, but that is a long and complicated story for another day and absolutely not the fault of East Somerset Models who supplied a fine running model!
I have no connection with any of the suppliers mentioned except as a satisfied customer.
