First a reminder that The Summit is all set to be on show at Model Rail Scotland at the SEC, Glasgow over the weekend of Friday 21st to Sunday 23rd February (a three day show). This enormous 7mm Scale 0 Gauge scenic layout is based on the railway between Settle and Carlisle, requires a lorry and a large team to transport erect and operate it, and exhibiting The Summit is a major undertaking. It’s not unheard of for visiting locos to be given running rights, and our layout has been used at exhibitions to test locos before purchase. If you’re at the show please come along and say hello, and we’ll take it from there!
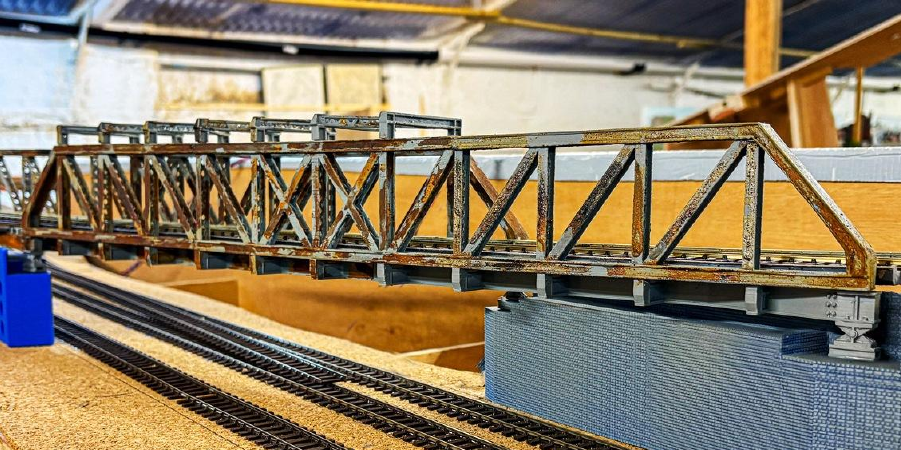
Over the past few months, Andrew has been working on the impressive flyover bridge for our 00 Gauge Heyno Junction club layout. The design was first created using CAD software, and the structure was divided into 12 sections for 3D filament printing. Once assembled, the bridge was painted grey, and Deluxe Materials’ Rust-It solution was used to give it a weathered, rusty appearance. To enhance its realism, further weathering is planned to make it look like it has stood the test of time. For the brick supports, he intends to clad the existing blocks with laser-cut plywood featuring a brick pattern, as the 3D CAD generated filament printed brickwork did not meet his expectations.


Allan has just finished this splendid 7mm model of the signal box at Cole in anticipation of his future layout of Cole station on the S&D which will replace Kingsferry in his railway shed.

It is constructed in card and Plastikard entirely from photographs as it was demolished when the line closed in 1966. It represents the signal box pre-nationalisation when the chimney was extant. It is finished in the brown and cream of the LMS parent company. Perhaps Allan was concerned that the Southern vivid green and cream would have shown up his collection of GWR engines in that dull browny-green so beloved of Swindon. A superb S&D model by an enthusiast for all things GWR – whatever next?!

2024 was a good year for 4mm scale Coombe Town as Dom managed to complete some major scenic projects including finishing the exterior of all the station buildings, adding the yard ground cover and building up the field in the front corner of the layout. All this has allowed him to start photographing some of the views he’s been aiming for the last five years, one of which is included here. 2025 will hopefully see the completion of major works with the road and Station Master’s house currently under construction, with the garden to follow to complete basic ground cover across the layout. Your editor reckons the overall look and that backscene are pure genius!

Simon K has completed the weathering of Alice for his 7mm scale NG Tynradd layout.

And Tynradd virtually complete – electrics to be finished and the buildings shown previously to be positioned in the far right corner. Anyone wondering about the name could just try reading it backwards…
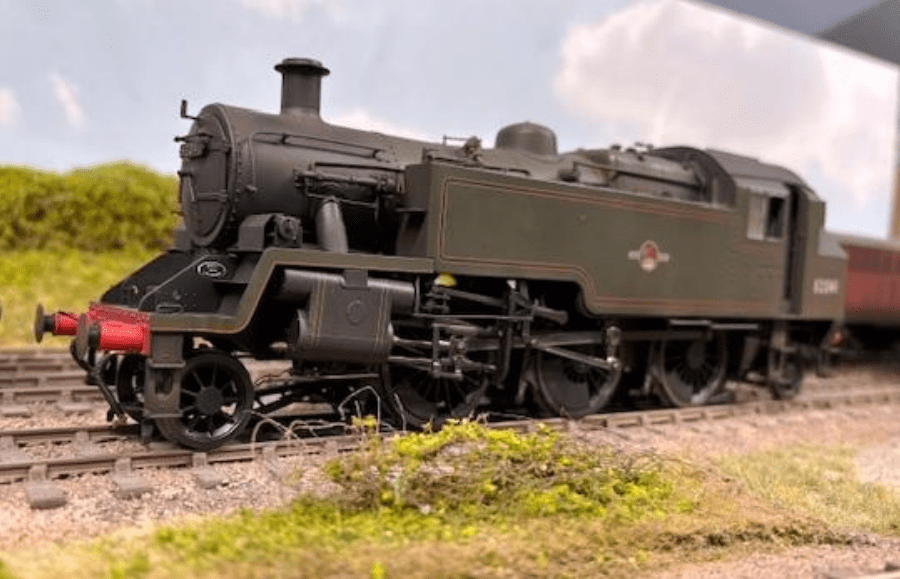
Also from Simon K, a picture of 82041 which was shedded at Bath GP so appropriate for S&D, but it and sister engines also ran on ex GW branches (such as that through Shepton) so OK for his little layout.

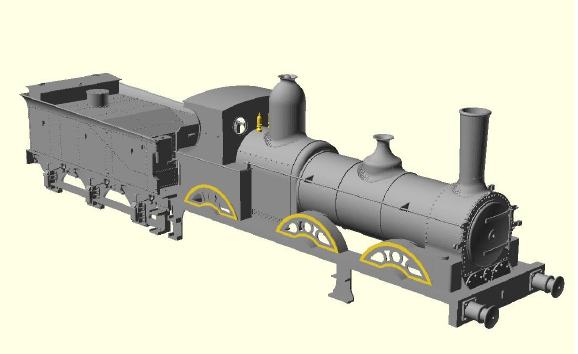
Dave H reports that City of Gloucester is coming along nicely – the picture shows the now running chassis. As designed the kit entombs the wheels and motor forever between the outside frames (a bit of a blind spot in an otherwise very good kit). He’s spent some time and bother making the outside frames detachable so that the wheels can come off for maintenance. It also needs special outside cranks made as the Slaters ones don’t work with GWR engines (the extended axles aren’t long enough). Luckily MOK supply some very good machined steel replacements originally developed for their Armstrong kit. The Slaters wheels are good – they screw onto threaded axles which is quite neat. The extended axles for the outside cranks have tiny squared ends to make sure the quartering is spot on.
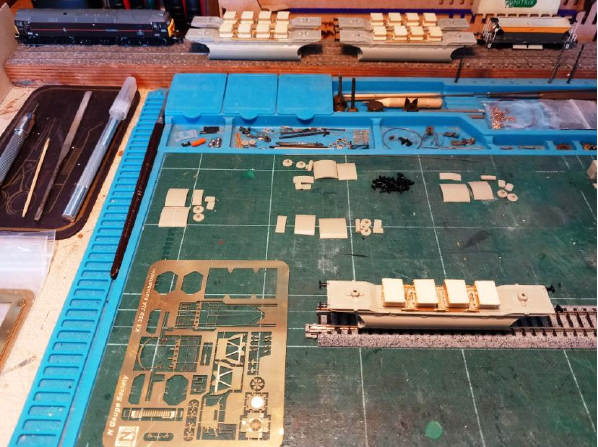
Jim has been working away at constructing a train of 10 autoballaster wagons in 2mm Scale. They are N Gauge Society kits which will have 2mm finescale wheels installed at the last stage – not a straight-forward kit with a sheaf of very delicate etches. The first batch of five have brass etches but the second batch, yet to be started, have stainless steel etches so they may be a little more durable. Below is a picture of the prototype:

Missing so far from Steve’s putative recreation of the Downton Train Crash of 1884 is the Lion Class pilot engine Stour of 1869. So over the Christmas Holiday options were explored for modelling this Nine Elms built contemporary of the more well known Beyer Peacock built Double Framed Goods. This process turned out to be slippery slope. There were over forty examples of the class, and there are photos of a subset of these engines in Bradley, but none of Stour. The only drawing available was from the Locomotive Magazine from 1933 published in Mike Sharman’s collection of drawings. This is only a side view, but it was scanned, scaled and traced in QCAD and a start was made on developing plan, front and rear elevations from the very few known dimensions.
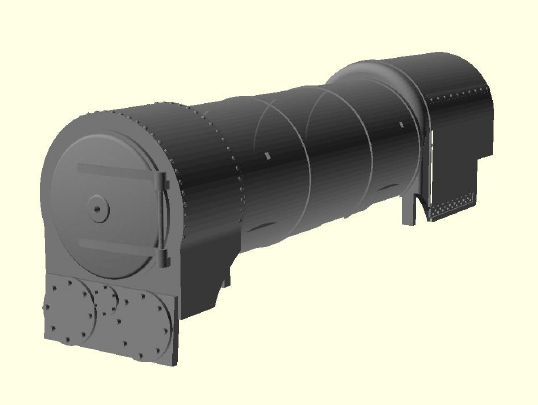

Slithering over the crest of that slippery slope, the boiler unit was modelled in OpenSCAD with a view to 3D printing it. The boiler then needed a backhead, and it needed to be a double firebox one as the Lion Class received the final development of them. The only drawing in Bradley was of 7′ 2-4-0 Clyde of similar vintage, but once traced it was found to fit inside the Lion Class cab like a glove. This is also the backhead that the crude example in the K’s kit was clearly supposed to represent so this will be an upgrade for Vesuvius Class 294.
How to make the rest of this somewhat peculiar little loco though? Chemical Etching seemed the way forward for cab, splashers, running plate etc., so the sorts of etched shapes needed were mocked up and a start made on assembling them around the boiler and smokebox unit. This allowed Steve to pose his 3D model against photographs allowing adjustment of the jigsaw puzzle of etched parts to improve the proportions, and confirm fit of the different components. There was now the boiler unit (and backhead), sitting on a reasonable looking running plate with the filigreed splashers and fitted with an Adams’ cab. To robustly model the ‘face’ a half etched smokebox surround was drawn up to also represent the handrail brackets and lamp irons, with the fastenings for those to be pushed through from the back. The smokebox door and hinges, will be 3D printed as will the sandboxes and buffer beam. There’s a gap behind the huge wooden buffer beam on the prototype for access to the cylinder covers, and the cylinder block is clearly angled to align with the crank axle.
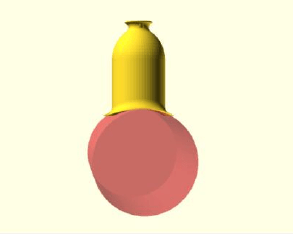
Adams’ stove pipe chimneys are available commercially so not a problem to obtain, but Steve is not aware of any source for those distinctive Beattie domes. As has been mentioned earlier in the thread, OpenSCAD has no tools to flare one cylinder into another, but conceptually rolling a ball round the junction of the two cylinders must just be a matter of some convoluted trigonometry. This needed to be a generic capability so the boiler and dome size and the required flare were all parameterised. Segments of flare were hung round the dome and the correct height of each segment calculated using somewhat rusty trigonometry so that the corner sat at the junction of the two cylinders as shown above. As can be seen this didn’t completely reproduce the ‘ball rolling round the junction’ effect that was required.

Having an engineering background rather than being a mathematician Steve resorted to a more empirical approach to resolve this problem by adding a ‘fudge factor’ (in this case 1.55) for the vertical axis that can be adjusted to further drop the curve of the flare in the correct position for the two cylinders. This left a bit sticking out each side of the ‘saddle’ and this was removed by an intersection operation with an elipse of a ratio of a second fudge factor (in this case 0.95). No doubt a mathematician could come up with a suitable formula for these two crucial values, but that’s something for another day. For Stour and 294 these domes would have been painted, so they will be printed in positon on the boiler, though hollowed out for resin drainage and for weight to be added.
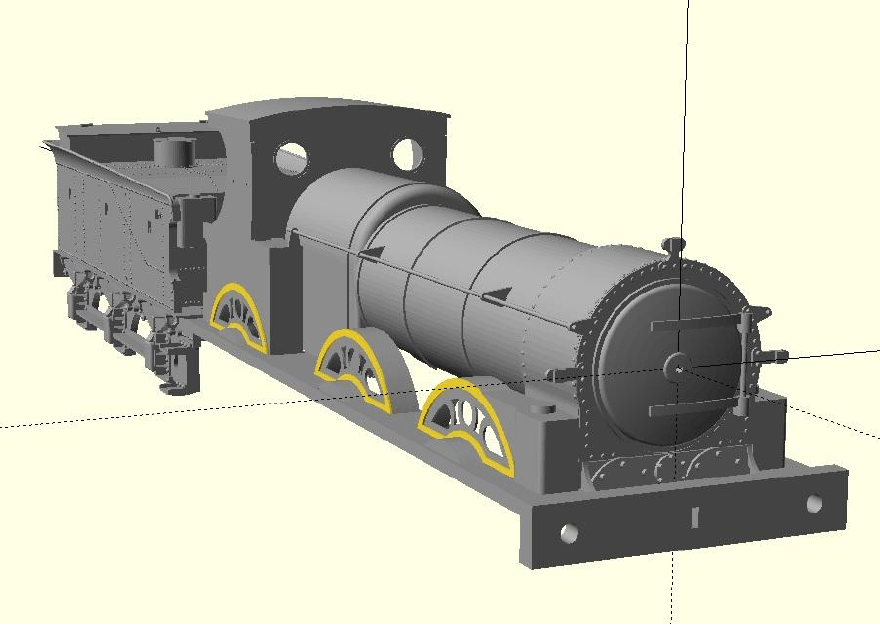
This is the loco attached to the tender. The dragbeam (and running plate) is currently a scale 6’6″ wide and that seems very narrow. The running plate is visibly 6″ narrower than the bufferbeam, that in itself is about the same width as the Beattie tender buffer beam. Photographs confirm that the loco was narrower than its tender but by this much? The Stour of 1884 would have had a sort of pressed steel looking Beattie cab, and the CAD for that will be more cardboard based to try to confirm what an etch for that should look like.
Steve likens his approach to scratchbuilding in CAD rather than commercial kit development allowing a less rigorous approach to be taken to the design. His model will be 4mm scale EM Gauge, but a couple of friends might build ones in 00 and P4 Gauges. The use of 0.4mm sheet for 4mm scale etches might enable models in S or 7mm scales using proportionately thicker etched material with the 3D printed parts scaled up, but his own model of Stour in 4mm scale remains the main objective.
