February 2022

February 2022

Last month “Evercreech New” was dismantled and the track and rear scenic boards of “The Summit” were re-erected in its place. However, the board containing Prestleigh Viaduct was deliberately left accessible so more scenic work could be carried out on it. How prescient was that! Out of the blue, we were invited to take “Evercreech New” to an exhibition at the Bath and West Showground in early April. The main purpose of this exhibition is to show off “Heaton Lodge Junction”, a huge 7mm scale model of said place, which is north east of Huddersfield in West Yorkshire. However, unlike its first solo outing in Wakefield last December, the owner Simon George has decided to show it with other layouts. Given the venue, a mainly S&D theme was chosen. Consequently, Evercreech New will be there, along with a superb 4mm rendition of Bournemouth West, other layouts and well known model traders.

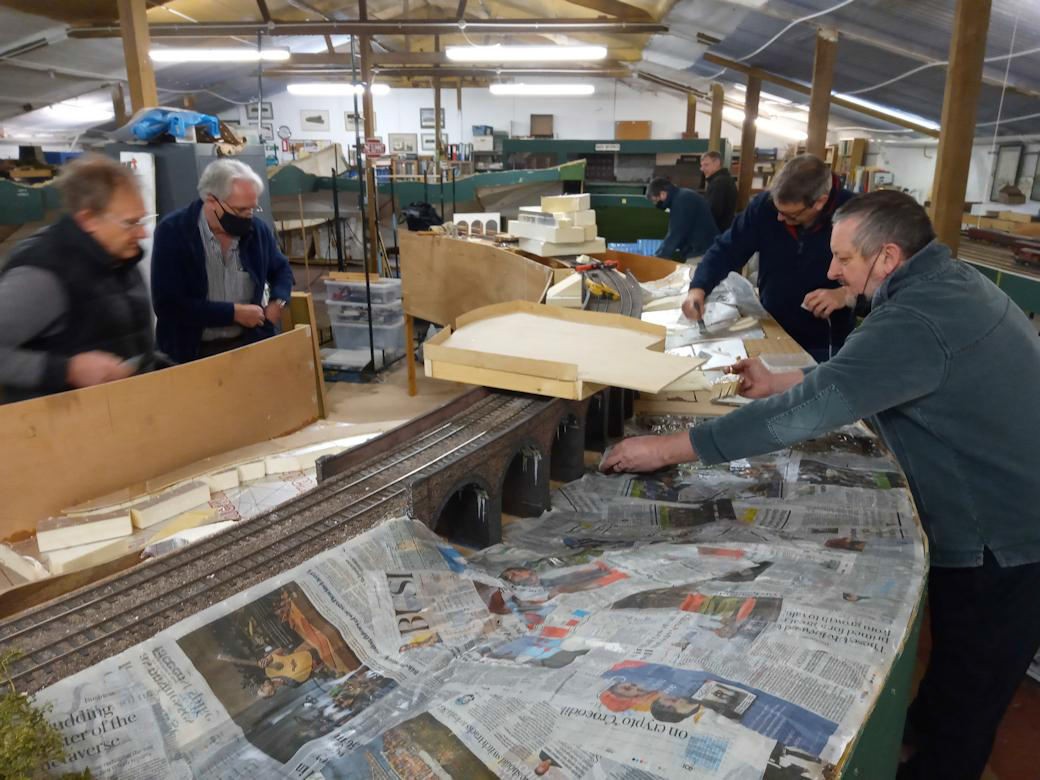
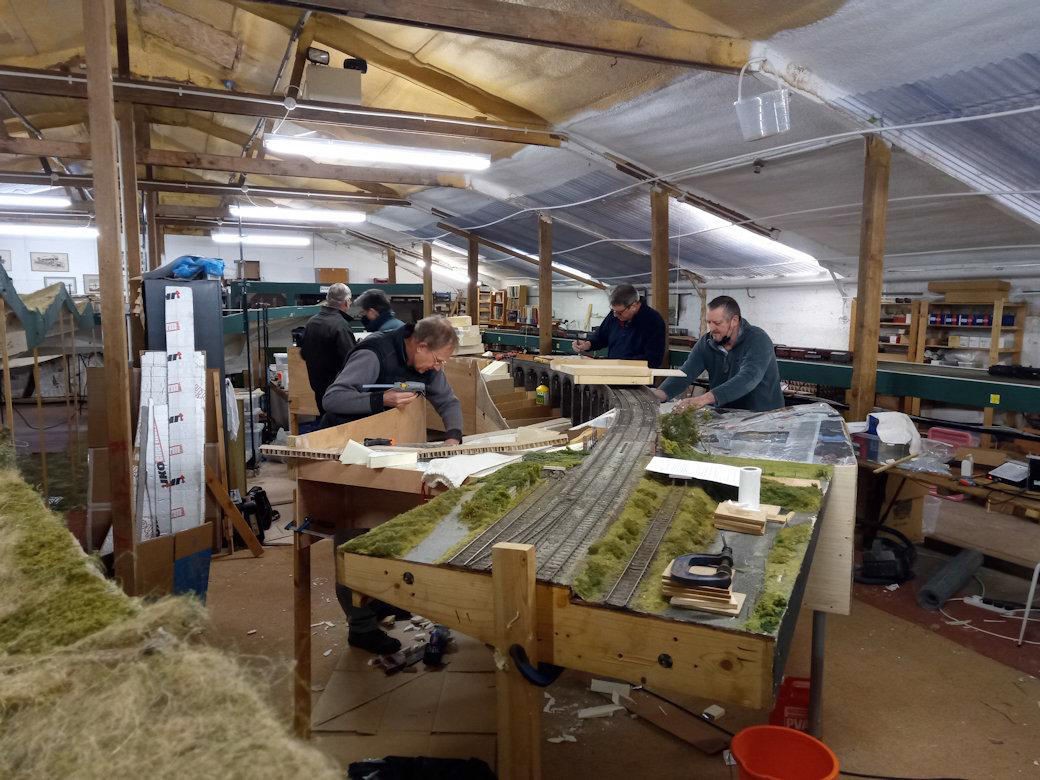
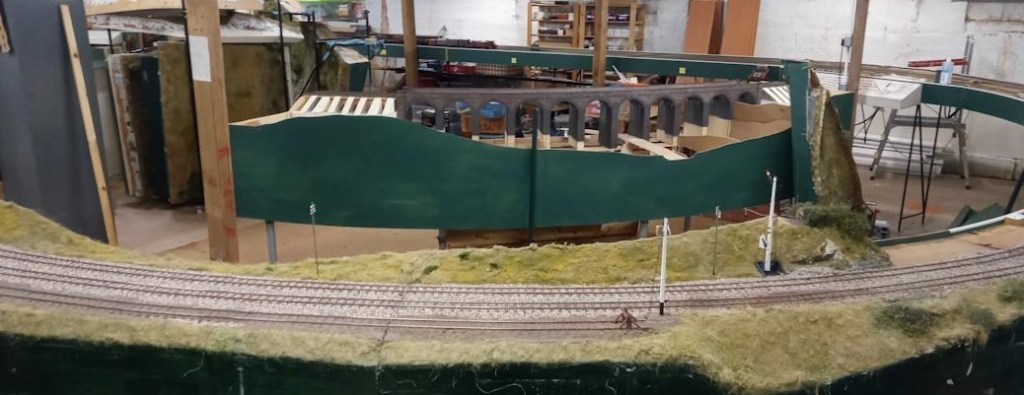
The scenic work on Prestleigh Viaduct has gone into overdrive, with only five weeks or so to the (three day) show. Good old fashioned papier-mache ,chicken wire and cardboard is coming to the fore and lots of old newspaper being gobbled up in the process. It’s a team effort with everyone mucking in. The Holly Junction gang will be majoring in grass and hedges, Allan on the farm module, Pete C on running repairs to existing scenery and miles of fencing, snd Rob G is doing the huge backscene boards. Ed, Dean, Christopher, Konrad and others will produce the vital scenic substructure, Steve a model of Normans’ Bridge which will mask the fiddle yard entry, Keith will look over the pointwork, and Dave S will make sure we have all the necessary DCC equipment lined up and ready. Given our scenic ambitions for Prestleigh Viaduct, we are unlikely to have time for a test run before the exhibition, but then we do have a whole day before the show to set up and get it all working again.

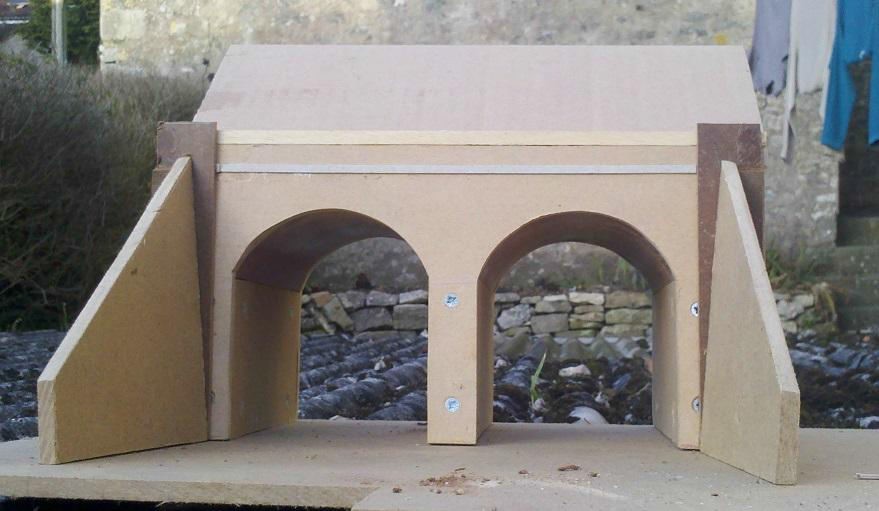
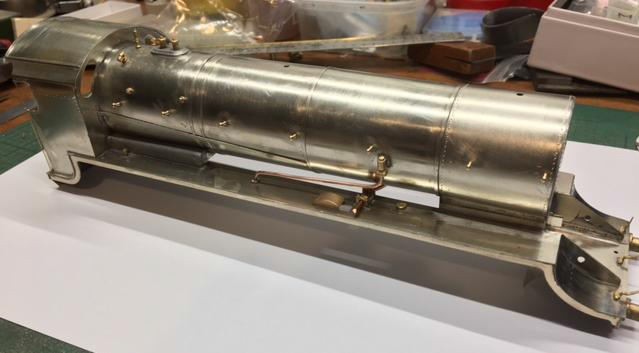
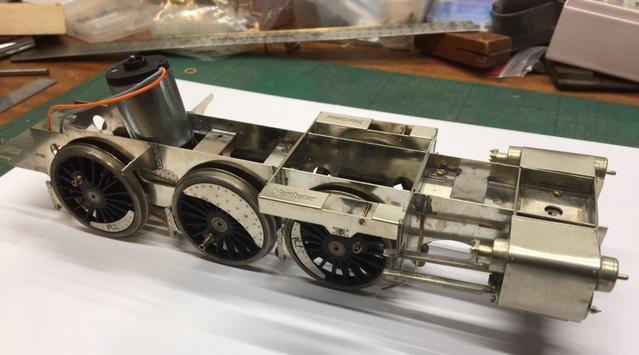
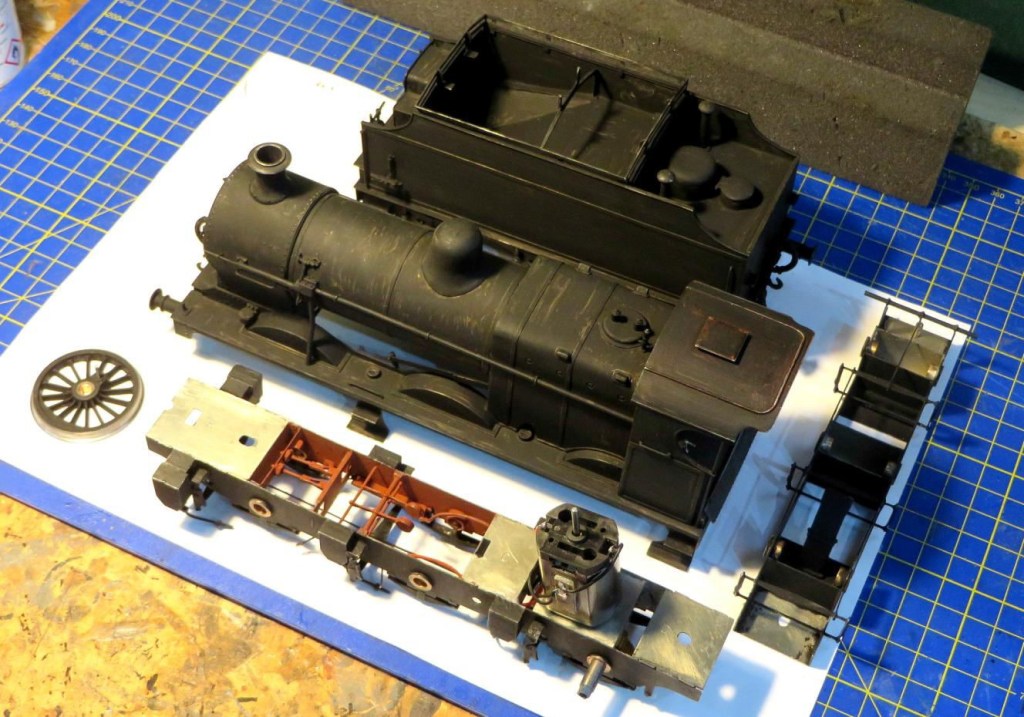
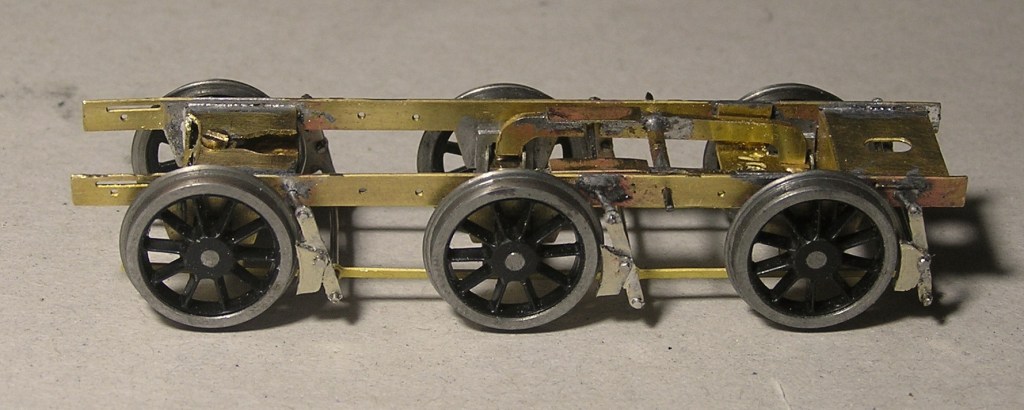
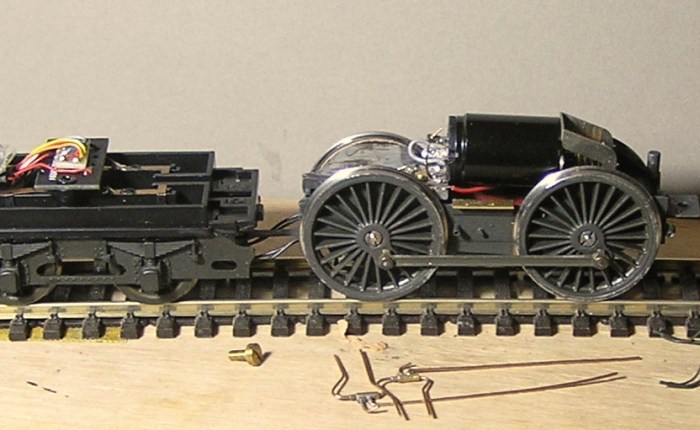
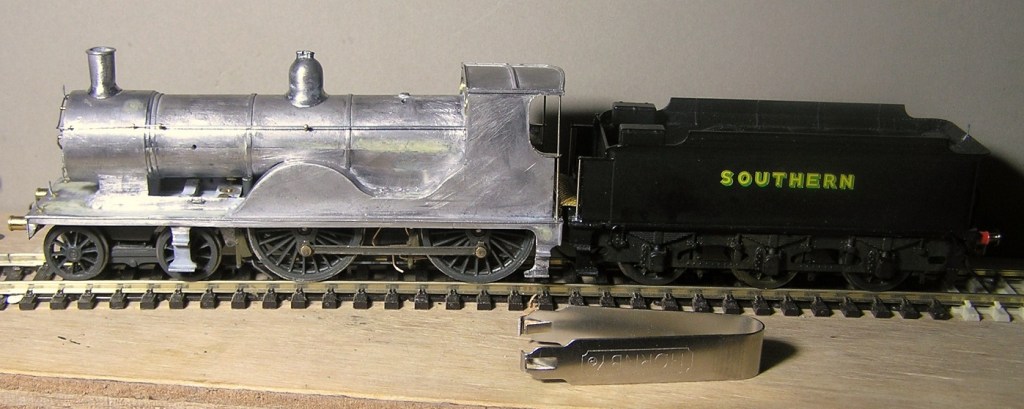
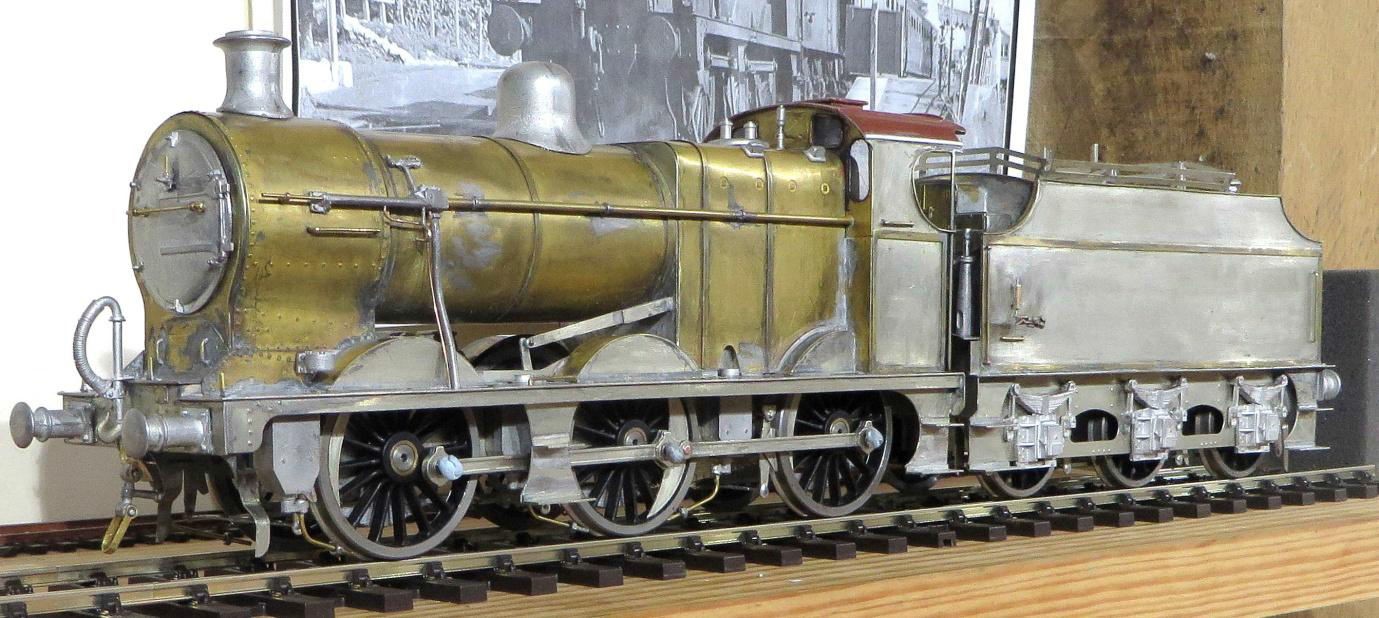
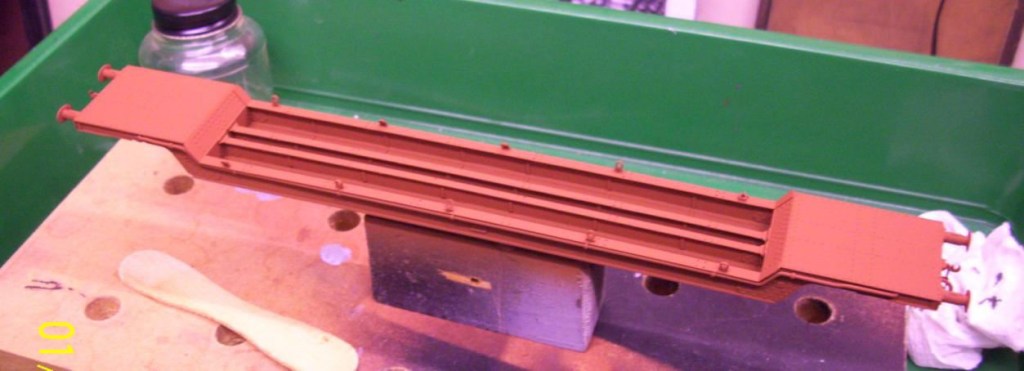
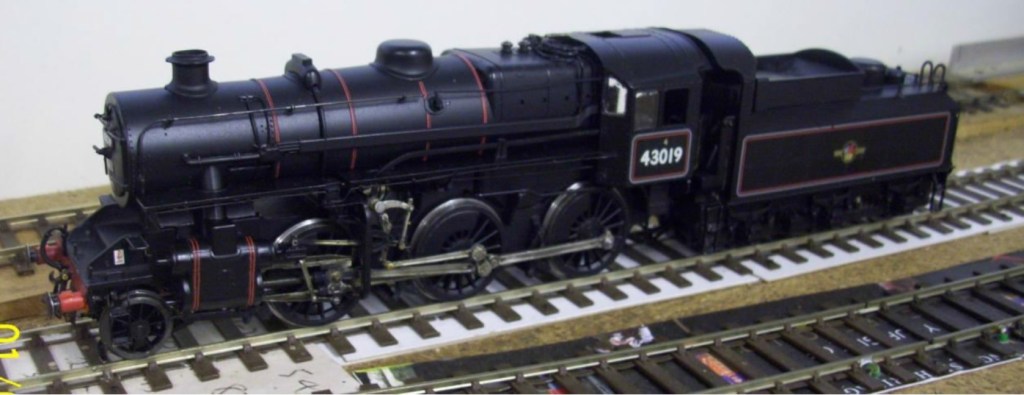
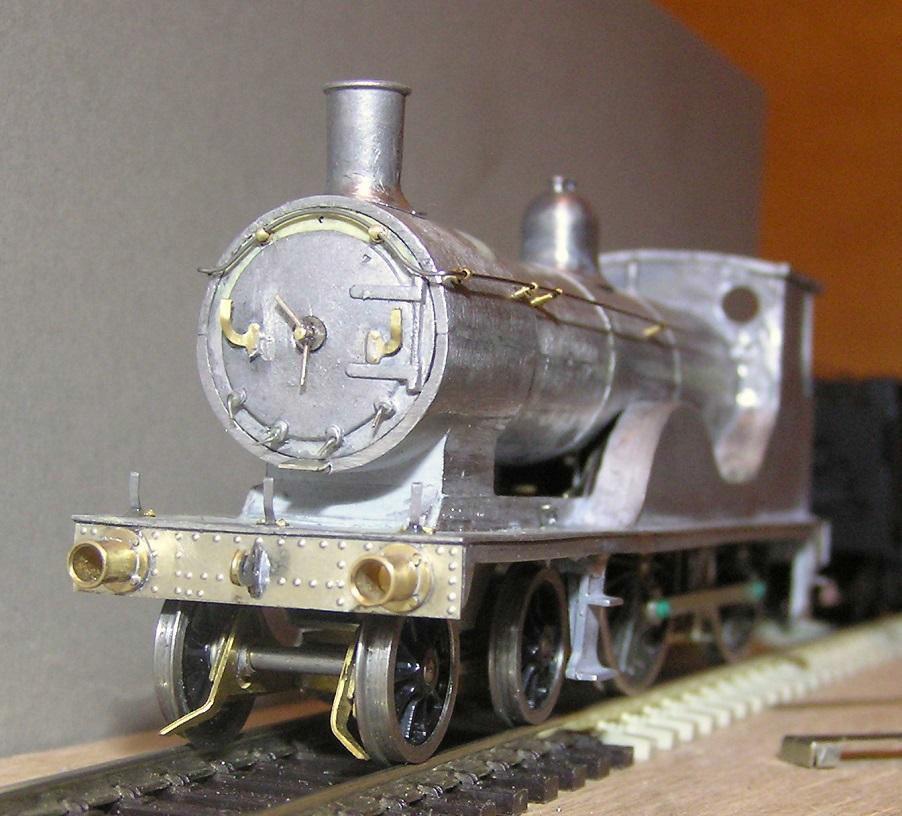
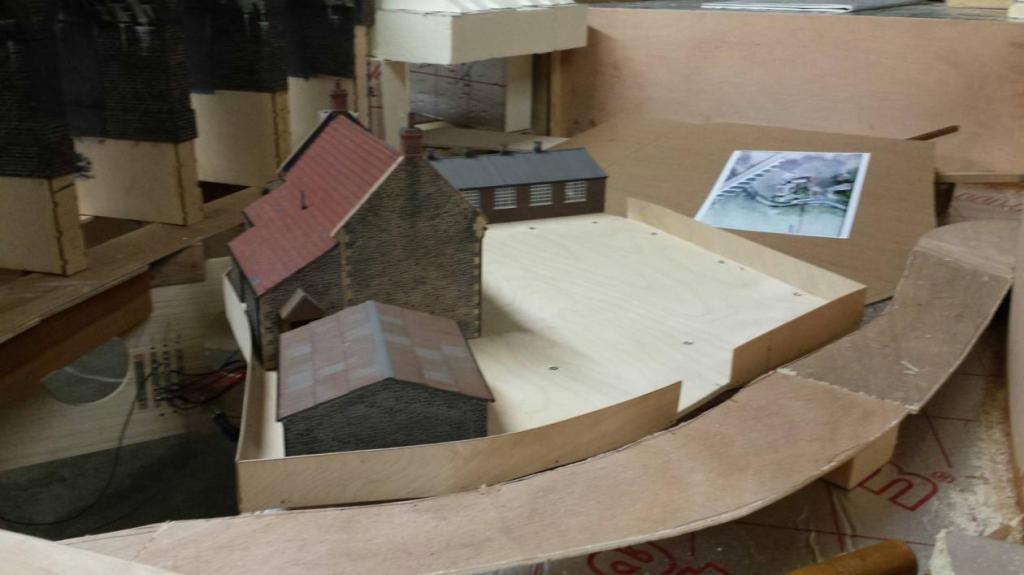
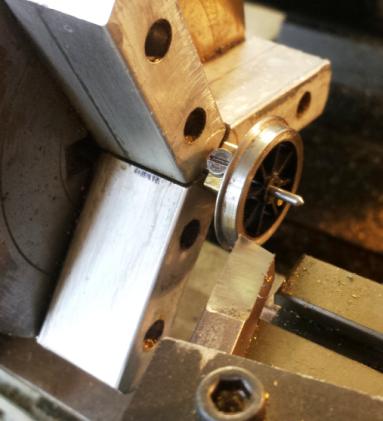
The exit to the fiddle yard will be the twin portal Normans’ Bridge a substantial structure some 60′ long, so on the way to being a tunnel. The first overbridge north (Whitstone Lane) was not typically S&D so the next one along was chosen, the left portal being added when the line was doubled. The Normans are the local farmers who still farm the land around the cutting that they filled in, and live nearby. Your editor likes to imagine that there continues to be an army of them (hence Normans’). Farmer Norman at the time the bridge was built insisted that a six foot high solid wooden fence should be built along the top of the bridge embankment to stop his cattle having ‘kittens’ at the sight of the trains, and the fence was there right to the end. The mostly MDF carcass that Steve has made is pictured above. Clearances on the S&D were quite tight, so a test was carried out to check that the tall chimneys on our 7F 2-8-0s will not get chopped off by this unforgiving structure.

Dave Haines has started making some trees, using twisted wire and sisal string to thicken it up, coated with PVA/Polyfilla mix and painted with acrylics – mostly burned umber, greys and green. They represent trees about 60 feet high:

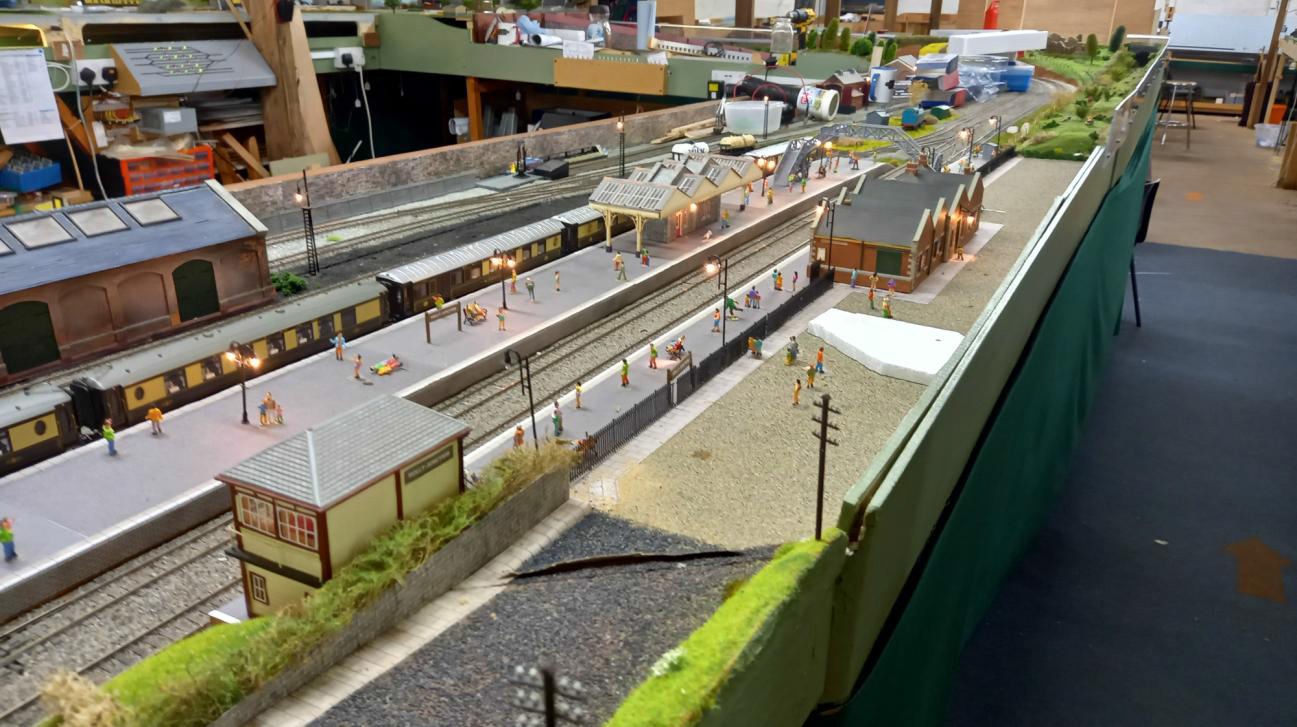
Next up some pictures of Holly Junction.  Never let it be said that the Gang of Four ever waste any baseboard space – it is action everywhere, usually with lights on - great fun!

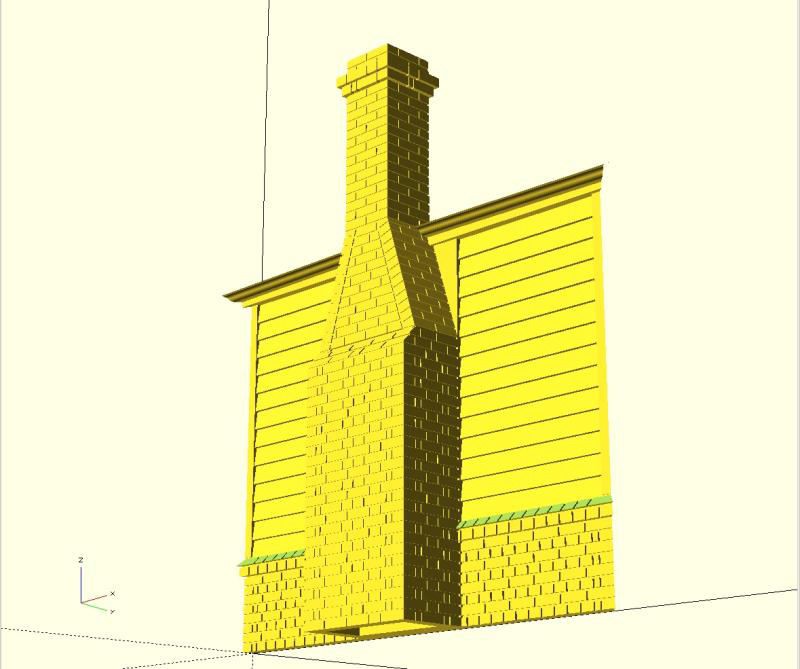
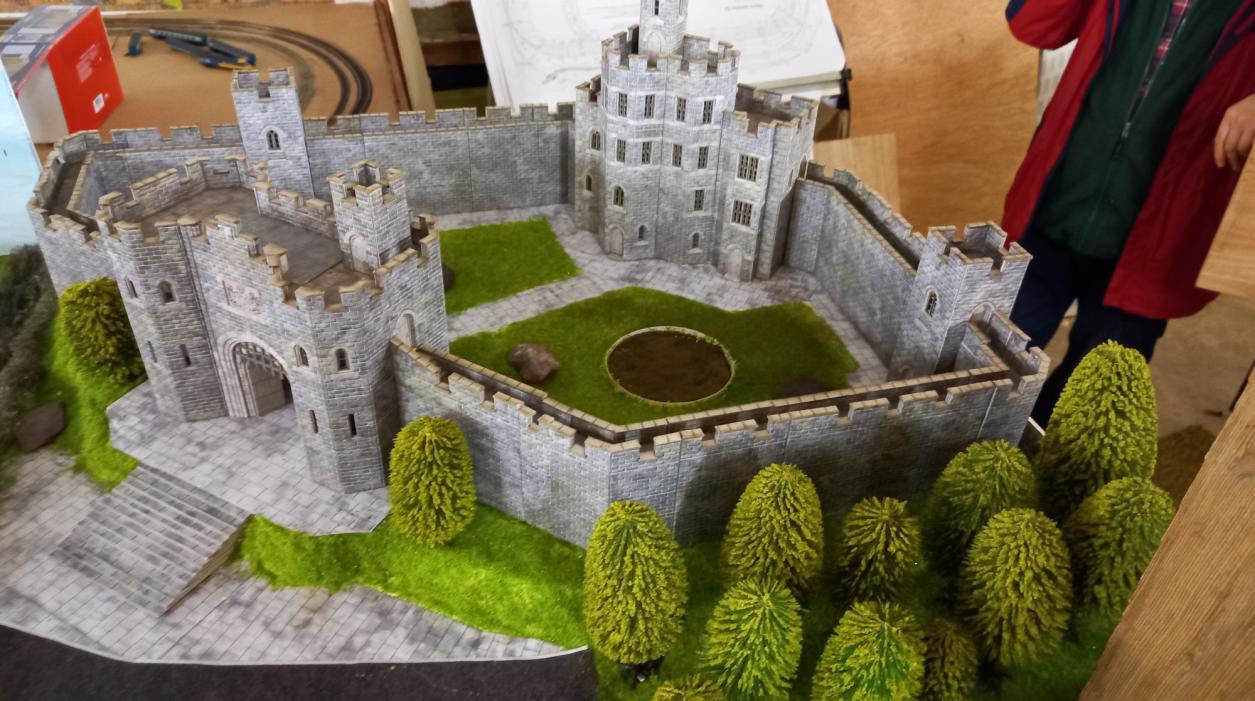
This castle is spectacular – all railway layouts should have one!

Jim’s 2mm finescale “working diorama” is due to appear at the Warley Show in late November as part of the belated Diamond Jubilee celebrations of the 2mm Scale Association – it was formed in 1960. They have their own event at the Derby Conference Centre in June, but Warley MRC offered them a “show within a show” by inviting some of the best 2mm layouts around. As Jim says “Somehow they even included mine!”

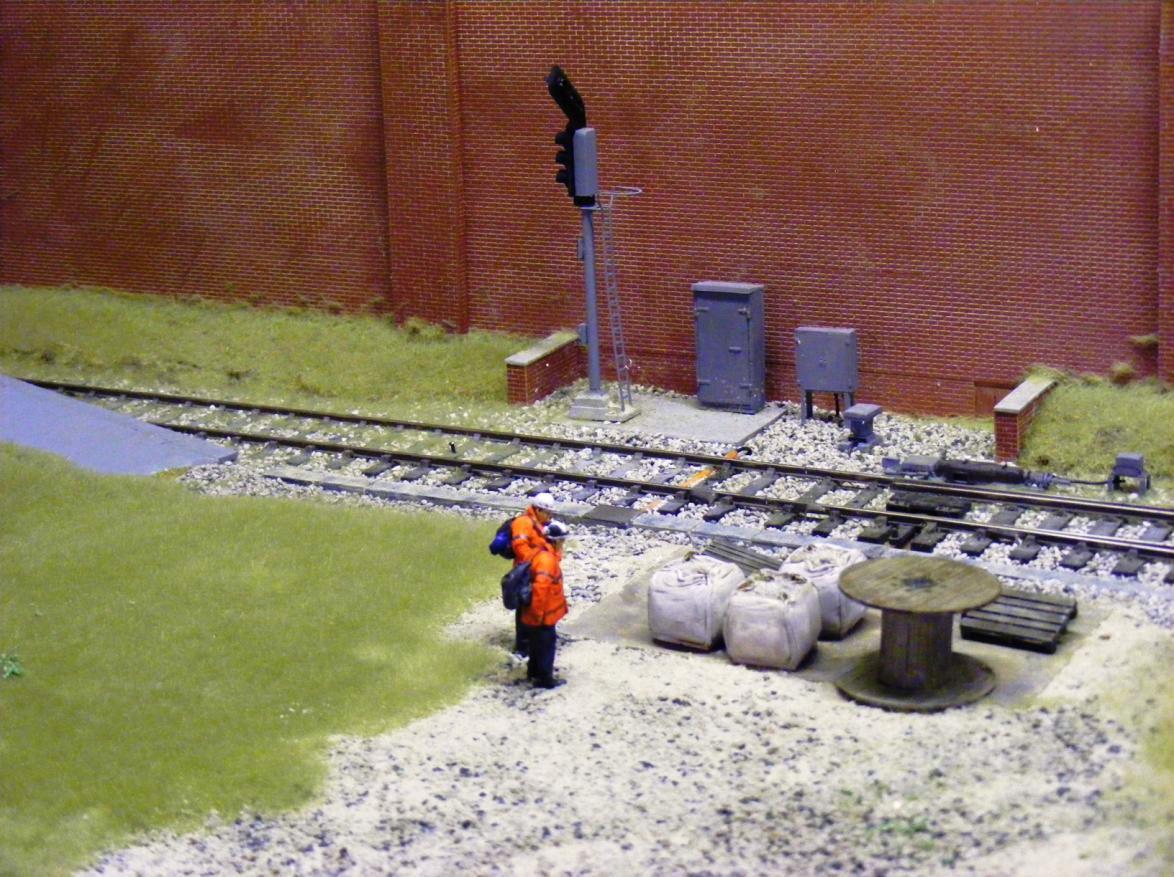
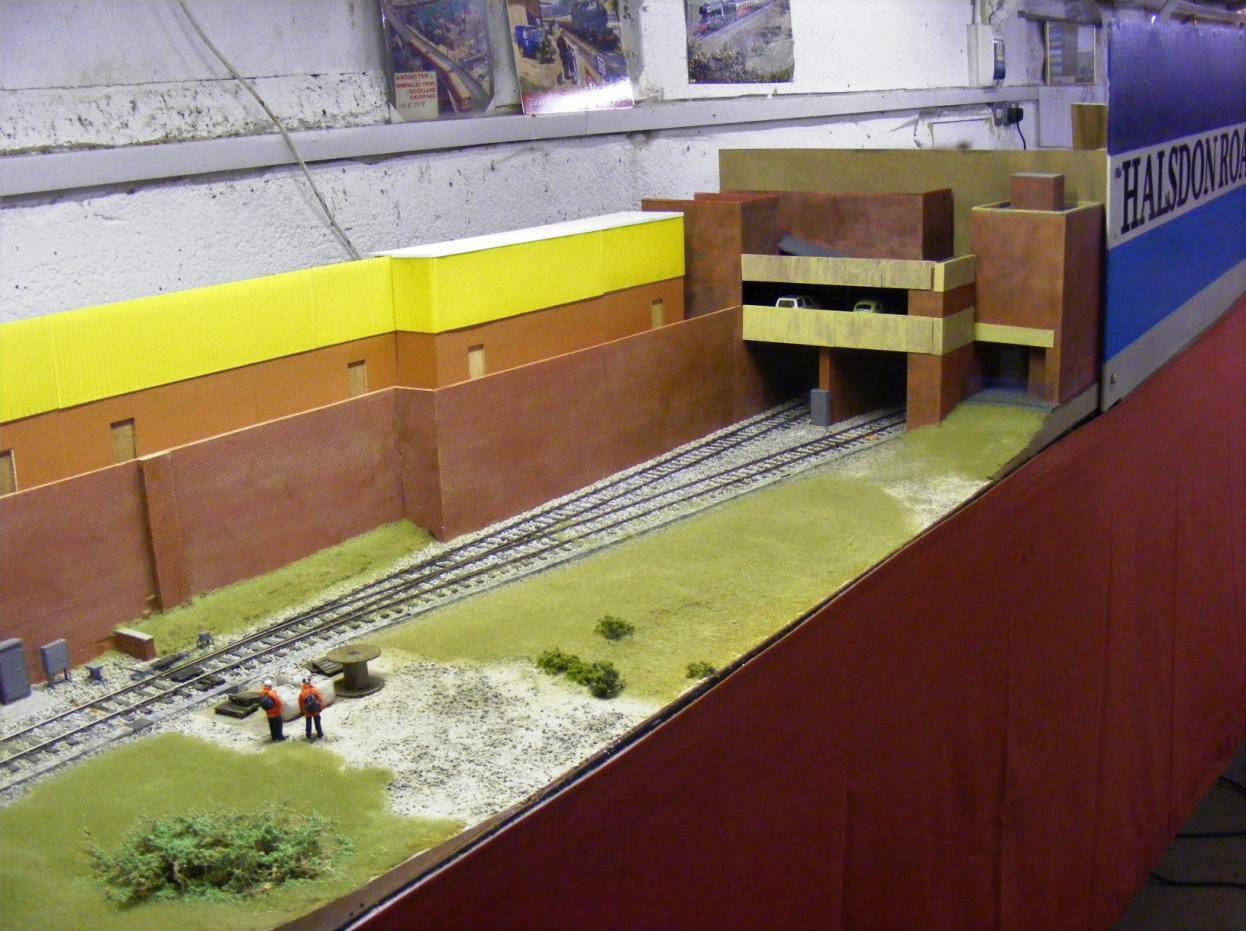
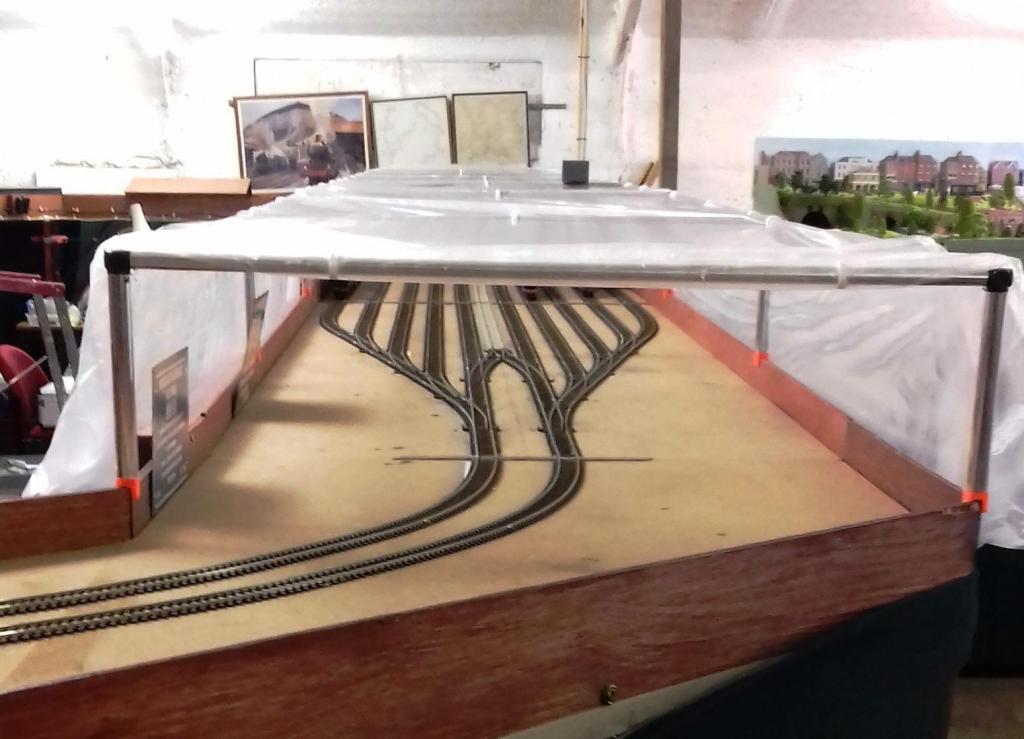
Although late November is a long way away, the full details are required by the organisers by late March, so Jim had to quickly put a lot of it together, including some idea of what is going to be in the second diorama, which shares the cassette fiddle yard with the original one. The photos below show what has been achieved so far.

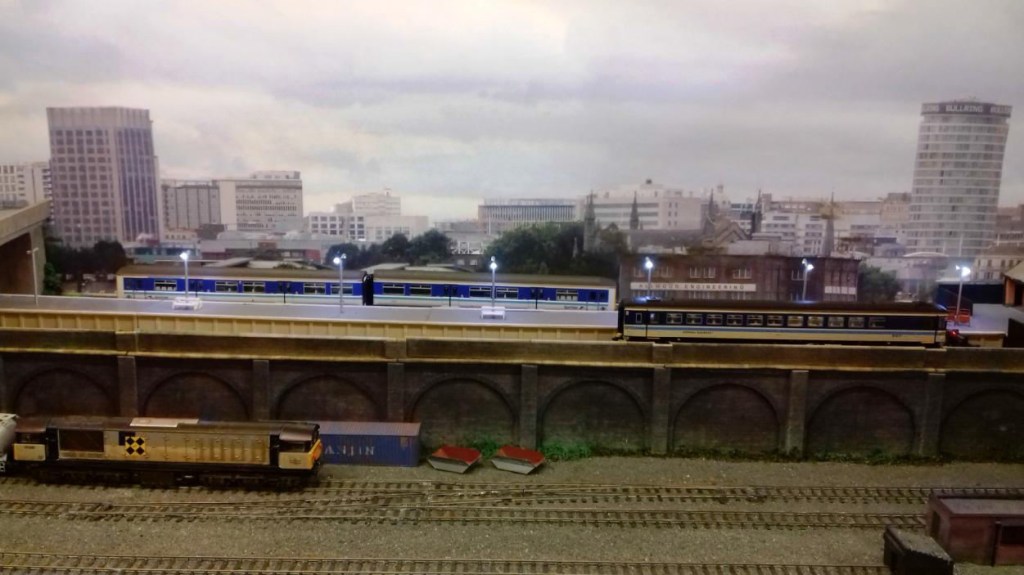
Above is the original diorama that appeared at “Railwells” in August 2019. For six years, Jim worked on the 13th floor of the tower block on the LH side!

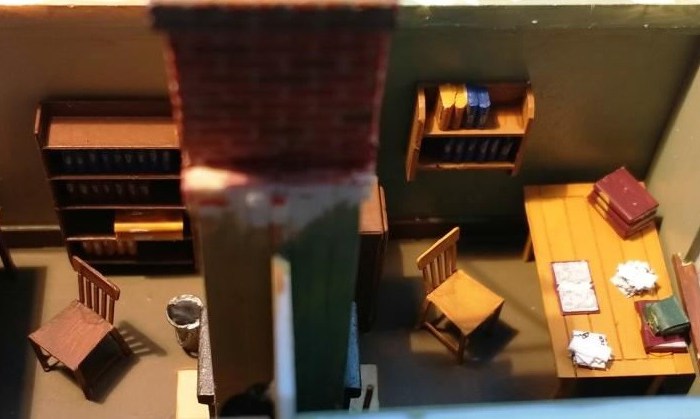
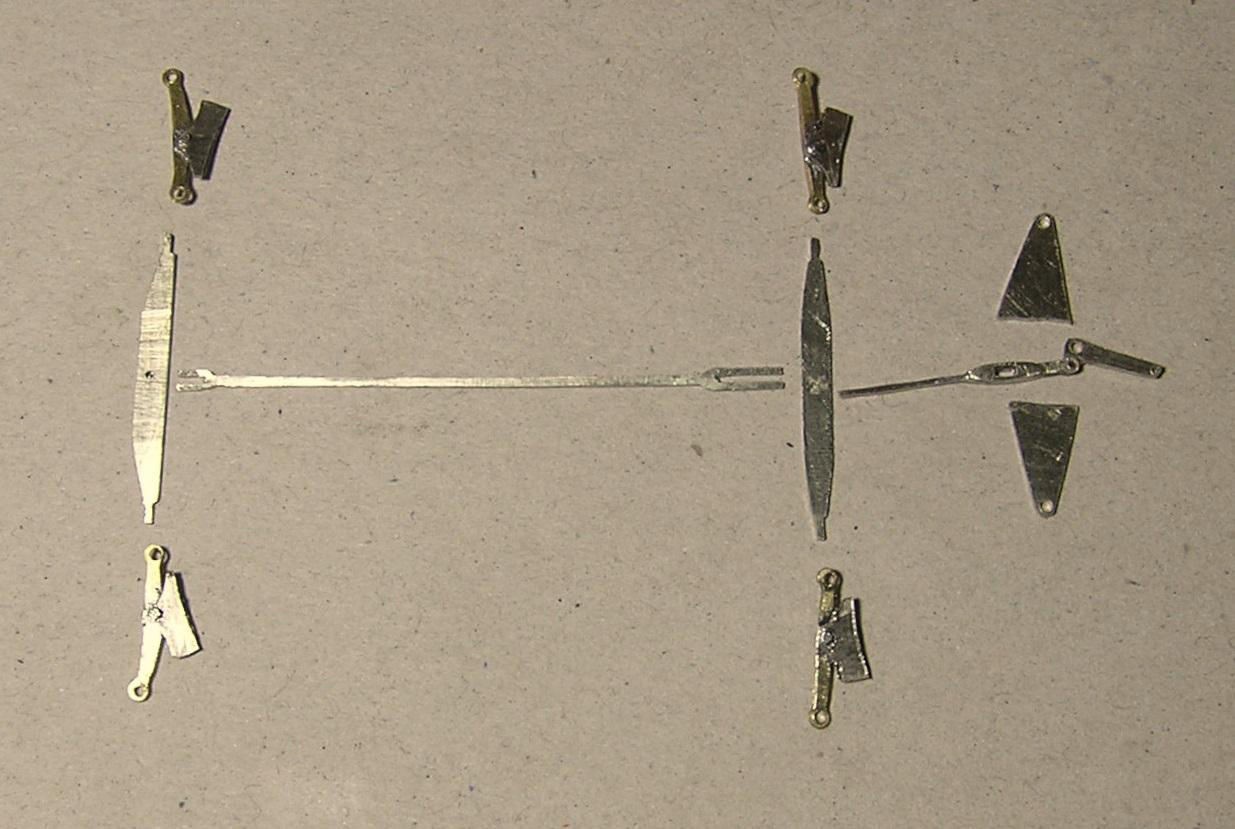
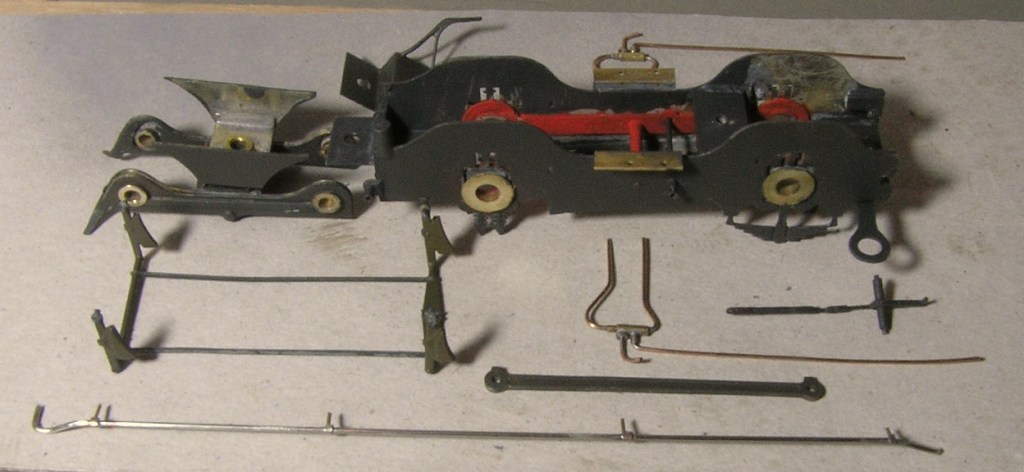
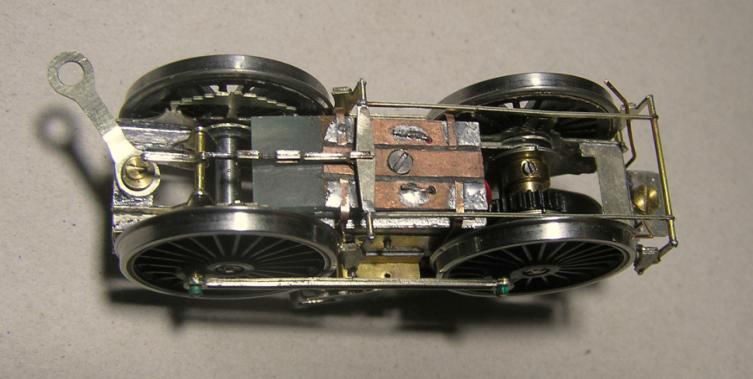
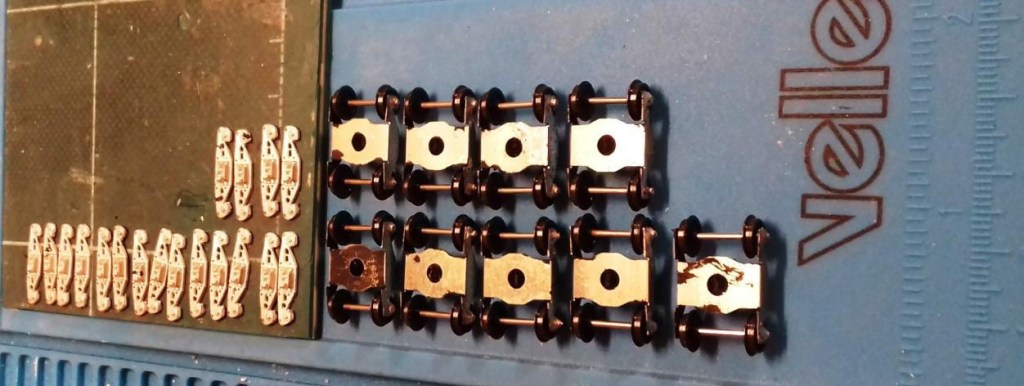
The lower exit from the fiddle yard (just behind the 2mm FS logo) needs a visual blocker so Jim rummaged around in his drawers for a suitable building, and came across a Langley etched LNWR signal box, part built. Although it seemed unlikely a freight yard would have a fully fledged box, rather than just a shunt frame, it was ideal to fit between the first and second track. The photo below shows the pieces, including an etch of levers, along with a £1 coin for size comparison. The real anoraks will notice that the levers do not have the traditional LNWR hoop shaped catches!

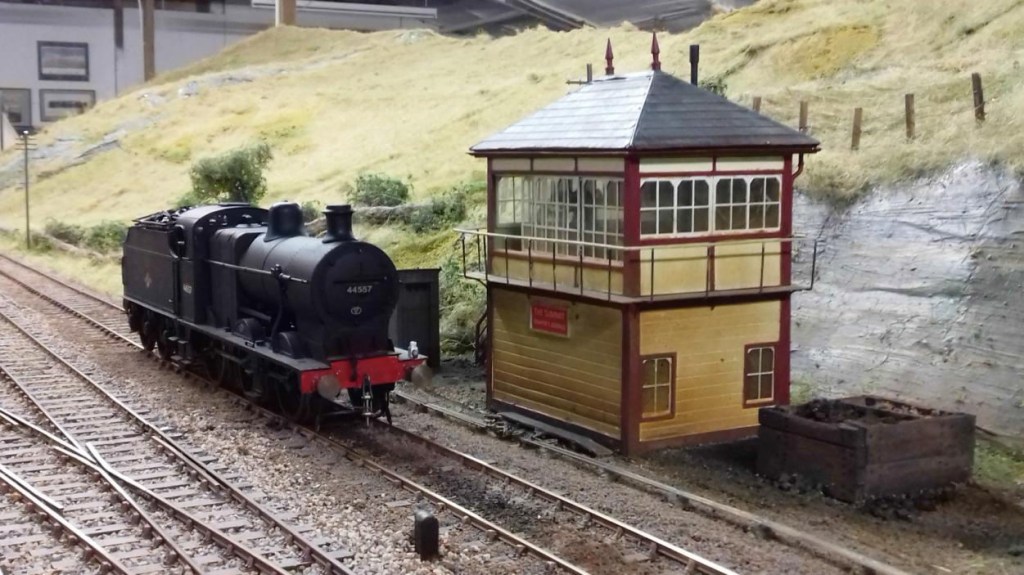
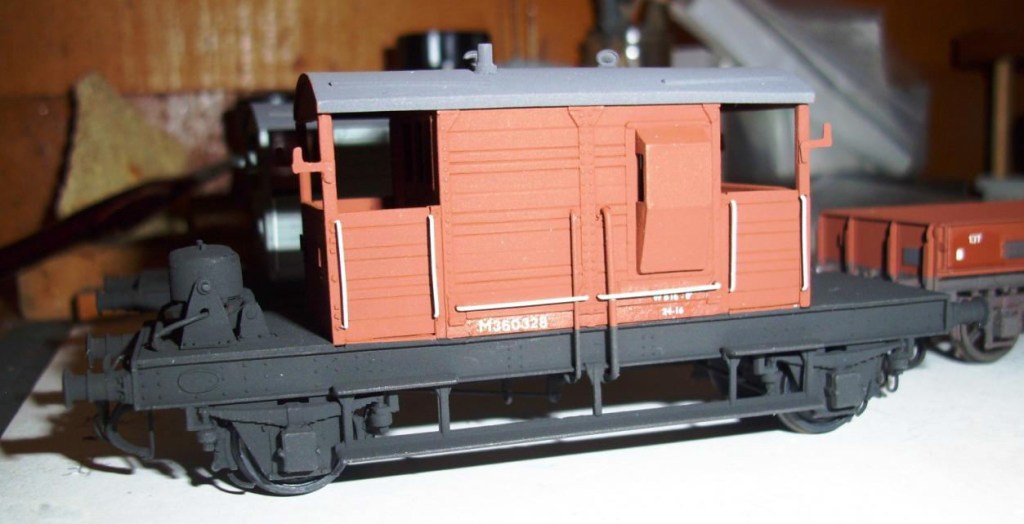
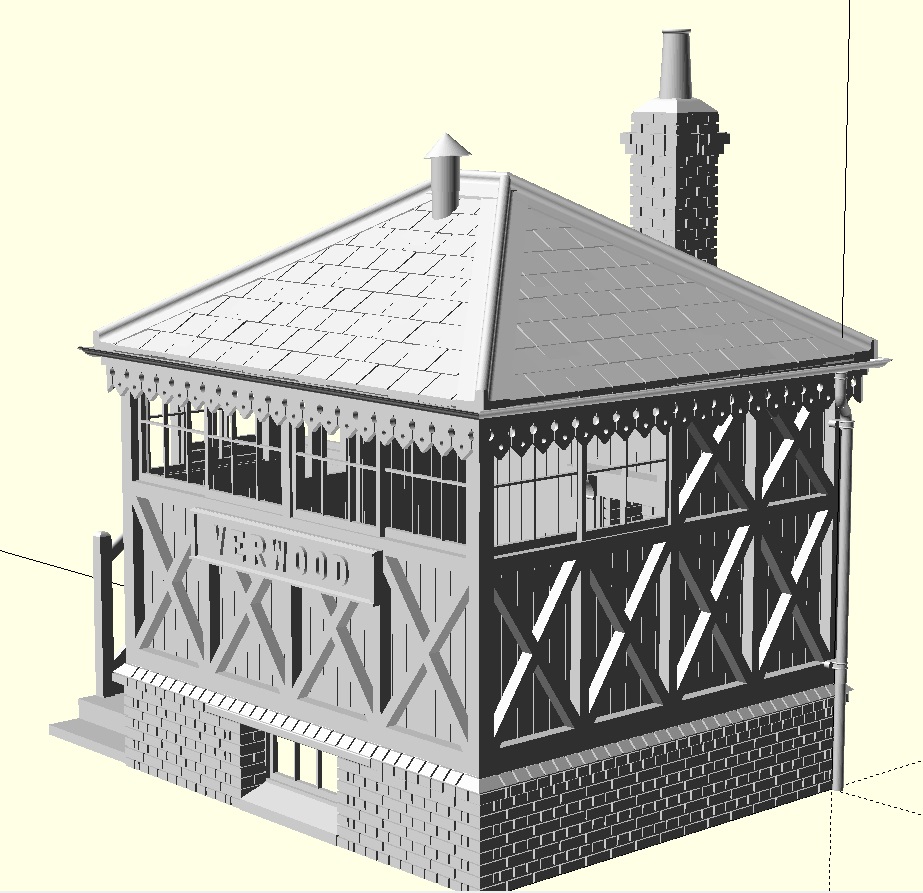
Bringing up the rear are a couple of views of Steve’s completed model of a LSWR Type 1 signal platform mounted box in its full pre-grouping glory with frame exposed and valancing.

And the 3D model of the Stevens frame to go in it.

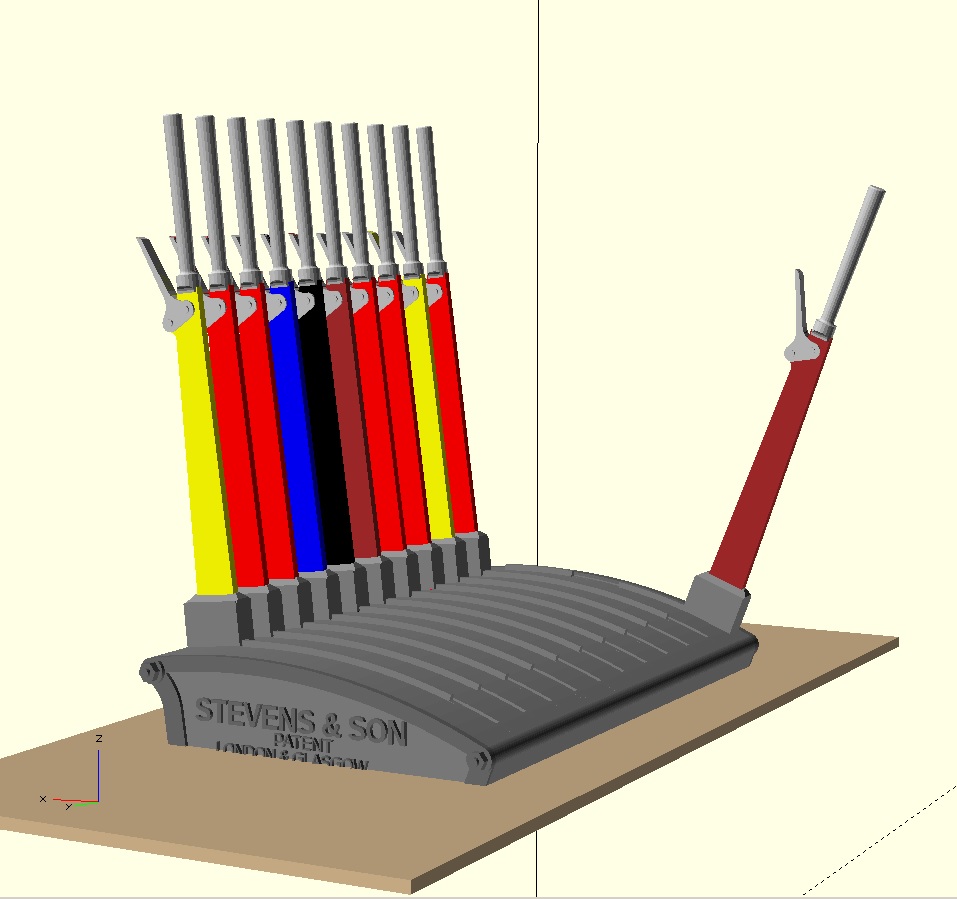
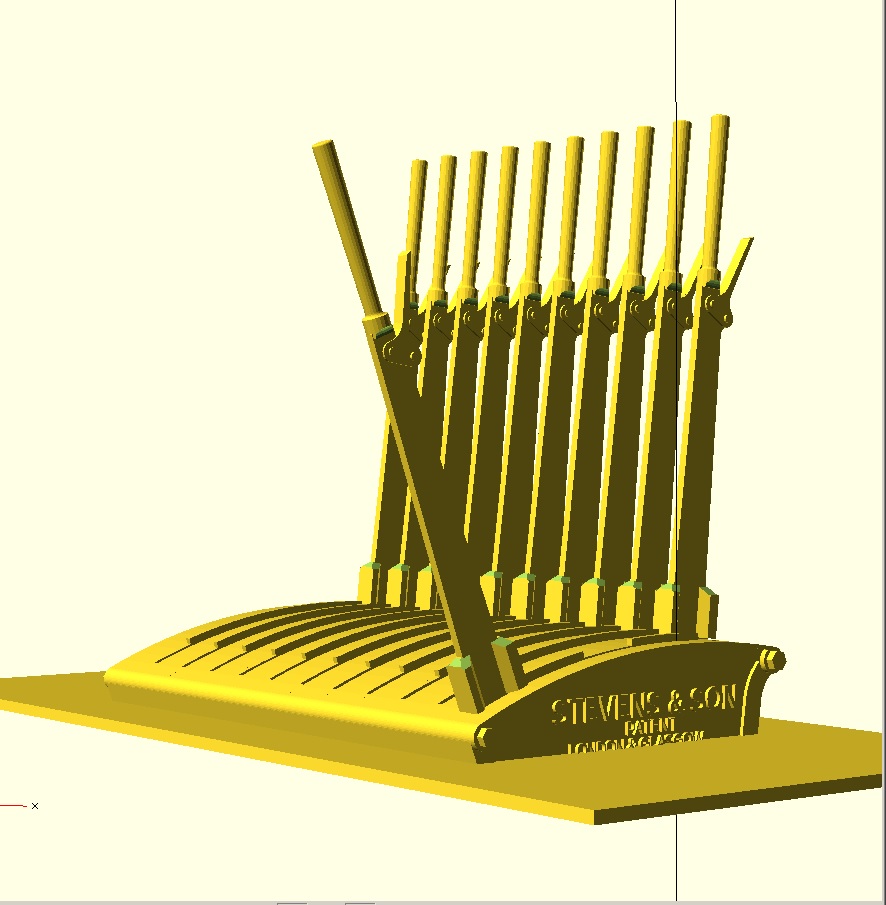
There is a thread covering the design process on RMWeb for those who would like to know more: RMWeb 3D Model of LSWR Type 1 Signal Box

January 2022

January 2022

A bumper blog with lots of activity this month in the clubroom (CS2), and in homes across the South West of England and further afield. With Covid now somewhat behind us, attendance (and output) at CS2 on Wednesdays has increased significantly. The biggest change has been in the 7mm scale, with “Evercreech New” dismantled after what seems a lifetime and “The Summit” re-erected in its stead. Evercreech new boards can be seen in their stillage in the first view. These can (just about) be wheeled onto the tail lift of the 7.5T truck that we would hire to transport them.

In the view below glimpsed across the spine boards of The Summit is the Evercreech New board for Prestleigh Viaduct with a start made on some very extensive landscaping.

It was nice to see “The Summit” back so that all sorts of stock could stretch its legs. In the shot below, Jim’s 4F (purchased already constructed, but now modified) is sitting in the lay by siding by the signal box whilst the driver complains to the signalman about the poor current collection, affecting its slow running. The signalman is suggesting (a) installing pick-ups on the tender wheels and/or (b) cleaning the driving wheels!

At the other extreme in N Gauge our mini-modellers are busy installing pointwork and wiring the new fiddle yard boards for ‘The Bank’ (based on Hemerdon Bank in Devon). Dean has rejoined the crew, and Dave S continues to help out, along with Alan.

Point motors have been installed with associated wiring now well in progress. Note the wiring diagram in top left corner of the above picture – always useful to have! Work continues on Holly Junction and Heyno Junction (00 Gauge DCC), and minor repairs and upgrades continue on the venerable South Junction (EM Gauge DC).

With the exhibition invite to the 2022 Taunton Show in October getting closer, Gary has been beavering away at the top end of his 7mm scale Halsdon Road on the station building (an architectural signature piece!) and the multi-storey car park.

Dave H has finished off one of the plastic wagon kits of a “prehistoric” prototype that were donated to him. Dave takes up the tale:

“I finished one of the free half-built wagons that Jim gave me just before Christmas.
This was the most advanced of them, but the solebars were too close together which meant that buffers couldn’t be fitted – I suspect that’s why the builder had given up. I had to hack them off with a blunt scalpel blade then fit them back trying to keep the wheels all in line.

There were no buffer beams for some reason, so I made some from bits of plastic, and fitted some buffers, couplings and brake gear from other kit leftovers. The brake lever is a bit of bent nickel silver, and I added the metal capping strip along the tops of the sides in plastic strip. Lettering is cut and shut bits from old Slaters and Fox transfer sheets to do the 1896 style lettering. It was meant to be a quickie, so I’ve left it with oil axleboxes – they might have been fitted by 1902.”

Peter B has sent us pictures of a few items that he has built for use on Market Bosworth (his P4 layout). To quote Peter: “The deal wagon and the Midland 1400 class are both London Road models kits built to P4. Not quite finished yet. The deal wagon needs chains to secure the load.”

“The building is a scratch built one for use as a coal office. Furniture is by Severn Models and scratch built. There were two agents at the station. Again, it is still not quite finished. I need to make some signs with the agent’s names on”:

David S has been increasing the loco stud on his S&D 7mm scale layout. The SR Z 0-8-0 is a DMR kit, now sold by Phoenix, and built by a (very good!) local builder for David:

Below are two photos of the S15 kit he is building – a Northstar kit from Gladiator. The tender and chassis are largely complete, the motion has been fitted and removed (with help from Dave S!). David is currently working on the body. He is hoping to have the S15 running by the end of the month.

Allan H has now applied some black paint to his Templecombe shedded 4F, constructed from a Connoisseur kit.

Allan has done a brilliant job bodging the inside valve gear from bits of scrap, rather than just purchasing Laurie Griffin castings – he is after all a 4mm scale modeller with 4mm cost expectations!

With the heavy metal monster (Wills T9) ready for paint, Steve decided to resurrect his Hornby T9 conversion to EM started in 2014 as a ‘quick win’ – roll eyes!

It uses a Perseverance chassis with twin beams and HLK hornblocks. By the time the correct ride height had been gained the frames had been reduced to a ‘power pod’ and a vestigial bit of frame above the bogies. The bogie has side control using coil springs and due to the twin beams takes the weight of the front of the body which is applied centrally between the bogie wheels. Steve’s usual Multi-box had been fitted with a Mashima 1224 motor, but in truth there wasn’t really room for this setup, so the more compact HLK RoadRunner has been fitted instead. The “Persy” brake etches were wrong on so many levels that a scan of the GA from Bradley was scaled and traced in QCad. This was printed it out and UHU’d to some .015″ nickel silver sheet and a set of brake parts was laboriously fretted out.

In the process of fitting the brakes it was realised that the chassis was set at the wrong height in the body all those years ago, so that had to be fixed too! Anyway it ran on South Junction last week, but despite packing the many voids in the etched chassis with lead it was only capable of hauling four heavy MK1 coaches due to those slippery nickel-slither build wheels that will be replaced with steel tyred AGW wheels after the chassis has been painted.

This engine will become 30729 which spent two spells at Bournemouth post-war. Still to be addressed is the cab cut-out which is 1.5mm too narrow for a narrow splasher T9, but fixing that will give me solid mounting points for the correctly stepped stanchions/handrails. Oddly Hornby have fitted brake pipes down both sides of the valance when one side should be a steam pipe, but happily one of those was made for the Wills T9 before realising it was almost always hidden on that sort of T9.

The Hornby tender hasn’t escaped Scot free either. Hornby supplied the 13′ wheelbase tender with their T9 even though most if not all T9s post-nationalisation had 14′ wheelbase tenders. Hornby did supply a 14′ wheelbase tender with their 700, and since the tanks are the same, and it is possible to buy the 14′ frames and keeper plate as a spare, the 13′ wheelbase chassis can be converted to 14′ with just a little bit of soldering to refit the loom. The uncompensated chassis didn’t ride well on EM track, so a Comet etched chassis has been fitted instead, and as none of the supplied brake blocks looked remotely LSWR, a new set was fretted out as per Steve’s Jidenco 700 conversion.

Bringing up the rear is another of Steve’s projects that was partially prompted by him being sent a photo of the back of the box at Verwood – a view he thought he’d never see. This photo has allowed him to attempt a very detailed and correct 3D model of the LSWR Type 1 Signal Cabin at Verwood with a view to getting it 3D printed.

QCAD has been used for the basic 2D drawings, and OpenSCAD to extrude, and move the pieces into position – all on a trusty Windows 7 laptop from 2011! The canopy elevation of the box is also complete and was probably unique in that the original diagonal framing had not been weather boarded and was mostly hidden behind poster boards. I’m contemplating modelling the whole box with and without the weatherboarding and fancy valancing because it’s really not much more work compared with all that crazy brickwork on the chimney, where the depth of the mortar can be varied with another parameter!

For the roof the slate laying is completely parameterised so that the size, spacing and lap of the slates can be changed on the fly and everything stays centred! Because it could be done, the boarding and rafters on the interior have been modelled, but not the bosses for the finials that Verwood probably had, and that survived on the downgraded box at Downton.

December 2021

December 2021

Despite seasonal distractions, members made progress on several fronts. Our featured image is the painted and assembled chassis for the battered Wills T9 that Steve S is building to 00 Gauge for a friend. The Zimo chip is in the Hornby tender and the Hornby loco harness has been wired into the loco PCB. This means that current is collected from the driving and tender wheels.

Shown above are the various painted assemblies built as per the SE Finecast instructions with the addition of a Perseverance bogie to replace the SEF bogie that had been used elsewhere. The SEF etched chassis is implemented as a ‘power pod’ that despite being twin beam compensated runs perfectly well standalone, plus a vestigial section of frame above the bogie. The brake arrangements in the kit are closer to those of the saturated T9, but not actually correct for either version. The steam pipe was not needed by this engine as only two of the wide cab T9s seems to have had them running down the outside of the running plate. Happily, it will come in very handy for a Hornby narrow cab T9, which came with the smaller diameter brake pipe with the tighter bends down both sides – perhaps they all do! News of that EM conversion should feature next month.

This is the very smooth running T9 (on DC) waiting for a test run on its new home layout – and there lies a tale in a future blog! The cab cutouts had to be modified to get the handrails/stanchions to line up with the Hornby tender. The front footsteps had originally been fitted too far back, and initially I just put them back where I found them, having noted the very poor location there. Once correctly centred on the rear bogie wheel the fit was much improved!

Dominic has very sensibly (and successfully) been trialling static grass on the other side of his “photo plank” in preparation for some scenic work on Coombe Town.

Dom’s other picture shows progress on the Goods Shed with the guttering and roof on the office. It is a mirror image of the goods shed at Washford and is getting more convincing with each appearance.

Allan H’s 7mm scale Fowler 4F (complete with tablet catcher) is now ready for the paint shop.

Allan is justly famed for Kingsferry, but it is still quite extraordinary that such a superb model should result from his very first loco build in any scale, and he only started it in the Autumn!

In EM Gauge Pete C has been busy; the two SR Brakes are almost finished, having been sprayed with Halford’s Matt lacquer to blend the transfers, “much nicer to use than Dullcoat – even the Americans have apparently banned its manufacture!” If Pete made a left hand ducket SR Brake van – then he reckons he’d have a complete set of SR brake vans. A Parkside Medfit and David Geen GW Conflat A have now been finished and are shown in a brake van sandwich.

The Trestol is now painted,

Pete’s Ivatt 2-6-0 has had some final adjustments, including polishing the treads of the tender wheels to improve pickup performance as the Gibson finish wasn’t that great. It now runs very smoothly at a nice slow speed.”

Next up a couple of completed 7mm Slaters cattle wagons from Dave H which his kids bought him for Christmas in 2020 (he thinks) – just to prove he does weather things sometimes! They are modelled c. 1900, with the lime wash they used to use in those days to disinfect the insides. Wagons were no cleaner in 1900 than they were in 1950 as far as he can tell.

While he was in the mood, Dave H weathered the two Stephenson Clarke coal wagons he built some time back from HMRS resin body mouldings. You can see how good the detail on the mouldings is – he’s not altered them in any way, just added running gear and brakes mostly from spares.

CS2 layouts have their very own ‘Cripple Sidings’ where wagons and locos go when in disgrace. John M has been attending to some 7mm scale examples. Generally they need replacement axle boxes, couplings or brake gear that have come adrift. This month we end with two such wagons, repaired and ready to go back into service.


November 2021

November 2021

This month our featured image is the late Bob O’s Wills T9 on a Perseverance chassis (so correct 10′ wheelbase) with Escap motor and gearbox driving the rear axle. Weathered, with Sharman wheels and compensated on the Sharman principle some 30 years ago – somewhat ahead of its time. Destined to go to a new home within the club for a lot of TLC. It’s very likely to feature on the ‘Western Thunder’ forum at some point!

Jim’s 2mm Freightliner wagons are making steady progress. The 40 bogies are now finished and painted but the lattice work of the wagon etches need completing and a means of fixing said bogies to said wagons needs firming up – 12BA nuts into bolts or 12BA bolts into nuts!

Top left are the 10 Worsley Works “simple” etches. They need bogie mounting points adding, plus some form of brake cylinders etc. Top right are the more complex Stephen Harris etches which have still to be finished. For example, bottom left are two folded etches that create kerb rails that need soldering onto the sides. When they are done, there are a further 18 like them! On the track are two Worsley Works etches that Jim acquired from a fellow modeller some years ago. For some reason, he chose to ignore the marks and put the bogie pivots much nearer the buffer beams – and used the wrong bogies! The former can be changed – the latter can’t as Jim has no spare correct bogies.

Gate-crashing the photo is the brilliant new Hunslet shunter from the N Gauge Society. It comes provided with a DCC chip, and just (!) needs the wheels turning down or changing for 2mm finescale ones.

Steve’s 00 Gauge Wills T9 ‘for a friend’ continues to progress. The upended ‘power pod’ is shown above with brake gear and sand pipes fitted. The SEF 00 chassis spacing is exceptionally wide for 00 Gauge and there is very little room round the wheels. Good for footplates, but bad for running clearances! The drive is an HLK RoadRunner paired with a HLK (High Level Kits) 1219 coreless motor. Whilst this is a superb combination on straight DC, it did very odd things when tested with a donated black Gaugemaster controller – it seems that black Gaugemaster’s come with feedback control!

The super-detailed face of the loco is above, with scratchbuilt bufferbeam courtesy of the superb GW Models riveting tool, and a delicate home made ‘Daddyman Dart’. The smokebox door clamps and dart are correctly positioned for 30314. Good proportions really help the Wills T9 which responds well to such treatment. More details can be found on the Western Thunder build thread linked in the last post.

John M continues with his Great Eastern D16/3. He says: “The vacuum brake exhaust pipe has been fitted. The vertical copper pipe is to drain any condensation in the pipe. When releasing the brakes after a station stop, without a drain, the condensate would go up the sooty chimney and shower black water in the surrounding area. The handrail knobs on the left side of the loco have also been fitted. These complete that side of the loco except items that also concern the cab such as windows.”

Dom has started construction of the signal box locking room for Coombe Town. It is based on the original at Crowcombe on the West Somerset Railway, the one that featured in “A Hard Day’s Night”.

In 0 Gauge, Halsdon Road (now booked for Taunton Rail-Ex 2022), has had a small extension featuring a multi-storey car park and a couple of S&T men admiring their new cabling.

Also in 7mm scale the beginnings of the farmyard module for Evercreech New with the foundation for Prestleigh Lane in front of it. The problems of compression in large scale model railway layouts may well come home to roost on this one!

Dave S is helping the N Gauge Group with new baseboards for the fiddle yard of “The Bank”. Built in genuine Poplar ply the result is shown below – they look strong enough for Gauge 1, let alone N, and are surprisingly light! The Overton sign is Jim’s. It was purchased on impulse from the late lamented Collectors Corner, and travelled home first class on the Manchester Pullman!

Bringing up the rear, the extensive fiddle yard of Yeovil Town under its super new covers, but apparently bereft of trains. In 00 Gauge and DCC controlled, layout operation will be fully automated.

October 2021

October 2021

Our featured image for October is Jim’s latest mega micro-project. He has sold off his N gauge Graham Farish RTR models of the traditional FFA/FGA Freightliner wagons, and is replacing them using etched kits. He claims the GF models are ‘crude’, but your author doesn’t know how he can possibly say that with such tiny models! 🙂

Anyway, two rakes (ten wagons) are from a fairly intricate design by 2mm Scale Association member Stephen Harris and a further two rakes are a much more basic (and simpler) etch by Worsley Works. They all need bogies – 40 of the little blighters – and these are constructed from a fold up etch (also by Stephen Harris), to which are soldered top hat bearings and then clothed with white metal cast sides. Needless to say, they take 2mm finescale wheels with 12.25mm long axles, not N gauge wheels with 14.8mm long axles.

The first picture shows the components, the second one shows most of them constructed and awaiting the paint shop. (Below are the “Clam” ballast wagons mentioned many months ago – no nearer being finished!)

In EM Gauge, Peter C has been finishing off the Cambrian Brake Vans that needed those 3D printed brake blocks that YMRG designed and printed for him. First up the WD/SR 25T Brake van undergoing final painting, using transfers from assorted sources. Sandboxes still to be fitted.

Next the SR 15T Brake van undergoing final painting, using transfers from assorted sources:

Finally bringing up the rear, although perhaps it should probably be on the front, is a Yorkshire Shunter in a nice understated ‘wasp’ livery. Built from a Judith Edge kit some years ago, and finally fitted with a cab side number and windscreen wipers, Pete only had to make six in all, he still hasn’t found the ones that flew away!

Next up is Allan H with rapid progress on his 7mm scale 4F, being built from a Connoisseur Models etched kit. The loco chassis looking very smart – and even better, it moves!

Moving onto 00 Gauge, Steve S has been repairing and upgrading a battered Wills T9 for a friend whose father must have started it over fifty years ago. As far as it had got, it had been assembled with a tinman’s soldering iron on a gas ring, using some sort of medium melt solder.

Collected at the end of September the body was repaired and sat on a new SEF etched chassis by the end of October – spectacular progress by Steve’s normal standards! Paired with the first of several iterations of Hornby six wheel tender – this was the view by the end of the month. A fairly comprehensive build thread for this rescue mission can be found here: https://www.westernthunder.co.uk/threads/wills-t9-repair-and-upgrade-in-4mm-00-gauge.9966/

Also in 00 Gauge Dominic has been doing bits and bobs on at Coombe Town. He has got the first parts of the Modelu guttering installed on the Goods Shed and has completed the first sliding door. The door is made from various bits of styrene strip with 3D printed wheels, which are designed to sit on the rails to allow the doors to be posed – and just how cool is that!

Finally, in 0 Gauge Dave H has been wrestling with wobbly wheels. As he says: “The only modelling I’ve done recently is to build a couple of Slaters GW cattle wagons. However I got so fed up with wobbly wheels that I decided to turn the rims of all new wheels using this little gizmo (picture below left). It’s just a bit of brass with a clearance hole for the axle, a brass peg that fits between the spokes as a driving peg, and a 6BA screw to clamp it to the axle.”

“The picture above (right) shows it in use to skim the treads on my aged cheapo lathe – it only needs a few thou off generally to get them concentric, then the transition between the tread and the flange is finished off with a half round file. Without the gizmo, they just turn on their axles with the lathe tool stuck in them. The flanges may still be a bit wobbly, but that doesn’t affect the running. If the treads are concentric with the axles, then you don’t get that awful limping effect as they run past. I’m afraid all the plastic centred wheel manufacturers I’ve tried suffer this problem occasionally – some worse than others.”

“The picture above shows the two cattle wagons nearly complete – just brake gear and roofs to add, then painting. I’ve modelled one with old style grease axle boxes, and the other with those new-fangled oil boxes.”

September 2021

September 2021

September saw us busy on both Evercreech New and Halsdon Road. Halsdon Road’s long overdue appearance at Taunton Raile-Ex was again postponed, and will now happen in 2022. The plan was to do a single update for the whole Autumn, but there was too much going on over that period for one post!

The 7mm scale D16/3 Claude Hamilton continues to progress with John reported that the cab roof had been rolled and riveted using a rivet punch that he had converted from a leather punch.

The finished cab roof. Milled brass angle is used for the rain strips and milled ‘U’ section for the ventilator slides. This has been modelled open. John claims: “62578 was a Melton Constable engine, and it is always dry and sunny in North Norfolk. No, it does not open and close!” The inside of the roof had a T section stiffener inside. This is again from T section brass which was soldered to some scrap brass before being shaped then unsoldered before fitting.

Not to be outdone, having completed the tender Allan H has started on the loco body for his Fowler 4F to run on “Evercreech New”.

Changing tack entirely, Jim has dug out some of his recent N Gauge purchases to see what scope there was to replace the wheelsets with finescale ones readily available to members of the 2mm Scale Association – rather than have the N scale ones turned down in a lathe. The majority of the recent purchases have been various types of bogie container wagons, which have 5.25mm diameter wheels. However, something slightly different was a pair of KUA nuclear flask wagons, designed to carry fuel to and from Sellafield and Rosyth and Devonport for our nuclear submarine fleet.

They are impressive beasts and will look good on “Bungham Lane”, assuming it is ever built! Although the model makers, Revolution Trains, tend to use axle lengths that do not correspond with the Association’s standards, I found 16 axles that were suitable, and the result is above.

Pete C has been beavering away with various EM Gauge projects, including replacing the pony wheels on his Ivatt Mogul. Pete says: “They came from John Meakin and are Sharman wheels, Mike Sharman being an RAF aircraft engineer used 3/32” axles. The bogie bearings were for 2mm axles, so I had to make a couple of bushes on the Unimat, my Unimat came via Peter Bedding who was his commanding officer on Vulcans. Luckily I successfully made 2 bushes first time and fitted them with a smear of Loctite retainer:”

A Weltrol wagon now has trestles.

Also our featured image a 40 year old Mainline Warship now has new windscreens, the old glazing having yellowed: What a splendid model this was for its time – as long as it either has two motor bogies or a replacement mechanism…

Finally, for Peter B’s P4 magnum opus depicting Market Bosworth, an exquisite Johnson Class 1400 2-4-0.